Here in the run the sample section you will do the following:
Install the applications (*.ear files) via the admin console (which is importing the *.ear files)
Get familiar with the 'Approve Claim Space'
Start the process 'RandomProcesses' to create a number of instances of the ApprovalClaim process
Experience various features of IBM Business Space in order to customize your task list:
Work with customized task lists (exploiting query table definitions)
Sorting tasks
Grouping tasks
Filtering tasks
By the way: The final 'Approve Claim Space' business space you are about to create here in the run the sample section is available for download in the download section. If you do not want to do the exercise all by yourself, you can import the 'Approve Claim Space' business space. To do so, in IBM Business Space click on the Manage Spaces tab, and in the Space Manager window, click on Import Space, and then select the downloaded *.zip file.
Before you can work with the business processes and the query tables
discussed in the build it yourself sections, we need to deploy them on WPS.
The *. ear files you need to deploy are available for download in the
download section.
To deploy the *.ear files, launch the admin console from the servers view within WID:

When prompted, log on to the admin console with userid 'admin', and password 'admin'.
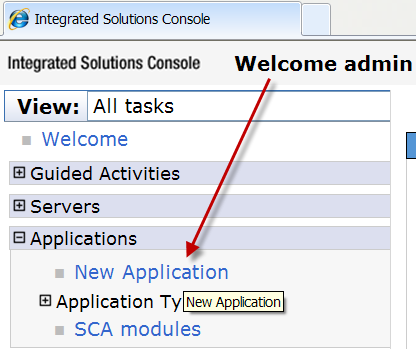
Once the admin console is running, open the applications folder, and click on new application:
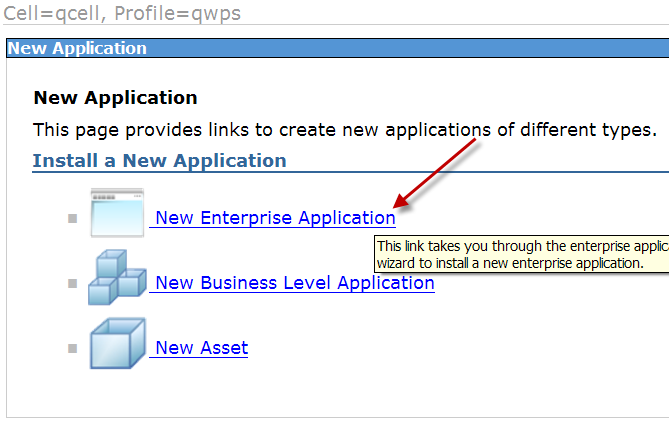
In the new application window, click on New Enterprise Application:
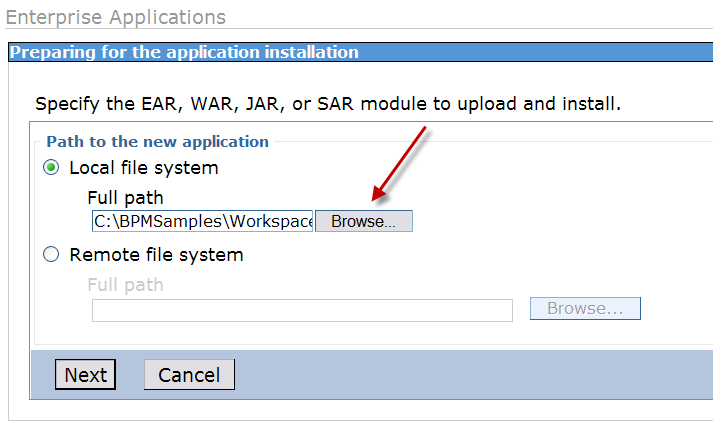
On the Enterprise Application window, on the local file system browse
to the folder where you have save the downloaded *.ear files. First
import the ApproveClaimApp_PROCESSES.ear, and click next.
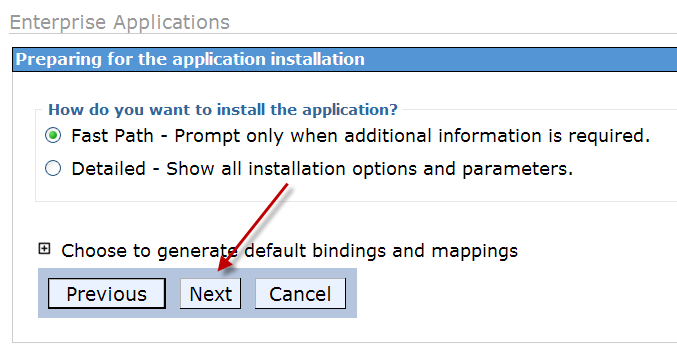
On the next window, accept the defaults and click next:
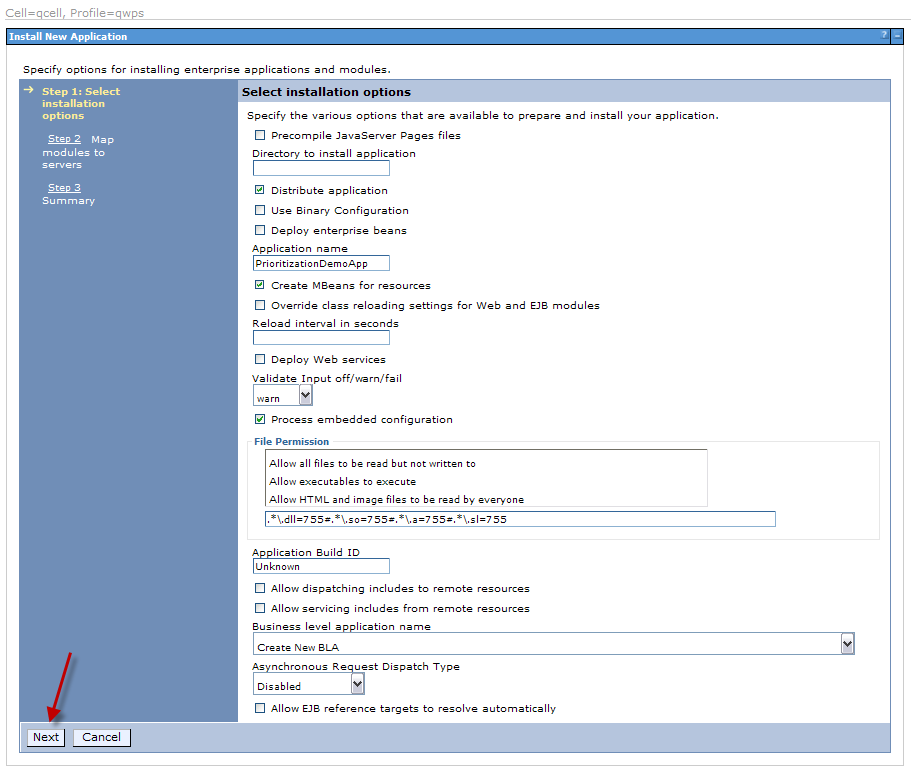
On the Install New Applications window, accept the defaults for the installation options, and click next:
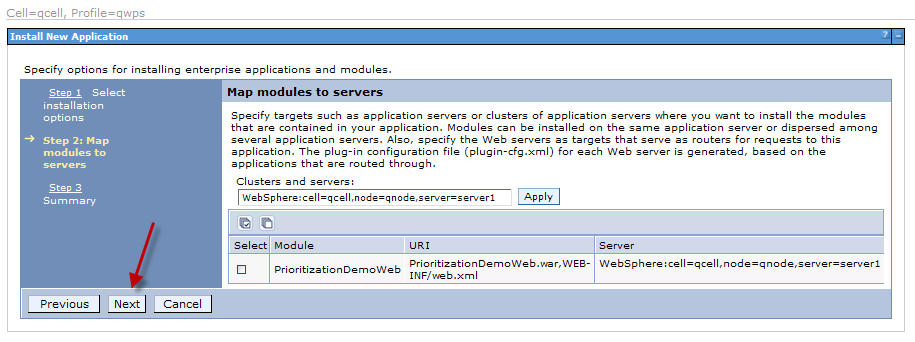
On the Install New Applications window, accept the defaults for the map modules to server settings, and click next:
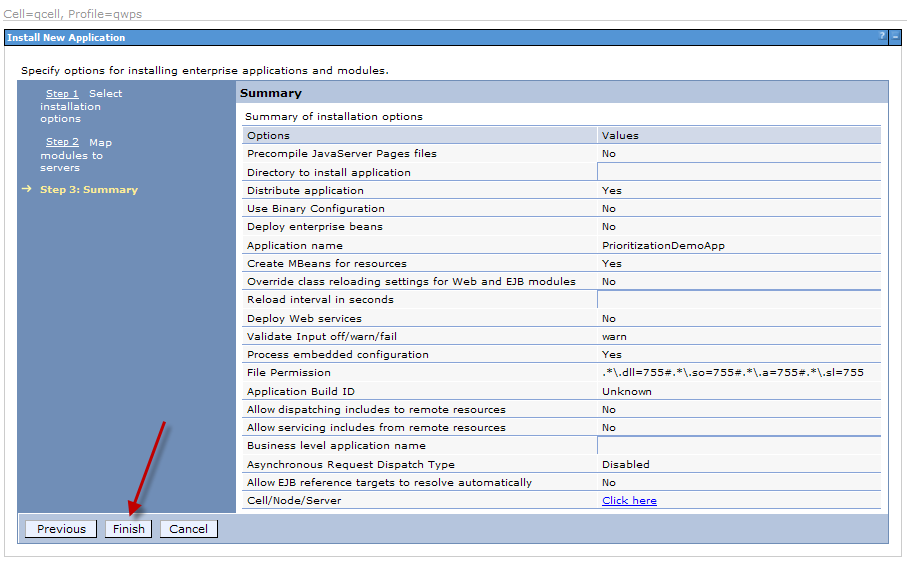
On the summary window, simply click on Finish:
Finally, save the master configuration:

If you have not tested one of the query tables as described in the
build it yourself section, you have to install the
ApproveClaimApp_QTD.ear as well. To do so, follow the steps described
above, once done, save the master configuration again.
If you have tested the query tables, and try to install them again, you get the following message:

Everything is fine when you get this - all applications are installed, and you can continue.
If you have closed and / or logged out from IBM Business Space, open
Business Space again and logon on with userid 'bdaniel' and password
'wid'.
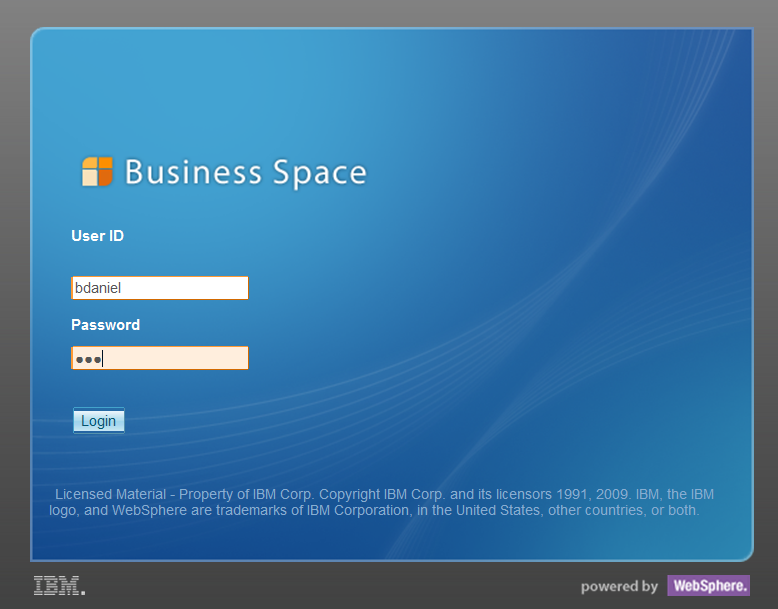
IBM Business Space always presents the page that was opened before you logged off from IBM Business Space the last time.
For the next steps of this sample, please switch to the business space you
have created in the 'build it yourself' section, which you should have
named 'Approve Claim Space'.
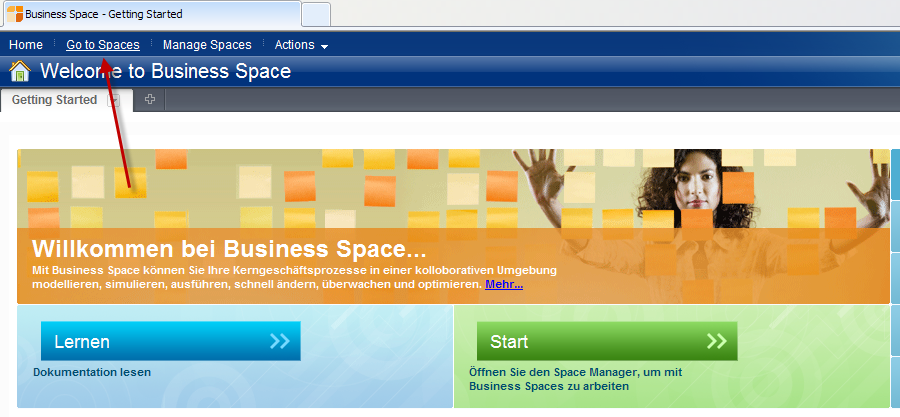
Once logged on to IBM Business Space, open the 'Approve Claim Space'
by clicking on 'Go to spaces' on the upper left corner on the Welcome
page:
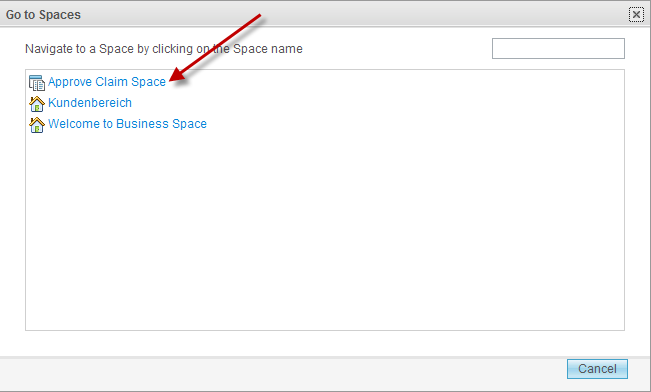
The 'Go to spaces' windows, opens, click on 'Approve Claim Space':
For the sake of this sample, switch to the first page named 'Work on tasks', if this page is not presented automatically:

Now you are ready to investigate the Approve Claim Space.
The 'Approve Claim Space' was created using the 'Advanced Managing of Human Tasks and Workflow' business space template. Therefore you will see - arranged on different business space pages - the human tasks and workflow widgets currently available in Business Space. These are the following ones (and by the way: In this sample we will not investigate all of them):
Task Definitions List
Tasks List
Create Tasks
Tasks I Created
Available Tasks
My Tasks
Task Information
Human Workflow Diagram
My Work Organizer
Escalation List
The Tasks list is the first widget you'll find in the upper left
corner of the 'Work on Tasks' business space page - there is a good
chance that this widget does not contain any tasks, simply because we
have not yet started any processes.
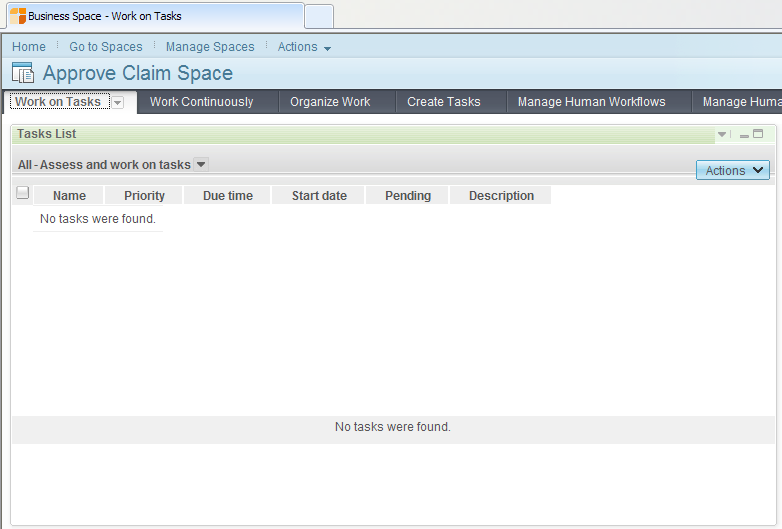
The Tasks List widget will later display all the tasks that have been assigned to you.
Before further exploiting IBM Business Space, let's create some process instances and activity instances.
In this chapter you will work with the following human tasks widgets:
Task Definitions List widget - The Task Definitions List widget contains a list of task templates that you can use to create your own task instances. It can be considered the starting point for creating tasks and working on tasks associated with specific task definitions
Task Information widget - The Task Information widget shows detailed information about tasks. It interacts with the other human task widgets when business users request to edit or view the task details.
Tasks List widget - Use the Tasks List widget to work with different types of tasks, for example, tasks that you own, or tasks that are available for you to work on.
This sample is all about experiencing some of the features of IBM
Business Space. However - this can only be done if we have a certain
number of business process instances and activity instances.
The sample process named RandomProcesses creates a number of process
instances of the ApprovalClaim process. The various process instances
of the created ApprovalClaim processes slightly differ due to randomly
created custom data, as you have seen in the build it yourself section of the sample.
To get started - let's first run the RandomProcesses process. To do so,
in the 'Approve Claim Space', switch to the 'Create Tasks' page.

In the upper left corner, you will find the Task Definitions List
widget. The Task Definitions List widget contains a list of task
templates that you can use to create your own task instances. It can be
considered the starting point for creating tasks and working on tasks
associated with specific task definitions.
Because you have imported
the samples' *ear.files, you will at least see the
'StartRandomProcesses' task:
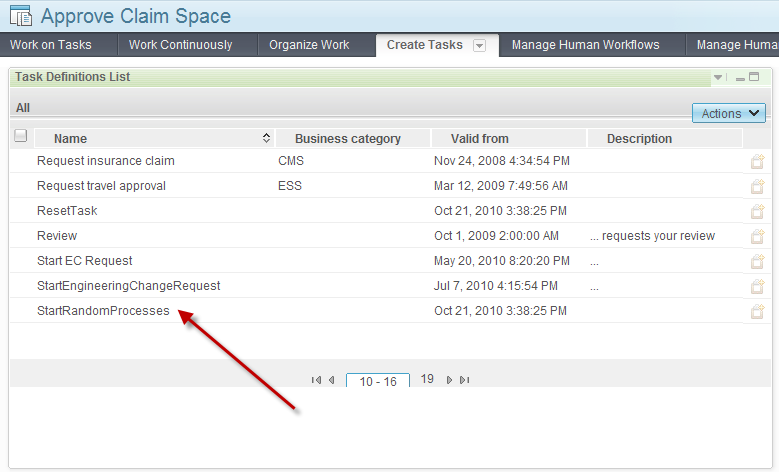
Now we create an instance from the 'StartRandomProcesses' task by clicking on the icon next to the task's name:

Right next to the Task Definition Lists widget, in the Task Information widget, the StartRandomProcesses task is opened:
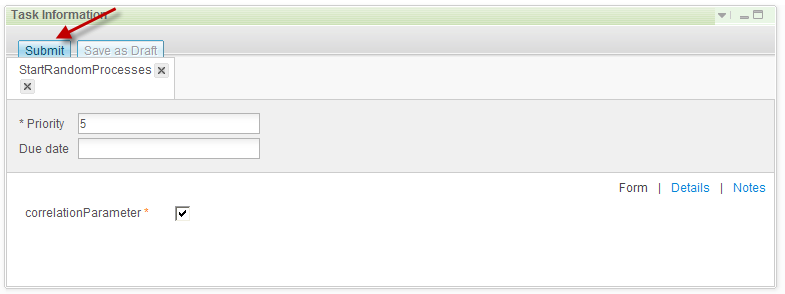
Accept the details, and click the 'Submit' button.
Now, have a look at the Tasks Lists widgets underneath the Tasks Definitions List widgets:
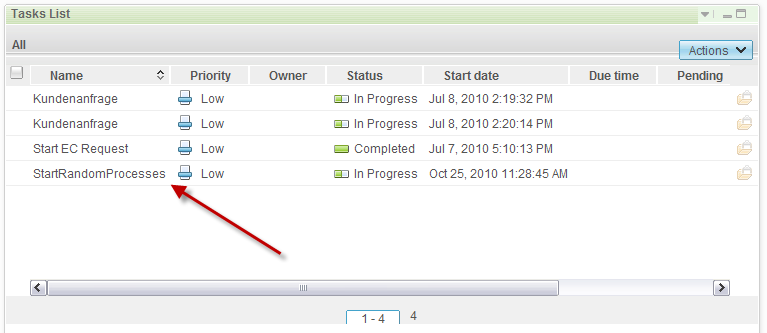
You will see that the 'StartRandomProcesses' task is processing - which actually means, that a number of AproveClaim processes are instantiated.
Switch back to the 'Work on Tasks' page and have a look at the Tasks List widget - there should be a number of tasks listed:
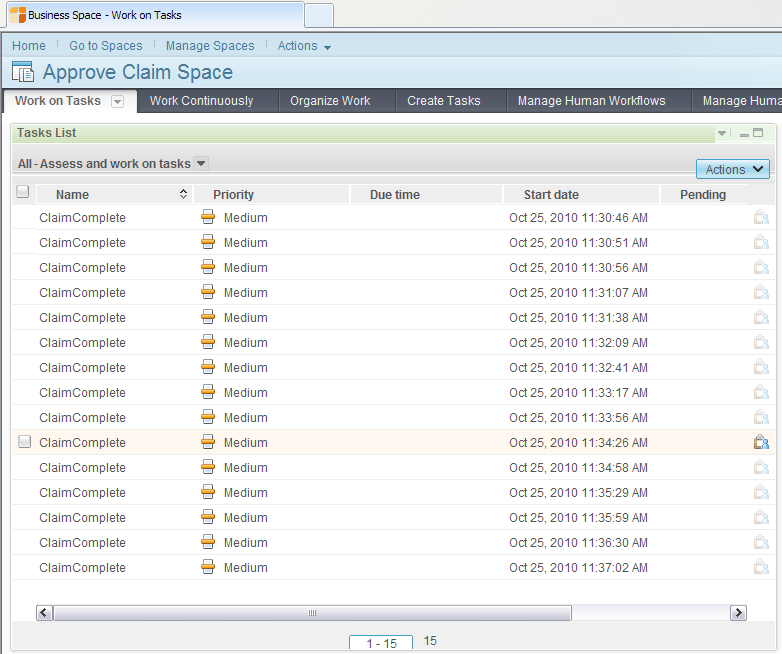
Now we have data we can use to further explore IBM Business Space!
(By the way: If you do not have a task like 'StartRandomProcesses'
which does create process instances (here for the ApproveClaim
process'), normally as a knowledge worker working with your tasks in
IBM Business Space, people or business processes will create these
tasks for you.)
Remember the query tables we have created for you in the 'build it
yourself' section? Now it is time to display custom data next to the
tasks listed in the Tasks List widget. Among the few query tables we
have defined for you, the one we need here for this exercise is named
'High Priority Tasklist'.
In order to display custom data, we need to edit the Tasks List widget
and select the 'High Priority Tasklist' as task list to be used when
presenting tasks in the Tasks List widget.
To get this done, first click on 'Edit Page' available from the upper right corner of the page:

Once done, click on the little triangle in the caption of the Tasks List widget and select 'Edit Settings':
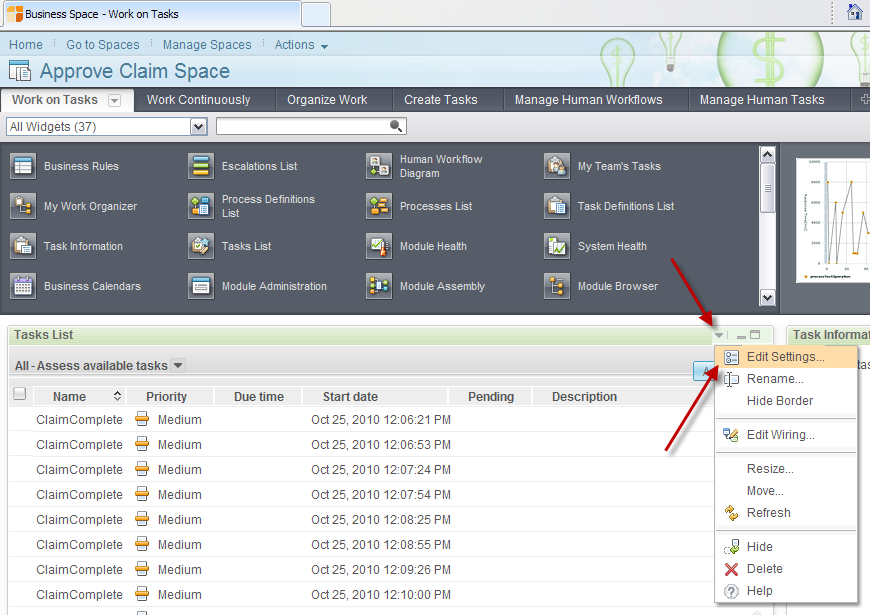
Now you can work on the Tasks List widget settings.
Have a first look at the 'Content' tab of the Task List Edit window:
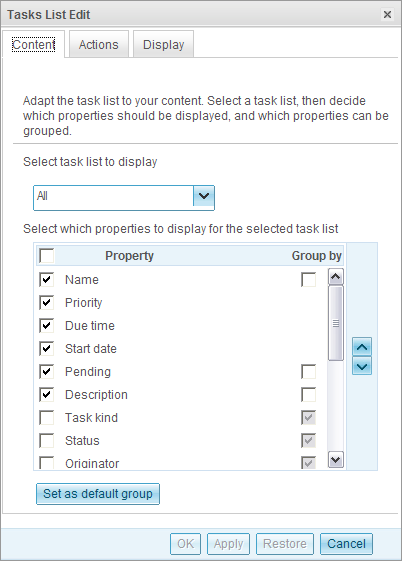
Here you can select additional properties to be displayed next to the tasks in the Tasks List widget.
However - we want to display custom data that we have made available via a query table, named 'High Priority Tasklist'.
In order to use the task list we have defined via a query table click on 'Select task lists':
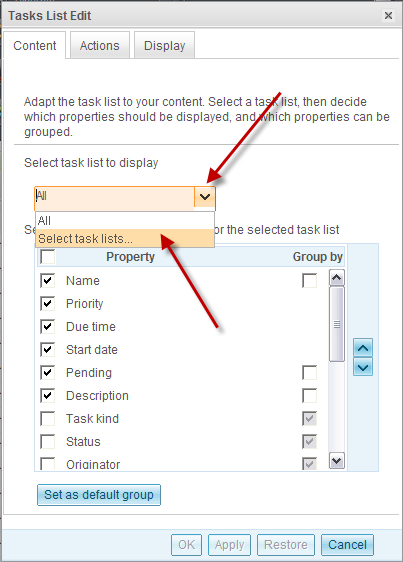
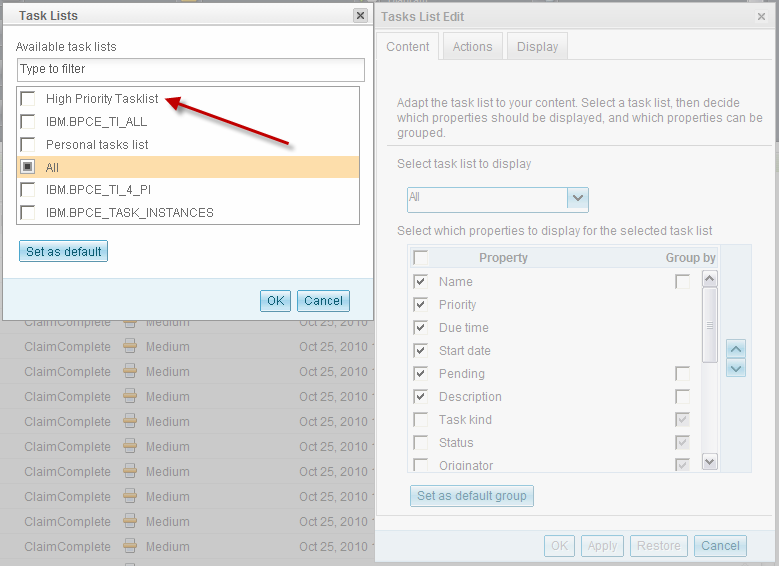
When done, in the Task Lists window, select 'High Priority Tasklist':
and click Ok:
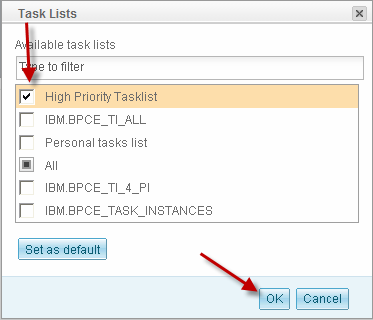
Back in the Tasks List Edit window now the High Priority Tasklist is selected, and all the
properties we have made available via query tables are
pre-selected:
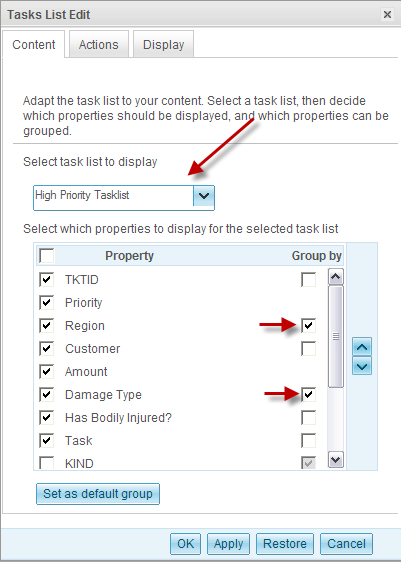
Accept all properties to be selected, and select the 'Group by' flag for the 'Region' and 'Damage Type' property, because we will explore those later.
Now, click on the 'Display' tab, and click on the 'Refresh' link:
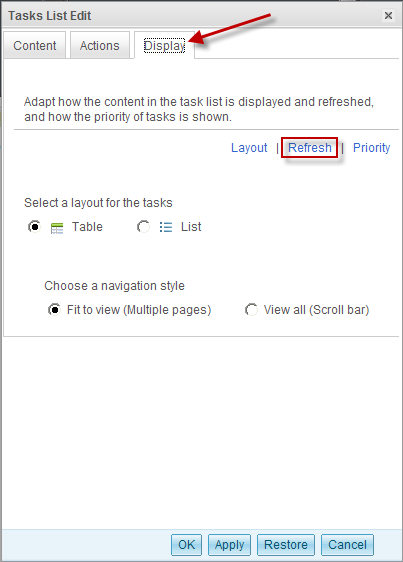
On the 'Refresh' window, select 'Automatically' for the refresh method, and specify a refresh interval of 1 minute:
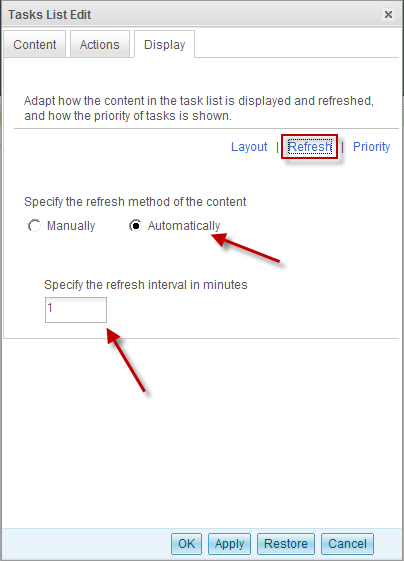
These settings define whether you have to refresh your task list
manually, or if your task list is refreshed automatically as specified
by the refresh interval setting.
When done, click on the 'Priority' link to deal with the priorities
specified for the human tasks. If you have explored the human tasks of
the ApproveClaim process in the build it yourself section, you might have seen that we have specified
priorities on the details tab of the human task properties. In our
definition, the highest priority is 99, and the lowest priority is 1.
Therefore, select the radio buttons as shown below, and specify the MIN
to MAX values as shown be below.
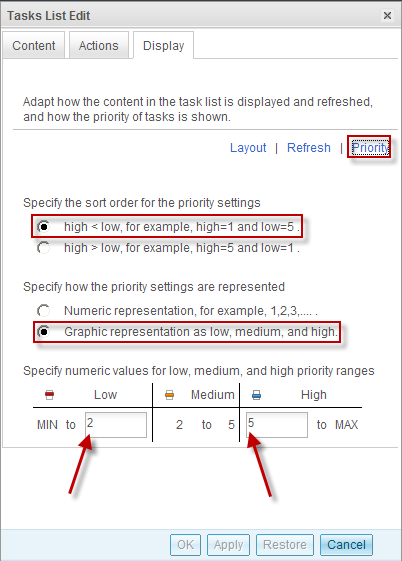
When done - click OK to indicate that you are done with the task list editing.
The Task Lists widget however is unchanged. Now we have to select
the HighPriorityTasklist in order to present the tasks as specified in
the HighPriorityTasklist. In
order to so, open the drop down list next to 'All' and select the '
High Priority Tasklist':
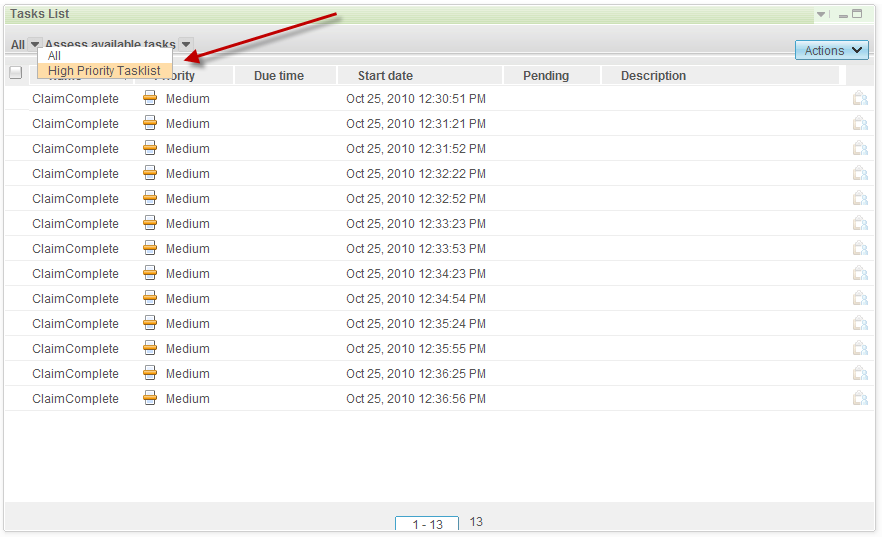
Now the 'High Priority Tasklist' is taken by Tasks
List widget, and the custom data defined via the defined query table is presented next to the tasks:
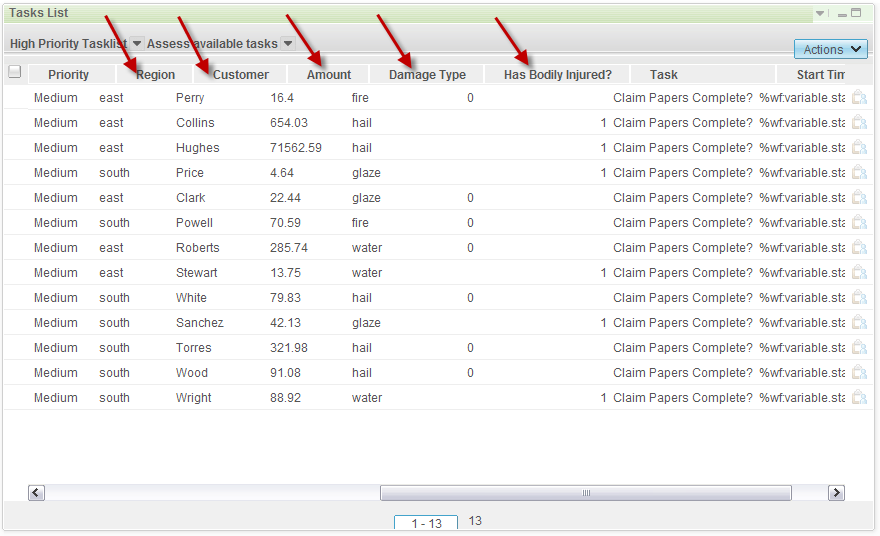
By the way: When running the task 'StartRandomProcesses', the custom
data listed in the columns 'region', 'Customer', 'Amount', 'Damage
Type' and 'Has Bodily Injured' is exactly the data that was randomly
assigned to the created ApproveClaim process instances.
Now you can leave the edit mode by clicking on 'Finish Editing' in the upper right corner of the page:
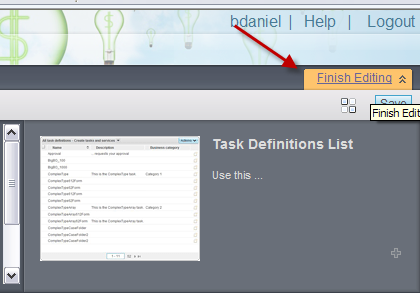
This feature of creating customized task list to present custom data is very important to present the tasks in a way that does allow for optimized and efficient task completion. Your endusers will be able to much easier identify and find the tasks they are looking for, and all the task handling is much simpler in terms of increasing enduser work efficiency.
Now, one could be interested in sorting and filtering the task list.
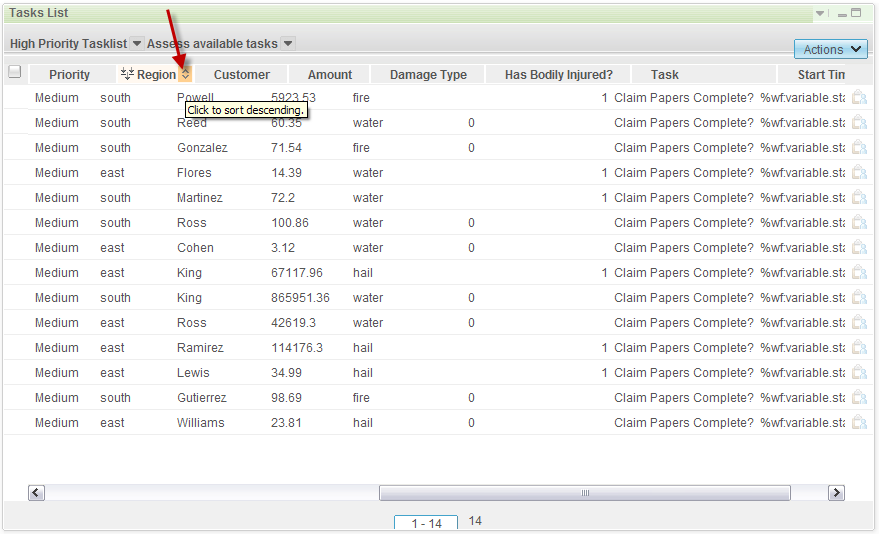
First - let's have a look at task sorting. To sort a task list, simply hover over
the column which is your candidate for sorting the tasks. In this case,
hover over the 'Region' column caption, and wait until you see two tiny
little arrows appear, as well additional hover help is displayed. Now, click on
either 'ascending' or 'descending'. Once clicked, all the tasks will be
sorted and displayed accordingly.
Remember that you have set checkmarks for the 'Group by' flag for some
properties - in my case I have checked those for 'Region' and 'Damage
Type'. Now you can further display the tasks grouped by those properties.
Simply do so by clicking on the drop down list next to the Group by
list, and select e.g. 'Damage Type':
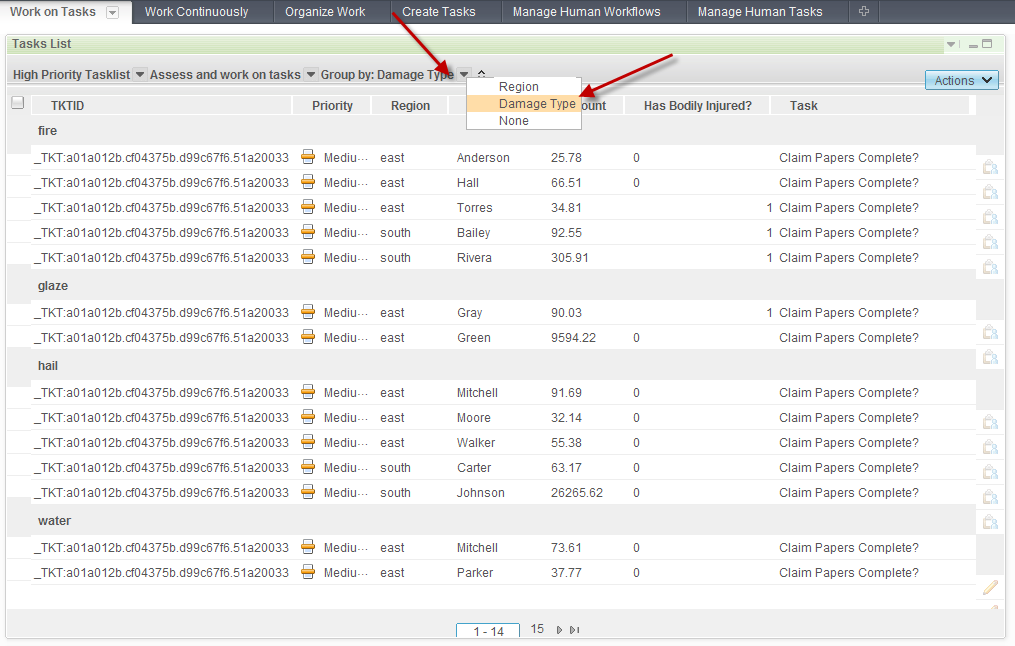
Now - for the enduser - it is much simpler to identify all tasks of e.g. damage type equals fire, or glaze, etc.
You can as well filter the tasks to be presented. Let's pretend you
only want to see the tasks that are assigned to the region east.
Explore the filter to filter out all tasks that are not assigned to
region east. With the mouse, hover over the 'Region' column caption,
until you see the filter icon:

Click on the filter icon.
A small entry field appears. Enter 'east', and click the filter icon again:

Now you only will see tasks with region equals east:
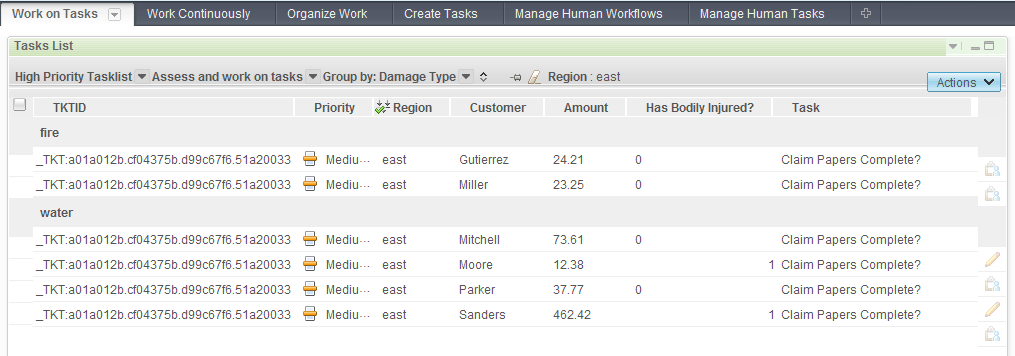
A small icon in the Region column caption indicates that the task list
is filtered by Region.
If you want to see all tasks again, click on the filter
icon in the Region column caption again and click on the erazer:

When done, all tasks will be displayed again.
You can as well set multiple filters for different columns. The next
picture shows all tasks filtered by region equals south, and Has Bodily
Injured equals 1, still grouped by Damage Type:

So - finally - sorting, grouping and filtering task lists is important to better identify the tasks of interest, which are the tasks that should probably be completed earlier than others. These task list features are important as well to quickly find specific tasks for any other reason.
-----------------------
Finally, the 'RandomProcesses' process runs forever, and does create ApproveClaim process instances as long as your WebSphere Process Server is up and running. Therefore you need to stop this process, e.g. in WebSphere Process Server BPC Explorer business process instance list. However, this cannot be done in IBM Business Space because 'bdaniel' does not have administration rights for the 'RandomProcesses' process.
You can stop the 'RandomProcesses' process by performing the following steps:
Start BPC Explorer
Login with userid 'admin' and password 'admin'
Open the process instances list 'Administered By Me'
Select the 'RandomProcesses' process instance, and click 'Terminate'
This completes our exercise! You have successfully completed the sample!