Run the sample
If you did not build the sample yourself, you must import the completed sample application before continuing.
- If you originally accessed this sample directly from the Business Process Management Samples Web site, you should have a download link on the menu above. Click this link and follow the instructions on the Download page.
To deploy, configure, and run the samples, complete the following tasks:
- Deploy modules to WebSphereŽ Enterprise Service Bus (WebSphere ESB) or WebSphere Process Server.
- Import the AddressMediation module into WebSphere Service Registry and Repository (WSRR).
- Configure the WSRR connection, in WebSphere ESB or WebSphere Process Server.
- Create mediation policies using the Module Administration widget.
- Run the sample in WebSphere Integration Developer.
Deploy modules to WebSphere ESB or WebSphere Process Server
To deploy the modules to WebSphere ESB or WebSphere Process Server, complete the following steps:
- In WebSphere Integration Developer, click the Servers tab.
- Right-click either WebSphere ESB Server or WebSphere Process Server.

- From the pop-up menu, click Add and Remove Projects... The Add and Remove Projects window appears.
- Select the AddressMediationApp and AddressServicesApp projects and click Add >. The selected projects are moved to the Configured projects column.
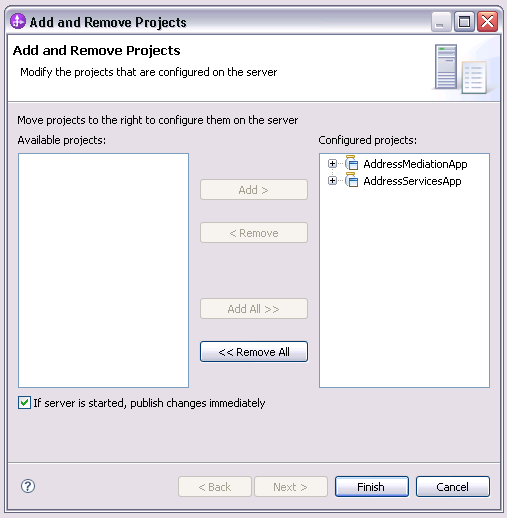
- Click Finish. The projects are added to the server configuration.
- If the server is not in Started state, right-click the server and then click Start.
- If the Status of the server is not Synchronized, right-click the server and then click Publish.
Import module into WSRR
To import the AddressMediation module into WSRR, complete the following steps:
- In WebSphere Integration Developer, right-click the AddressMediation project and click Export.... The Export window opens.
- Select Java EE > EAR file.
- Click Next.
- Ensure that the EAR Project is AddressMediationApp, and enter a destination file name ending in '.ear'
- Click Finish. The module is exported in .ear format, ready to be imported into WSRR.
- Log on to the WSRR console.
- Click Browse on the Load Documents panel.
- Select the EAR file that you exported from WebSphere Integration Developer. The path to the EAR file is displayed.
- Select Document type SCA integration module.
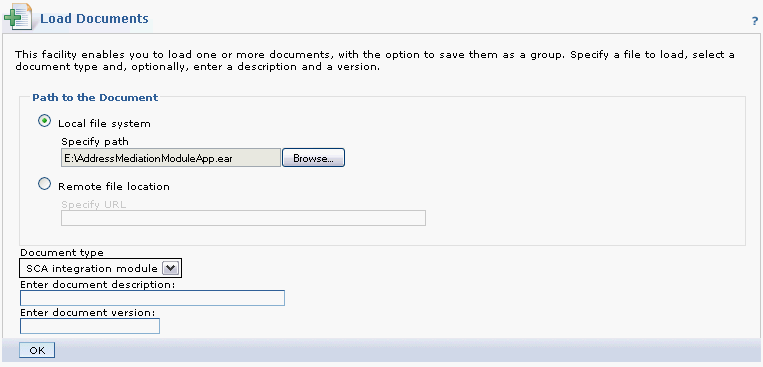
- Click OK. The module is loaded into WSRR.
Configure a WSRR Connection in WebSphere ESB or WebSphere Process Server
To configure and test the connection to WSRR, complete the steps documented in the Creating a new WSRR definition section of the information center, ensuring that the created definition is the default.
Log on to Business Space
- Start Business Space
To start Business Space in the integrated test environment of your WebSphere Integration Developer, complete the following steps:
- In WebSphere Integration Developer, click the Servers tab.
- Right-click either WebSphere ESB Server or WebSphere Process Server.
- From the pop-up menu, click Launch > Business Space.

To start Business Space on WebSphere ESB or WebSphere Process Server, complete the following steps:
- Open a Web browser.
- Type the URL
http://yourhost:yourport/BusinessSpace.
Note: Replace yourhost with your server's internet address and replace yourport with the port of your server's HTTP transport,
for example http://localhost:9080/BusinessSpace.
- If security is enabled, enter a valid User ID and Password. The default User ID is admin.

- Click Login.
- A Business Space start screen is displayed. If you have already worked with Business Space, the start screen might be similar to the following screen:

Create a new Business Space for module administration
If you have not worked with modules in Business Space yet, do a one-time setup on your server by completing the following steps:
- From the Welcome Business Space, click Manage Spaces.
- In the Business Space Manager, click Create Space:

- In the pop-up menu, type a name for your Business Space, for example,
my Business Space.
- Click the Create a new space using a template radio button, then select Solution Administration.
- Select a Space Style and Space Icon, then click Save.

- Click OK.
After the browser has been refreshed, your new Business Space is displayed:

Now you are ready to work on your mediation policies with Business Space.
Create mediation policies using the Module Administration widget
The sample mediation flow has two aspects that mediation policies can change: firstly, the target address of the service and, secondly, whether to log the message body to the system console. There are three address services provided in the AddressService project: for American, British, and French addresses. The US service is the default and you will configure policies to correctly route to the other services. You will also configure a policy to log messages that have a US address.
- Open up the Business Space,
my Business Space, and switch to the Module Administration page.
- In the Module Browser widget, click on the toggle icon beside AddressMediation. You can now view the contents of the module.
- In the expanded view, click on Module Policies. The contents of the Module Administration widget refreshes. It will contain an empty table because no policies are attached to the module in WSRR.
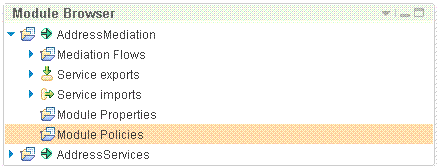

- In the New Policy Attachment field, type France, then click Create.... This begins the process of creating a new policy attachment; a form is displayed.
- Click on the group name Address Mediation.
- Under the Policy Section click the Create New radio button and type France as the New Policy. Click Next.
- In the Assertions section, select the property name targetAddress
- In the value field, type http://localhost:9080/AddressServicesWeb/sca/FranceAddressExport.
- Click Add Assertion.
- In the Gate Conditions Optional section, complete the gate condition name by entering country in the text box, and entering the value country="France".
- Click Add Gate Condition.

- Click Save. A policy attachment for French addresses is created in WSRR. When that is complete, the widget refreshes and displays the attachment in the table.
- In the New Policy Attachment field, type GreatBritain, then click Create.... This begins the process of creating another new policy attachment; a form is displayed.
- Click on the group name Address Mediation.
- Under the Policy Section click the Create New radio button and type GreatBritain as the New Policy. Click Next.
- In the Assertions section, select the property name targetAddress
- In the value field, type http://localhost:9080/AddressServicesWeb/sca/BriantGreatAddressExport.
- Click Add Assertion.
- In the Gate Conditions Optional section, complete the gate condition name by entering country in the text box, and entering the value country="Great Britain".
- Click Add Gate Condition.
- Click Save. A policy attachment for British addresses is created in WSRR. When that is complete, the widget refreshes and displays the attachment in the table.
- In the New Policy Attachment field, type USA, then click Create.... This begins the process of creating another new policy attachment; a form is displayed.
- Click on the group name Address Mediation.
- Under the Policy Section click the Create New radio button and type USA as the New Policy. Click Next.
- In the Assertions section, select the property name logging
- In the value field, type true.
- Click Add Assertion.
- In the Gate Condition section, complete the gate condition name by entering country in the text box, and entering the value country="USA".
- Click Add Gate Condition.
- Click Save. A policy attachment for US addresses is created in WSRR. When that is complete, the widget refreshes and displays the attachment in the table.
Run the sample in WebSphere Integration Developer
With the module deployed into WebSphere ESB or WebSphere Process Server, and with policy attachments present, you can now test the mediation using the Test Component functionality in WebSphere Integration Developer.
You will test the mediation using three famous addresses, one American, one British, and one French.
- In WebSphere Integration Developer, open the AddressMediation Assembly Diagram and right-click on the AddressMediation module.
- Click on Test Component. The Test Component view opens.
- Click on the value cells in the table and enter the address details shown in the following screen shot.

- Click on the Continue button
 . The flow is tested and the response shown.

- Examine the response. You can see the response uses the correct format for Great Britain, with the city and postal code on separate lines.
- Repeat the process with the French address shown in the following screen shot.

- The resulting message is shown in the following screen shot.

- Examine the response. You can see the response uses the correct format for France, with the city and postal code on a single line but with the postal code first.
- Finally, repeat the process with the US address shown in the following screen shot.

- The resulting message is shown in the following screen shot.

- Examine the response. You can see the response uses the correct format for the US, with all elements capitalised and with the city, state, and postal code on a single line, and in the correct order.
- Switch to the console view. You should see the request message body for the US address request, but no trace entries for the other requests you have made.

 Note:
Note:
The Policy Resolution mediation primitive uses the WSRR cache; therefore, any policy changes you make might not take effect until the cache expires. To manually expire the cache, see the Clearing the cache associated with a WSRR definition task in the information center.