This section describes the coding needed for implementing a simple JAX-WS web service client which makes use of the Web service API delivered with the WebSphere® Business Process Choreographer. The sample is structured in two parts, a Basic sample and an Advanced sample.
In the Basic sample, the focus is on setting up the infrastructure, getting the Web Services Description Language file (WSDL file) and setting up security, as this interface is designed as a secured Web service interface. The actual Web service call in the Basic sample is then a very simple query without parameters: a query for all active process templates on the server.
In the Advanced sample, the focus is on the Java code needed to perform some more advanced Web service calls. This includes constructing an input message based on a nested business object, passing the parameters when starting a process. and receiving the resposne of the successful initiation. As prerequisite for running the advanced sample, the application containing the BPEL process advertiseProcess must be deployed on the server.
The following five source files are shipped with the sample:
- Basic sample: index.html
This HTML file is the entry page of the small Web application. It contains only plain HTML code. The file contains one HTML form with one push button; this push button issues an HTTP GET request to the invoke.jsp file, which then performs one Web service call. In addition, this file contains a shortcut to the start page of the Advanced sample.
In the Basic sample the HTML code includes to prompt the enduser for userid and password. In the Advanced sample the useridadminand passwordadminare hardcoded and passed with the API call.
- Basic sample: invoke.jsp
This JSP file contains one single call to the Web service API, as well as the necessary object definitions for passing parameters to the call and for processing the response. This code is explained in more detail in the following sections. In addition, the invoke.jsp file contains some code to render the response data as an HTML table, containing dynamic strings. Those pieces are usual JSP coding techniques that are not explained in more detail here. - Advanced sample: startprocess.html
This HTML file is the start page of the Advanced sample. It allows the user to enter input data that will be used as input for a long-running BPEL process. This file contains only plain HTML code and consists of one HTML form with four text input fields. The submit button of the form passes the actual content of these input fields as a parameterized HTTP GET request to the startprocess.jsp file, which will perform the appropriate Web service calls for starting the process. - Advanced sample: startprocess.jsp
This JSP file contains the code to assemble an input message object and to fill this object with the supplied parameter values. Using this input message object, a request to start a long running process is submitted to the Web service API. This is an asynchronous call, which by definition does not immediately return the result of the business process. It does, however, immediately return a handle to this business process, the so-called Process Instance ID (PIID). This PIID can be used later to query the process status and to access the result of the business process once it has been completed. Therefore, after a successful process start, the rendering code of this JSP displays a parameterized link to viewprocess.jsp, which can be used in the next step to view status and result of the business process. In addition to the Web service calls, the startprocess.jsp file contains some code to convert HTTP parameter values into Java String values (in the beginning) and some dynamic HTML code for rendering the response displayed to the user. These pieces are usual JSP coding techniques that are not explained in more detail here. - Advanced sample: viewprocess.jsp
This JSP file contains the code to query certain attributes of a particular process instance with a given PIID. Using the Web service API, it is demonstrated how to access the input data, query the execution state, and evaluate the output once the process instance has finished. In one particular case, namely when the execution state of the process instance is found to be STATE_RUNNING, this JSP file will add HTML code which will cause an automatic refresh to be performed after a few seconds; this mechanism will periodically poll the process execution state as long as the process is found in running state. In addition, the viewprocess.jsp contains some code to read the PIID parameter into a Java String variable (in the beginning) and some conditional HTML, depending on Java variable values. These pieces are usual JSP coding techniques that are not explained in more detail here.
In the following, we will take a look at the most interesting code
pieces inside the JSP files.
invoke.jsp
Reference the MySecurityHelper class and use shorthands instead of
the fully qualified class names
(here, MySecurityHelper instead of com.ibm.jaxws.sample.security.MySecurityHelper)
in the remainder of the JSP file. This helper calls is used to provide
the security context for the BFM API calls:
<%@page
import="com.ibm.jaxws.sample.security.MySecurityHelper"%>
<jsp:useBean
id="BFMService"
class="com.ibm.xmlns.prod.websphere.business_process.services._7_0.binding.BFMJAXWSService"
scope="session"></jsp:useBean>
BFMJAXWSPortType bfm = BFMService.getBFMJAXWSPort();
ProcessTemplatesType processTemplatesType = bfm.queryProcessTemplates(
null, null, null, null );
//do security
String user = request.getParameter("username");
String password = request.getParameter("password");
MySecurityHelper.enhanceWithUsernameToken(bfm, user,
password);
The response data are in the ptt object now. Use the getter method to extract the list of process templates into an appropriate array:
List listTemplates = ptt.getProcessTemplate();
startprocess.jsp
This JSP file contains the code to prepare the process template and to assemble an input message object used to start a process instance. and to fill this object with the supplied parameter values. Using this input message object, a request to start a long running process is submitted to the Web service API. This is an asynchronous call, which by definition does not immediately return the result of the business process. It does, however, immediately return a handle to this business process
Reference the mySerializer class and use shorthands instead of the fully qualified class names (here,mySerializer instead of com.ibm.mySerializer.mySerializer)
in the remainder of the JSP file. The Serializer is used for the BO to
XML transformation. You also reference the MySecurityHelper, as
mentioned for the invoke.jsp, and the process and process interface
classes, hier the WSApiModule process respectively application.
<%@page
import="com.ibm.jaxws.sample.security.MySecurityHelper"%>
<%@page import="com.ibm.mySerializer.mySerializer"%>
<%@page import="wsapimodule.*"%>
<%@page import="wsapimodule.advertiseprocessinterface.*"%>
<jsp:useBean id="BFMService" class="com.ibm.xmlns.prod.websphere.business_process.services._7_0.binding.BFMJAXWSService" scope="session"></jsp:useBean>
Use the Java proxy, extended by security provider, to use the process start API later on.BFMJAXWSPortType bfm = BFMService.getBFMJAXWSPort();
MySecurityHelper.enhanceWithUsernameToken(bfm, user, password);
// Process template settings
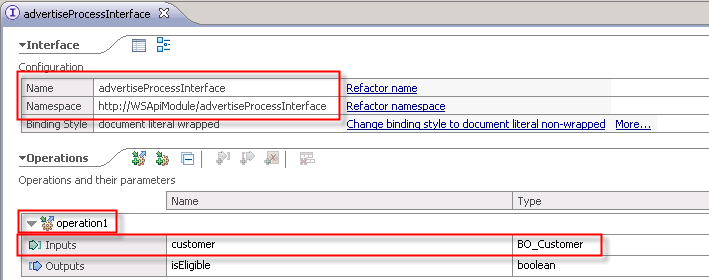
String myOperation = "operation1"; // Interface editor: we did
use the default
String myPortTypeName = "advertiseProcessInterface"; // see
Interface editor
String myInterfaceURI = "http://WSApiModule/"+myPortTypeName; //
see IF editor
String myNamespacePrefix = "mynsprefix"; // can be any value
String myProcessTemplateName = "advertiseProcess";
// Data received from HTML form
String myFName = (String) request.getParameter("fname"); //
first name
String myLName = (String) request.getParameter("lname"); // last
name
String mySName = (String) request.getParameter("sname"); //
street name
String myCName = (String) request.getParameter("cname"); // city
name
// assemble the process input message
BOAddress address = new BOAddress();
address.setStreet( mySName );
address.setCity( myCName );
BOCustomer customer = new BOCustomer();
customer.setFirstName( myFName );
customer.setLastName( myLName );
customer.setAddress( address );
Operation1 operation1 = new Operation1();
operation1.setCustomer( customer );
// prepare parameters for starting the process
UserDataType userdata = new UserDataType();
userdata.setAny(mySerializer.getElement("wsapimodule.advertiseprocessinterface",
operation1));
<String piid = bfm.sendMessage(myProcessTemplateName, new QName(myInterfaceURI, myPortTypeName), myOperation, userdata, null);
The remainder of the startprocess.jsp file contains the code to handle the response whether the process as started successfully together with some basic exception handling. It also renders the parameterized URL for calling the viewprocess.jsp page.viewprocess.jsp
Reference the mySerializer class and use shorthands instead of the
fully qualified class names
(here, mySerializer instead of com.ibm.mySerializer.mySerializer)
in the remainder of the JSP file. This class includes the Deserializer
used for the demarshalling of the xml representation of the output
message into a business obejct.
<%@page
import="com.ibm.jaxws.sample.security.MySecurityHelper"%>
<%@page import="com.ibm.mySerializer.mySerializer"%>
<%@page import="wsapimodule.*"%>
<%@page import="wsapimodule.advertiseprocessinterface.*"%>
<jsp:useBean id="BFMService" class="com.ibm.xmlns.prod.websphere.business_process.services._7_0.binding.BFMJAXWSService" scope="session"></jsp:useBean>
Use the Java proxy, extended by security provider, to use BFM APIs.BFMJAXWSPortType bfm = BFMService.getBFMJAXWSPort();
MySecurityHelper.enhanceWithUsernameToken(bfm, user, password);
// Initialize the variables which we will display on
this page
String myPIID = request.getParameter("PIID"); // passed in URL
as "...?PIID=_PI:..."
String myInternalPIID = myPIID; // will be refreshed
later
String myExecutionState = null;
String myInput = "";
String myOutput = "(not available yet)";
String myOutputVarForDisplay = "";
boolean doRefresh = false;
boolean piidExists;
getProcessInstance operation and obtain the
current execution state.// get the process instance
ProcessInstanceType myProcessInstance =
bfm.getProcessInstance( myPIID
);
// get internal PIID which is required for retrieving the messages
myInternalPIID = myProcessInstance.getPiid();
// get the execution state
myExecutionState =
myProcessInstance.getExecutionState();
getProcessInstance operation, that unique name is
accepted as valid PIID value. However, in other operations that take a
PIID as input (for example, getInputMessageForProcessInstance)
the internal PIID is required.Extract the ExecutionState from the process instance object into a Java String. In case the process is still running, set a boolean variable which conditionally includes an auto-refresh directive to the HTML header:
abc
// get
the execution state
myExecutionState =
myProcessInstance.getExecutionState();
if
(myExecutionState.equals("STATE_RUNNING")) {
// still in
running state, try again in a moment
doRefresh = true;
} else if
(myExecutionState.equals("STATE_FINISHED")) {
// done, get the
output message
UserDataType
userdata_Output = bfm.getOutputMessageForProcessInstance(
myInternalPIID );
Operation1Response myGetOutputMessage = (Operation1Response)
userdata_Output.getAny();
Create the objects for the response of the
getProcessInstance
operation:
abc
a b c
Provide the PIID which was extracted from the HTTP request, then
launch the getProcessInstance operation:
That is why the PIID is queried again from the system and stored in
the variable myInternalPIID and used in other operations
that rely on a PIID:
abc
a b c
myProcessInstance = myGetProcessInstanceResponse.getProcessInstance();
// get internal PIID which is required for retrieving the messages
myInternalPIID = myProcessInstance.getPiid();
...
myGetInputMessageForPIParms.setPiid(myInternalPIID);
After running the operation getInputMessageForProcessInstance,
extract the content from the response:
abc
a b c
Look for an element with XML tag "firstName"; to allow checking for null pointers, store the result of the item(0) method in a variable. If all checks for null pointers are passed successfully, concatenate the actual value to the Java variable which will be used for rendering later:
abc
a b c
tmpNode = myInputMessage.getElementsByTagName("firstName").item(0);
if (tmpNode!=null && tmpNode.getFirstChild()!=null)
myInput = tmpNode.getFirstChild().getNodeValue();
Extract the ExecutionState from the process instance object into a Java String. In case the process is still running, set a boolean variable which conditionally includes an auto-refresh directive to the HTML header:
abc
a b c
myExecutionState = myProcessInstance.getExecutionState();
if (myExecutionState.equals("STATE_RUNNING")) {
// still in running state,
// try again in a moment
doRefresh = true;
} else ...
...
<% if (doRefresh) { %>
<META http-equiv="refresh" content="4">
<% } // end if %>
When the value "STATE_FINISHED" is found as ExecutionState, the
output message is extracted in the same way as the input message has
been extracted earlier. In addition to the value, the name of the
output variable is retrieved by the getNodeName() method.
This way, the viewprocess.jsp can be used for monitoring arbitrary
long-running process instances and display the first element of the
output message.
Keep in mind though that for running process instances frequent polling
will happen, which may add some extra load to your system.
The remainder of the viewprocess.jsp file contains the code to render the process instance data as an HTML table.
MySecurityHelper
Reference the MySecurityHelper class and use shorthands instead of
the fully qualified class names
(here, MySecurityHelper instead of com.ibm.jaxws.sample.security.MySecurityHelper)
in the remainder of the JSP file. This helper calls is used to provide
the security context for the BFM API calls:
<%@page
import="com.ibm.jaxws.sample.security.MySecurityHelper"%>
<jsp:useBean
id="BFMService"
class="com.ibm.xmlns.prod.websphere.business_process.services._7_0.binding.BFMJAXWSService"
scope="session"></jsp:useBean>
BFMJAXWSPortType bfm = BFMService.getBFMJAXWSPort();
ProcessTemplatesType processTemplatesType = bfm.queryProcessTemplates(
null, null, null, null );
mySerializer
Reference the MySecurityHelper class and use shorthands instead of
the fully qualified class names
(here, MySecurityHelper instead of com.ibm.jaxws.sample.security.MySecurityHelper)
in the remainder of the JSP file. This helper calls is used to provide
the security context for the BFM API calls:
<%@page
import="com.ibm.jaxws.sample.security.MySecurityHelper"%>
<jsp:useBean
id="BFMService"
class="com.ibm.xmlns.prod.websphere.business_process.services._7_0.binding.BFMJAXWSService"
scope="session"></jsp:useBean>
BFMJAXWSPortType bfm = BFMService.getBFMJAXWSPort();
ProcessTemplatesType processTemplatesType = bfm.queryProcessTemplates(
null, null, null, null );