The travel booking sample business process invokes services implemented as Java classes. To build the travel booking sample, follow these steps:
- Create a new module.
- Define the data types.
- Define the interfaces.
- Generate and implement the Java services.
- Develop the business process.
- Bind the business process and the services.
- Assemble the enterprise application.
Create a new module
To create a new module, complete the following steps:
- In the Business Integration view, right-click the canvas.
- From the pop-up menu, select New > Module.
- In the Module Name field, enter
TravelBooking. - Leave the other fields unchanged.
- Click Finish.
The New Module window opens.
Define the data types
To create a data type, complete the following steps:
- In the Business Integration view, right-click Data Types.
- From the pop-up menu, select New > Business Object.
- In the Business Object panel, uncheck the Default checkbox next to the Namespace field.
- Enter values for Name, Folder, and Namespace. See the table below for the name and namespace, and use
bpc/samplesfor the folder. - Click Finish.
To add an attribute to a business object, complete the following steps:
- In the business object editor, click the Add Attribute button
 .
. - To edit the name, click the name in the business object figure.
- To edit the type, click the type in the business object figure, then select a type from the list. If the type of the attribute is a business object, select the business object, or click Browse to browse for and select a data type.
- On the toolbar, click the Save button
 .
.
In the folder bpc/samples, create the business objects that are listed in the following table:
| Business Object | Namespace | Attribute Name | Attribute Type |
|---|---|---|---|
| CarReservationRequest | http://bpc/samples | company | string |
| category | string | ||
| pickupDate | string | ||
| dropoffDate | string | ||
| pickupLocation | string | ||
| dropoffLocation | string | ||
| creditCardNumber | string | ||
| creditCardCompany | string | ||
| CheckCreditCardRequest | http://bpc/samples | cardNumber | string |
| cardCompany | string | ||
| FlightReservationRequest | http://bpc/samples | airline | string |
| departureAirport | string | ||
| destinationAirport | string | ||
| departureDate | string | ||
| departureTime | string | ||
| creditCardNumber | string | ||
| creditCardCompany | string | ||
| HotelReservationRequest | http://bpc/samples | city | string |
| hotelCompany | string | ||
| checkinDate | string | ||
| checkoutDate | string | ||
| creditCardNumber | string | ||
| creditCardCompany | string | ||
| InvalidRequest | http://bpc/samples | message | string |
| TravelBookingRequest | http://bpc/samples | residence | string |
| destination | string | ||
| dateOfDeparture | string | ||
| dateOfReturn | string | ||
| creditCardNumber | string | ||
| creditCardCompany | string | ||
| departureAirport | string | ||
| departureTime | string | ||
| destinationAirport | string | ||
| airline | string | ||
| hotelCompany | string | ||
| carRentalCompany | string | ||
| carCategory | string |
Define the interfaces
To create an interface, complete the following steps:
- In the Business Integration view, right-click Interfaces.
- From the pop-up menu, select New > Interface.
- In the Create a new interface panel, uncheck the Default checkbox next to the Namespace field.
- Enter values for Name, Folder, and Namespace. See the table below for the name and namespace, and use
bpc/samplesfor the folder. - Click Finish.
You can add two types of operations to an interface: request response operations and one way operations. To add operations to an interface, complete the following steps:
- In the interface editor, click either the Add Request Response Operation button
 , or the Add One Way Operation button
  , depending on the kind of operation that you want to add.
 - To edit the name of the operation, click the operation name. See the table below for the operation name.
- To add an input message to an operation, select the operation and click the Add Input button
 .
. - To edit the name of an input message, click the message name. See the table below for the message name.
- To edit the type of an input message, click the message type and select a type from the list. In the list, select Browse if you want to assign a custom business object as the type. In the Data Type Selection dialog, browse for and select a business object.
- To add an output message to an operation, select the operation and click the Add Output button
 .
. - Repeat steps 4 and 5 to edit the name and type of the output message.
- To add a fault message to an operation, select the operation and click the Add Fault button
 .
. - Repeat steps 4 and 5 to edit the name and type of the fault message.
- On the toolbar, click the Save button .
In the folder bpc/samples, create the interfaces that are listed in the following table:
| Interface | Namespace | Operation Name | Message | Name | Type |
|---|---|---|---|---|---|
| CarReservation | http://bpc/samples/CarReservation | reserve | Input | request | CarReservationRequest |
| Output | response | boolean | |||
| CreditCardChecking | http://bpc/samples/CreditCardChecking | check | Input | request | CheckCreditCardRequest |
| Output | response | boolean | |||
| Fault | error | InvalidRequest | |||
| FlightReservation | http://bpc/samples/FlightReservation | reserve | Input | request | FlightReservationRequest |
| Output | response | boolean | |||
| HotelReservation | http://bpc/samples/HotelReservation | reserve | Input | request | HotelReservationRequest |
| Output | response | boolean | |||
| TravelBooking | http://bpc/samples/TravelBooking | book | Input | request | TravelBookingRequest |
| Output | information | string |
Create the Java services
To generate Java implementations, perform the following steps for each of the interfaces CarReservation, CreditCardChecking, FlightReservation and HotelReservation:
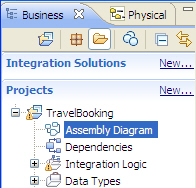
- In the Business Integration view, double-click TravelBooking > Assembly Diagram.
- In the Business Integration view, expand Interfaces > bpc\samples.
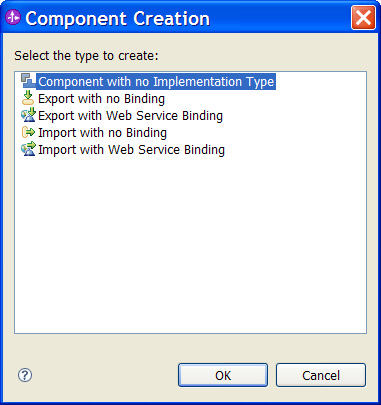
- Select the interface, drag it to the assembly editor, and drop it on the canvas. The Component Creation window opens.
- Select Component with No Implementation Type, then click OK.
A new component is added to the assembly editor.
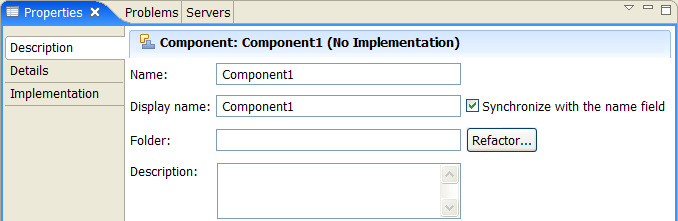
- Click the component.
- In the Properties view, select the Description tab.
- In the Name field, enter a name for the component. This automatically changes that Display name as well. See the table below for the names.
- In the assembly editor, right-click the component.
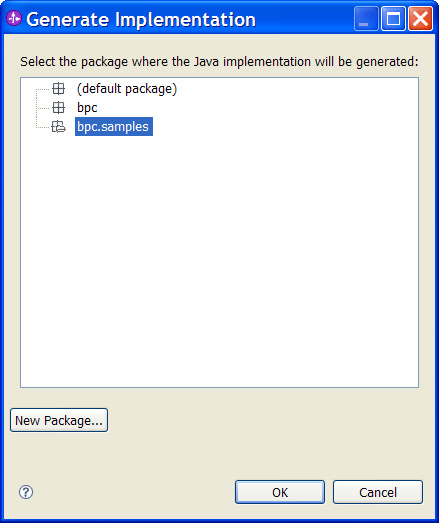
- From the pop-up menu, select Generate Implementation > Java.
- Select bpc.samples, then click OK. The Java source editor opens.
- Continue with the implementation of the generated methods. Refer to the table below for the required service implementation and replace the methods accordingly.
- On the toolbar, click the Save button .
- Switch to the assembly editor. On the toolbar, click the Save button .
The assembly editor opens.

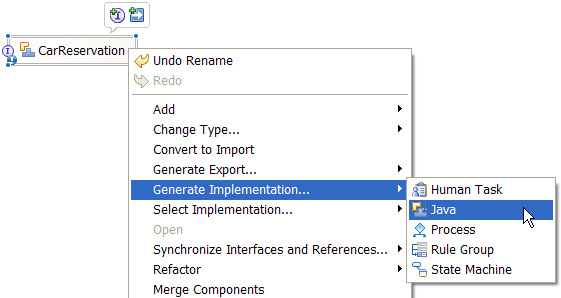
The Generate Implementation window opens.
To your assembly diagram, add the Java services that are listed in the following table:
| Java Service Name | Service Implementation |
|---|---|
| CarReservation |
CarReservationImpl
public Boolean reserve(DataObject request) {
System.out.print("CarReservation "); if(request != null) { String category = request.getString("category"); System.out.print("for category \'" + category + "\' "); if(category != null && category.equals("Luxury")) { System.out.println("was successful."); return Boolean.TRUE; } } System.out.println("failed."); return Boolean.FALSE; } |
| CreditCardChecking |
CreditCardCheckingImpl
import commonj.sdo.DataObject;
import com.ibm.websphere.sca.ServiceBusinessException; import com.ibm.websphere.sca.ServiceManager; import com.ibm.websphere.bo.BOFactory;
public Boolean check(DataObject request) {
System.out.print("CreditCardChecking "); if(request != null){ String cardNumber = request.getString("cardNumber"); String cardCompany = request.getString("cardCompany"); if(cardNumber == null || cardNumber.equals("") || cardCompany == null || cardCompany.equals("")) { ServiceManager sm = ServiceManager.INSTANCE; BOFactory bofactory = (BOFactory) sm.locateService("com/ibm/websphere/bo/BOFactory"); DataObject invalidRequest = bofactory.create( "http://bpc/samples", "InvalidRequest"); invalidRequest.setString("message", "Input data invalid."); throw new ServiceBusinessException(invalidRequest); } else if(cardNumber.equals("1")) { System.out.println("failed for credit card number: 1."); return Boolean.FALSE; } else { System.out.println("was successful."); return Boolean.TRUE; } } ServiceManager sm = ServiceManager.INSTANCE; BOFactory bofactory = (BOFactory) sm.locateService("com/ibm/websphere/bo/BOFactory"); DataObject invalidRequest = bofactory.create( "http://bpc/samples", "InvalidRequest"); invalidRequest.setString("message", "Input data must not be null."); throw new ServiceBusinessException(invalidRequest); } |
| FlightReservation |
FlightReservationImpl
public Boolean reserve(DataObject request) {
System.out.print("FlightReservation "); if(request != null) { String departure = request.getString("departureAirport"); System.out.print("from departure airport: \'" + departure + "\' "); if(departure != null && !departure.equals("Boeblingen")) { System.out.println("was successful."); return Boolean.TRUE; } } System.out.println("failed."); return Boolean.FALSE; } |
| HotelReservation |
HotelReservationImpl
public Boolean reserve(DataObject request) {
System.out.print("HotelReservation "); if(request != null) { String name = request.getString("hotelCompany"); System.out.print("for hotel \'" + name + "\' "); if(name != null && !name.equals("Venus")) { System.out.println("was successful."); return Boolean.TRUE; } } System.out.println("failed."); return Boolean.FALSE; } |
Develop the business process
Create a new business process
To create a new business process, complete the following steps:
- Switch to the Business Integration view.
- In the navigation tree, right-click TravelBooking > Business Logic.
- From the pop-up menu, select New > Business Process.
- Uncheck the Default checkbox next to the Namespace field.
- In the Namespace field, enter
http://bpc/samples. - In the Folder field, enter
bpc/samples. - In the Name field, enter
TravelBooking. - Click Next.
- In the Select a Business Process Type panel, select Microflow.
- Click Next.
- In the Select an Interface panel, select Select an existing Interface.
- Click Browse. The Interface Selection window opens.
- Select TravelBooking, then click OK.
- In the Operations field, select book.
- Click Finish.
- In the business process editor, delete the Receive and the Reply activity.
- Delete the request and the information variable, as well as the TravelBooking interface partner.
- On the toolbar, click the Save button .
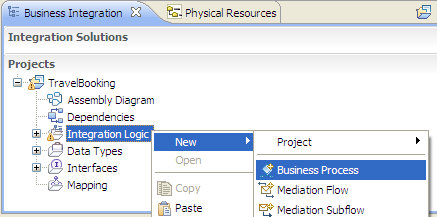
The New Business Process window opens.


Define process properties
To set the properties of the process, perform the following steps:
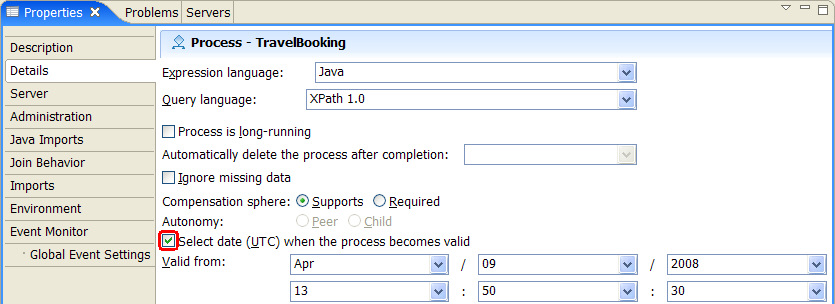
- Switch to the Properties view and select the Details tab.
- Make sure that the option Select date (UTC) when the process becomes valid is set. If this is not the case, check the checkbox and accept the default values for the date and time.
- Select the tab Java Imports to define imports required by the process' snippets.
- Insert the following lines:
- On the toolbar, click the Save button .
import com.ibm.websphere.bo.BOFactory;
import com.ibm.websphere.sca.ServiceManager;
Define an interface partner
In order to add an interface partner to the process, perform the following steps:
- In the business process editor, click the Add Interface Partner button
 .
. - The "Add an Interface Partner" window opens.
- In the Name field, enter
Client. - Select TravelBooking below "Matching interfaces" and click OK.
- On the toolbar, click the Save button .
Define process partners
There are two types of partners: interface partners and reference partners. Define interface partners for parties that interact with the process. Define reference partners for services with which the process interacts.
To define a reference partner, complete the following steps:
- In the business process editor, click the Add Reference Partner button
 .
. - The "Add an Reference Partner" window opens.
- In the Name field, enter a name for the partner. See the table below for the name.
- Select the matching interface (see the table below) and click OK.
- On the toolbar, click the Save button .
Define the partners that are listed in the following table:
| Name | Type | Interface |
|---|---|---|
| CarReservation | Reference partner | CarReservation |
| CreditCardChecking | Reference partner | CreditCardChecking |
| FlightReservation | Reference partner | FlightReservation |
| HotelReservation | Reference partner | HotelReservation |
Define process variables
To add variables to your process, complete the following steps:
- In the business process editor, click the Add Variable button
 .
. - The "Add a Variable" window opens.
- In the Name field, enter a name for the variable. See the table below for the name.
- Keep the Default Values and click OK
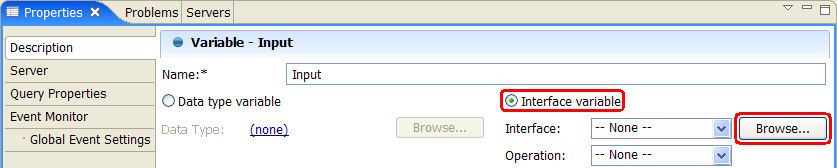
You can assign to a variable either an XSD type or a type derived from an existing interface.
To assign an interface type to a variable, complete the following steps:
- In the Description section of the Properties view, select the option Interface variable.
- Click Browse. The Interface Selection window opens.
- Select the matching interface, then click OK. Refer to the table below for the interface types.
- Select the appropriate operation in the Operation field.
- To select the appropriate direction, click either Input or Output.
- On the toolbar, click the Save button .

Add to your process the variables that are listed in the following table:
| Name | Interface Type | Operation | Direction |
|---|---|---|---|
| Input | TravelBooking | book | Input |
| Output | TravelBooking | book | Output |
| CarReservationInput | CarReservation | reserve | Input |
| CarReservationOutput | CarReservation | reserve | Output |
| CreditCardCheckingInput | CreditCardChecking | check | Input |
| CreditCardCheckingOutput | CreditCardChecking | check | Output |
| FlightReservationInput | FlightReservation | reserve | Input |
| FlightReservationOutput | FlightReservation | reserve | Output |
| HotelReservationInput | HotelReservation | reserve | Input |
| HotelReservationOutput | HotelReservation | reserve | Output |
Add activities to the process
Follow theses steps to add a Parallel Activities activity to your process:
- In the business process editor, click the Parallel Activities symbol
 on the palette. This icon can be found here.
 - Click the link between the start and end symbol of the process.

The Parallel Activities figure is added:
![]()
Follow these steps to add additional activities to the Parallel Activities activity:
- On the palette, click the icon of the activity that has to be added. See the table below for the activities to add.
- Click the empty area of the Parallel Activities activity. The activity will be added.
- Switch to the Properties view and select the Description tab.
- Enter the name of the activity in the Display Name field. See the table below for the name. (Note: the name changes automatically)
- On the toolbar, click the Save button .
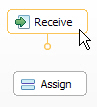
Add to your Parallel Activities activity the activities that are listed in the following table:
| Activity Name | Activity Type | Symbol |
|---|---|---|
| Receive | Receive |  |
| DataMap1 | Assign |  |
| CheckCreditCard | Invoke |  |
| DataMap2 | Assign | |
| DataMap3 | Assign | |
| DataMap4 | Assign | |
| CheckFlightReservation | Invoke | |
| CheckHotelReservation | Invoke | |
| While | While Loop |  |
| Confirmation | Snippet |  |
| Reply | Reply |  |
The next step is to add activities to the while loop. The while loop has an implicit sequence. You can add activities at a specific position. Follow these steps to add activities to the while loop:
- On the palette, click the icon of the activity that has to be added to the while loop. See the table below for the activities to add.
- In the while loop figure, click the position where you want to add the activity. The activity will be added.
- Switch to the Properties view and select the Description tab.
- Enter the name of the activity in the Display Name field. See the table below for the name. (Note: the name changes automatically)
- On the toolbar, click the Save button .
Add to the while loop the activities that are listed in the following table:
| Activity Name | Activity Type | Symbol |
|---|---|---|
| CheckCarReservation | Invoke | |
| EvaluateReservationResult | Snippet | |
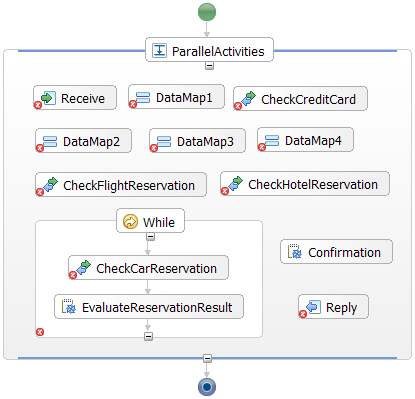
After all activities have been added, the process looks similar to this:
Activity implementation
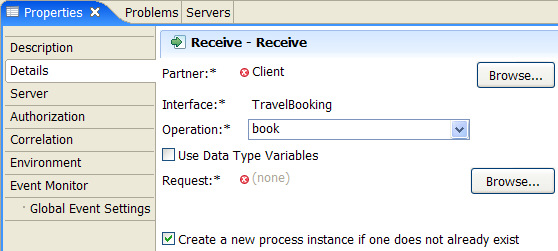
Receive
To complete the implementation of a receive activity, you have to specify the interface partner, the operation and a process variable for the activity. Furthermore, you can specify whether a new process instance is created when this receive activity is called.
- In the business process editor, click the Receive activity.
- In the Properties view, click the Details tab.
- Select Create a new Process instance if one does not already exist.
- To select an interface partner, click Browse next to the Partner field. The Select a Partner window opens.
- Select Client, then click OK.
- As Operation, select book.
- Deselect Use Data Type Variables.
- Click Browse next to the Request field. The Select a Request Variable window opens.
- Select Input, then click OK.
- On the toolbar, click the Save button .
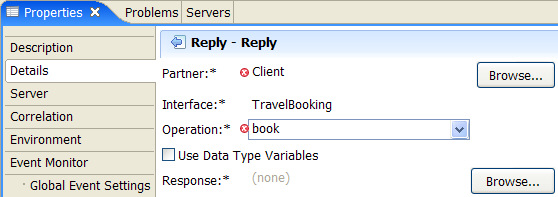
Reply
To complete the implementation of a reply activity, you have to specify the interface partner, the operation, and a process variable for the activity. If the operation supports fault messages, you can choose to return either a response or a fault message.
- In the business process editor, click the Reply activity.
- In the Properties view, click the Details tab.
- To select an interface partner, click Browse next to the Partner field. The Select a Partner window opens.
- Select Client, then click OK.
- As Operation, select book.
- If the operation supports fault messages, select the appropriate Reply Type: Normal or Fault.
- Deselect Use Data Type Variables.
- Click Browse next to the Response field. The Select a Response Variable window opens.
- Select Output, then click OK.
- On the toolbar, click the Save button .
Invoke
To complete the implementation of an invoke activity, you have to specify the reference partner, the operation, and the process variables for the activity.
- In the business process editor, click the invoke activity.
- In the Properties view, click the Details tab.
- To select a reference partner, click Browse next to the Partner field. The Select a Partner window opens.
- Select the matching partner, then click OK. See the table below for the partners.
- Select the appropriate Operation.
- Deselect Use Data Type Variables.
- Click Browse next to the Request field. The Select a Request Variable window opens.
- Select the matching variable, then click OK.
- Click Browse next to the Response field. The Select a Response Variable window opens.
- Select the matching variable, then click OK.
- On the toolbar, click the Save button .
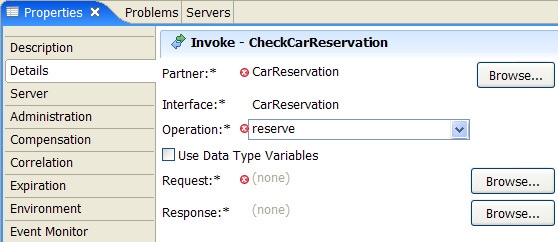
Implement the invoke activities with the settings that are listed in the following table:
| Name | Partner | Interface | Operation | Request | Response |
|---|---|---|---|---|---|
| CheckCreditCard | CreditCardChecking | CreditCardChecking | check | CreditCardCheckingInput | CreditCardCheckingOutput |
| CheckFlightReservation | FlightReservation | FlightReservation | reserve | FlightReservationInput | FlightReservationOutput |
| CheckHotelReservation | HotelReservation | HotelReservation | reserve | HotelReservationInput | HotelReservationOutput |
| CheckCarReservation | CarReservation | CarReservation | reserve | CarReservationInput | CarReservationOutput |
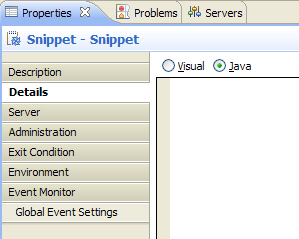
Snippet
To implement a snippet activity, complete the following steps:
- In the business process editor, click the snippet activity.
- In the Properties view, click the Details tab.
- Select Java.
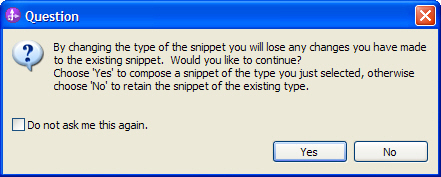
- If the Question dialog appears, click Yes.
- In the text area, enter the Java code of the snippet implementation. See below for the Java code that has to be entered.
- On the toolbar, click the Save button .
Complete the implementation of the following snippet activities:
| Snippet Name | Java Code |
|---|---|
| EvaluateReservationResult |
System.out.print("EvaluateReservationResult");
if(!CarReservationOutput.getBoolean("response")) { DataObject carReservationRequest = (DataObject)CarReservationInput.get("request"); carReservationRequest.setString("category","Luxury"); System.out.print(" - set category to \'Luxury\'"); } System.out.println("."); |
| Confirmation |
String msg = null;
if(CarReservationOutput != null && CreditCardCheckingOutput.getBoolean("response")&& FlightReservationOutput.getBoolean("response")&& HotelReservationOutput.getBoolean("response")&& CarReservationOutput.getBoolean("response")) { msg = "Travel was booked. Your confirmation no. is: " + System.currentTimeMillis() + "."; } else { msg = "Your travel could not be booked."; } System.out.println("Confirmation: " + msg); //initialize the Output variable: BOFactory factory = (BOFactory)ServiceManager.INSTANCE.locateService("com/ibm/websphere/bo/BOFactory"); Output = factory.createByType( getVariableType( "Output") ); //assign a value to the Output variable: Output.setString("information",msg); |
While
To specify the while condition, complete the following steps:
- In the business process editor, click the while loop.
- In the Properties view, click the Details tab.
- As Expression language, select Same as Process (Java).
- As Expression Type, select Java.
- If the Question dialog appears, click Yes.
- In the text area, replace the default Java code. See below for the Java code that has to be entered to define the while condition.
- On the toolbar, click the Save button .
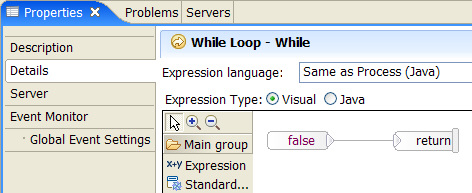
Complete the implementation of the while condition with the following Java code:
if(CarReservationOutput != null) {
condition = CarReservationOutput.getBoolean("response");
}
System.out.println("While: condition is " + condition + ". Returning: " + !condition);
return !condition;
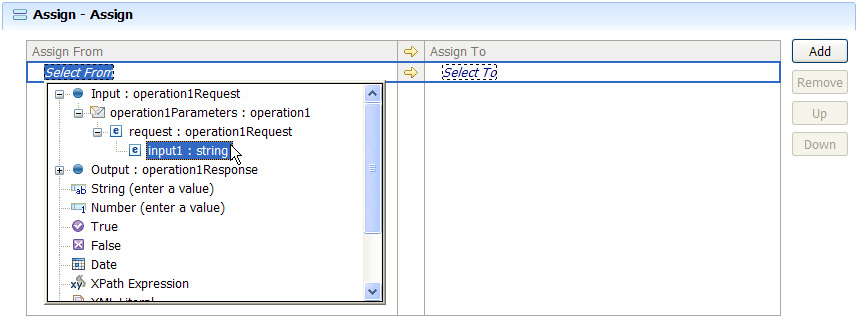
Assign
To complete the implementation of an assign activity, you have to specify one or more data mappings. To specify data mappings for variables, complete the following steps:
- In the business process editor, click the assign activity.
- In the Properties view, click the Details tab.
- To select the variable that will be mapped, click Select From. A drop-down list is shown that lists all variables.
- In the variable list, select the appropriate variable or part.
- To select the target of the mapping, click Select To.
- Select the appropriate variable or part in the drop-down list.
- If you want to specify more mappings, click Add, then repeat steps 3 through 6.
- On the toolbar, click the Save button .
Complete your assign activities with the mappings that are listed in the following tables:
DataMap1
| From Variable | Part | Attribute | To Variable | Part | Attribute |
|---|---|---|---|---|---|
| Input | request | creditCardNumber | CreditCardCheckingInput | request | cardNumber |
| creditCardCompany | cardCompany |
DataMap2
| From Variable | Part | Attribute | To Variable | Part | Attribute |
|---|---|---|---|---|---|
| Input | request | creditCardNumber | FlightReservationInput | request | creditCardNumber |
| creditCardCompany | creditCardCompany | ||||
| airline | airline | ||||
| departureAirport | departureAirport | ||||
| destinationAirport | destinationAirport | ||||
| dateOfDeparture | departureDate | ||||
| departureTime | departureTime |
DataMap3
| From Variable | Part | Attribute | To Variable | Part | Attribute |
|---|---|---|---|---|---|
| Input | request | creditCardNumber | HotelReservationInput | request | creditCardNumber |
| creditCardCompany | creditCardCompany | ||||
| destination | city | ||||
| dateOfDeparture | checkinDate | ||||
| dateOfReturn | checkOutDate | ||||
| hotelCompany | hotelCompany |
DataMap4
| From Variable | Part | Attribute | To Variable | Part | Attribute |
|---|---|---|---|---|---|
| Input | request | creditCardNumber | CarReservationInput | request | creditCardNumber |
| creditCardCompany | creditCardCompany | ||||
| carRentalCompany | company | ||||
| carCategory | category | ||||
| dateOfDeparture | pickupDate | ||||
| dateOfReturn | dropoffDate | ||||
| destination | pickupLocation | ||||
| destination | dropoffLocation |
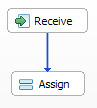
Add control links between activities
To add control links between activities, complete the following steps:
- Hover the mouse pointer over the source activity. The link handle of the activity is displayed.
- Click the handle, then drag it to the target activity. When you release the mouse button, a control link is added.
- On the toolbar, click the Save button .
Add to your process the control links that are listed in the following table:
| Source Activity | Target Activity |
|---|---|
| Receive | DataMap1 |
| DataMap1 | CheckCreditCard |
| CheckCreditCard | DataMap2 |
| CheckCreditCard | DataMap3 |
| CheckCreditCard | DataMap4 |
| DataMap2 | CheckFlightReservation |
| DataMap3 | CheckHotelReservation |
| DataMap4 | While |
| CheckFlightReservation | Confirmation |
| CheckHotelReservation | Confirmation |
| While | Confirmation |
| Confirmation | Reply |
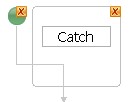
Add a fault handler to the process
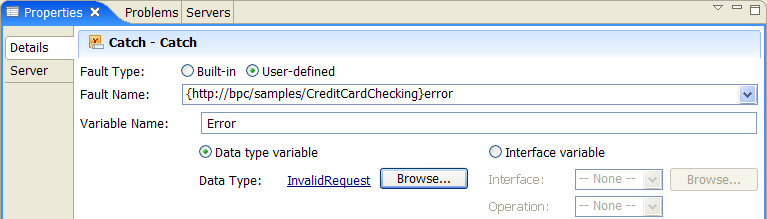
In this sample, an error was defined in the CreditCardCheckingService interface. This error can be handled by a user-defined error handler. To define such an error handler, complete the following steps:
- In the business process editor, click the start symbol of the process. The add handler symbols are displayed.
- Click the Add Fault Handler button
 . A fault handler is added.
 - Click Catch structure inside the added fault handler.
- In the Properties view, click the Details tab.
- For Fault Type, select User-defined.
- For Fault Name, select {http://bpc/samples/CreditCardChecking}error.
- In the Variable Name field, enter
Error. - Select Data type variable.
- Click Browse. The Data Type Selection window opens.
- Select InvalidRequest, then click OK.
- Continue adding activities to your fault handler.
- On the toolbar, click the Save button .


Adding activities to the fault handler
Add to the fault handler of your process the activities that are listed in the following table:
| Parent Activity | Activity Name | Activity Type | Symbol |
|---|---|---|---|
| error | HandleFault | Snippet | |
| error | ReplyFault | Reply | |
Complete the implementation of the HandleFault activity by adding the following Java code:
String msg = Error.getString("message");
//initialize the Output variable:
BOFactory factory = (BOFactory)ServiceManager.INSTANCE.locateService("com/ibm/websphere/bo/BOFactory");
Output = factory.createByType( getVariableType( "Output") );
//assign a value to the Output variable:
Output.setString("information",msg);
System.out.println(msg);
Complete the implementation of the ReplyFault activity with the settings that are listed in the following table:
| Name | Partner | Interface | Operation | Use Data Type Variables | Response |
|---|---|---|---|---|---|
| ReplyFault | Client | TravelBooking | book | No | Output |
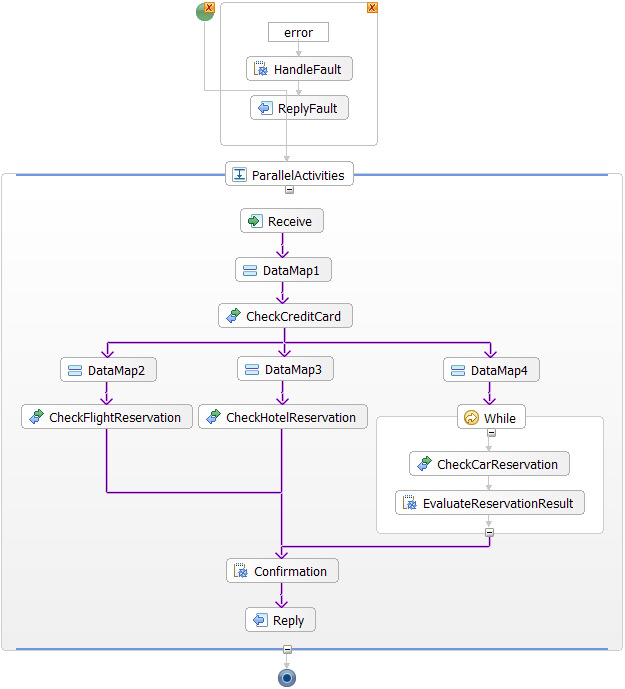
The completed business process with the added fault handler now looks like this:
Module assembly
To finish the implementation of the travel booking process, you have to create the module assembly. Complete the following steps:
- In the Business Integration view, double-click TravelBooking > Assembly Diagram. The assembly editor opens.
- Drag the TravelBooking process from the Business Integration view to the assembly editor.
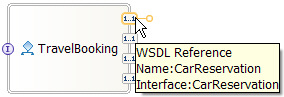
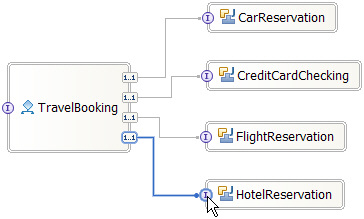
- Hover with the mouse pointer over the reference sections of the TravelBooking component to view the required references.
- For each reference section of the process component, drag the reference handle to the interface section of the corresponding Java component.
- On the toolbar, click the Save button .
Export process application
To create an installable application, complete the following steps:
- Switch to the Business Integration view.
- In the navigation tree, right-click the TravelBooking module.
- From the pop-up menu, select Export. The Export window opens.
- In the Export window, select J2EE > EAR file.
- Click Next.
- In the EAR application field of the EAR Export panel, select TravelBookingApp.
- In the Destination field, specify your destination directory.
- Click Finish.