This section shows how you can
- create resources on WebSphere Process Server,
- import prepared sample projects,
- create an SCA export with JMS binding,
- add resource references to the client application.
Create resources on WebSphere Process Server
To run the sample, you have to create JMS resources on the WebSphere Process Server: destinations, queues, connection factory and an activation spec for the message driven bean.
Destinations
To create the destinations, follow theses steps:
- Switch to the Administrative Console of your WebSphere Process Server.
- In the navigation pane of the administrative console, expand Service integration.
- Click Buses. The Buses page is displayed. In the Buses page, You should see the default Service Integration Bus (SIB) for SCA services created during installation named SCA.APPLICATION.<cell name>.Bus.
- Click SCA.APPLICATION.<cell name>.Bus.
- Under Additional properties, click Destinations. The Destinations page is displayed.
- Click New.
- Select Queue as destination type, then click Next.
- In the Identifier field, enter
JMSSample, then click Next. - Accept the default value for Bus member, then click Next.
- Click Finish. The destination will be created.
- Repeat steps 6 to 10 twice, to create destinations
JMSSampleReplyandJMSSampleCorrelation. - Click Save under Messages to save to the master configuration.
- Click save to confirm.
The following image shows the Destinations page with the three new destinations:

Queues
To create the JMS queues, follow these steps:
- Switch to the Administrative Console of your WebSphere Process Server.
- In the navigation pane of the administrative console, expand Resources > JMS Providers.
- Click Default messaging. the Default messaging provider page is displayed.
- Under Scope, select Server: server1, then click Apply.
- Under Destinations, click JMS queue. The JMS queue page is displayed.
- Click New.
- In the Name field, enter
JMSSample. - In the JNDI name field, enter
jms/JMSSample. - Under Connection, select SCA.APPLICATION<cell name>.Bus as Bus name.
- As Queue name, select JMSSample.
- Click Apply.
- Repeat steps 6 through 11 with name
JMSSampleReplyand JNDI name,jms/JMSSampleReply, select Queue name JMSSampleReply. - Repeat steps 6 through 11 with name
JMSSampleCorrelationand JNDI name,jms/JMSSampleCorrelationselect Queue name JMSSampleCorrelation. - Click Save under Messages to save to the master configuration.
- Click save to confirm.
The following image shows the JMS queue page with the three new queues:

Queue connection factory
To create the queue connection factory, follow these steps:
- Switch to the Administrative Console of your WebSphere Process Server.
- In the navigation pane of the administrative console, expand Resources > JMS Providers.
- Click Default messaging. the Default messaging provider page is displayed.
- Under Scope, select Server: server1, then click Apply.
- Under Connection Factories, click JMS queue connection factory. The JMS queue connection factory page is displayed.
- Click New.
- In the Name field, enter
JMSSampleReplyQCF. - In the JNDI name field, enter
jms/JMSSampleReplyQCF. - Under Connection, select SCA.APPLICATION<cell name>.Bus as Bus name.
- Click OK.
- Click Save under Messages to save to the master configuration.
- Click save to confirm.
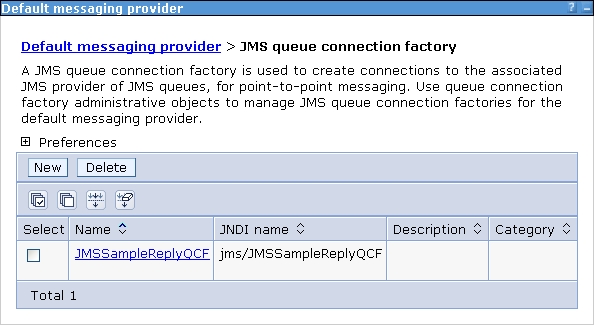
The following image shows the JMS queue connection factory page with the new queue connection factory:
Activation spec
To create the activation specification, follow these steps:
- Switch to the Administrative Console of your WebSphere Process Server.
- In the navigation pane of the administrative console, expand Resources > JMS Providers.
- Click Default messaging. the Default messaging provider page is displayed.
- Under Scope, select Server: server1, then click Apply.
- Under Activation Specifications, click JMS activation specification. The JMS activation specification page is displayed.
- Click New.
- In the Name field, enter
JMSSampleAS. - In the JNDI name field, enter
jms/JMSSampleAS. - Under Destination, enter
jms/JMSSampleas Destination JNDI name. - For Bus name, select SCA.APPLICATION<cell name>.Bus.
- Click OK.
- Click Save under Messages to save to the master configuration.
- Click save to confirm.
The following image shows the JMS activation specification page with the new activation specification:

Summary
The resources listed in the following table have been created on your WebSphere Process Server:
| Resource type | Resource name | JNDI name |
|---|---|---|
| Destination | JMSSample | |
| Destination | JMSSampleReply | |
| Destination | JMSSampleCorrelation | |
| JMS queue | JMSSample | jms/JMSSample |
| JMS queue | JMSSampleReply | jms/JMSSampleReply |
| JMS queue | JMSSampleCorrelation | jms/JMSSampleCorrelation |
| JMS queue connection factory | JMSSampleReplyQCF | jms/JMSSampleQCF |
| JMS activation specification | JMSSampleAS | jms/JMSSampleAS |
Import prepared sample projects
A project interchange file with prepared sample projects is available in the Download section. These projects contain the sample process and the client application, but without the required bindings. These bindings will be added in the following chapters.
To load the prepared projects into WebSphere Integration Developer, follow these steps:
- Download JMSSamplePrepared.zip file, and save it to a temporary directory.
- Switch to WebSphere Integration Developer.
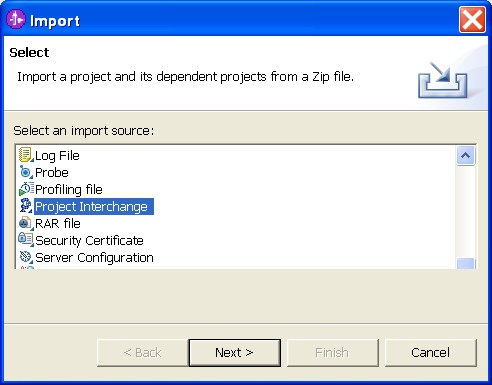
- From the menu, select File > Import. The Import window opens.
- Select Project Interchange.
- Click Next. The Import Project Interchange Contents window opens.
- Click Browse next to From zip file.
- Browse to the temporary directory. Select JMSSamplePrepare.zip, and click Open.
- Select your workspace directory as your Project location root.
- Click Select All.
- Click Finish.
- Wait until the automatic build process has finished.
Create an SCA export with JMS binding
To export the JMS sample process as SCA Service with a JMS binding, complete the following steps:
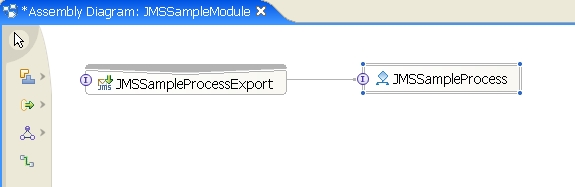
- Switch to the Assembly Diagram: JMSSampleModule.
- In the assembly editor, right-click JMSSampleProcess.
- From the pop-up menu, select Export > JMS Binding.
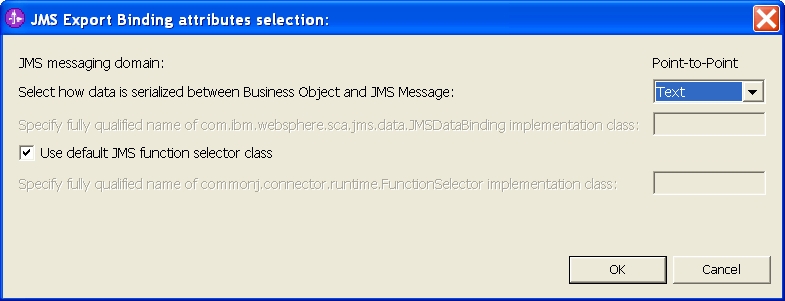
- For serialization method, select Text.
- Click OK.
- On the toolbar, click the Save button
 .
.

The JMS Export Binding attributes selection window opens.
The export has been added:
To update the bindings to resources on WebSphere Process Server, complete the following steps:
- In the assembly editor, click JMSSampleProcessExport.
- Switch to the Properties view, then click the Binding tab.
- Under Connection, enter
jms/JMSSampleASfor the JNDI Lookup Name for the activation specification. - Under Response Connection, enter
jms/JMSSampleReplyQCFfor the JNDI Lookup Name for the managed connection factory. - Ensure, that com.ibm.websphere.sca.jms.data.impl.JMSDataBindingImplXML is selected for Data Type.
- Select JMS Destinations tab:
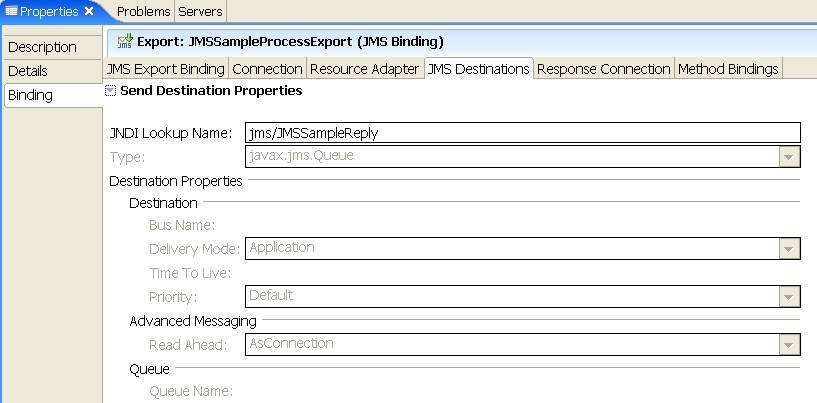
- Expand Send Destination Properties.
- In the JNDI Lookup Name field, enter
jms/JMSSampleReply. - Leave the other values unchanged.
- Expand Receive Destination Properties.
- In the JNDI Lookup Name field, enter
jms/JMSSample. - Leave the other values unchanged.
- Expand Callback Destination Properties.
- In the JNDI Lookup Name field, enter
jms/JMSSampleCorrelation. - Leave the other values unchanged.
- On the toolbar, click the Save button .
The binding properties are displayed:

Now, the JMS Export Binding page looks like:


The send destination properties look like:
Add resource references to the client application
To update the client application to resources on WebSphere Process Server, complete the following steps:
- Switch to the J2EE perspective.
- Expand Dynamic Web Projects > JMSClient.
- To open the deployment descriptor, double-click Deployment Descriptor: JMSClient.
- Click the References tab.
- Click Add.
- Select Resource Reference, then click Next.
- In the Name field, enter
jms/JMSSampleQCFRef. - For Type, select javax.jms.QueueConnectionFactory.
- For Authentication, select Container.
- Click Finish.
- Under WebSphere Bindings, enter
jms/JMSSampleReplyQCFin the JNDI name field: - Click Add.
- Select Resource Reference, then click Next.
- In the Name field, enter
jms/JMSSampleRef. - For Type, select javax.jms.Queue.
- For Authentication, select Container.
- Click Finish.
- Under WebSphere Bindings, enter
jms/JMSSamplein the JNDI name field. - Click Add.
- Select Resource Reference, then click Next.
- In the Name field, enter
jms/JMSSampleReplyRef. - For Type, select javax.jms.Queue.
- For Authentication, select Container.
- Click Finish.
- Under WebSphere Bindings, enter
jms/JMSSampleReplyin the JNDI name field. - On the toolbar, click the Save button .
The Reference page is displayed.

The Add reference wizard opens:

The Resource Reference page is displayed:

A new resource reference has been added:


Three resource references have been added:
