This section describes the steps how to generate a most simple J2EE client which makes use of the Web services API delivered with the WebSphere Process Server. This client will just display the list of Business Processes installed on your WebSphere Process Server.
In detail, in this section the following steps are described:
- Enable the required capabilities in your WebSphere Integration Developer.
- Export the required WSDL files from your WebSphere Process Server.
- Create a new Web project.
- Generate the Web services proxy.
- Create a simple Web application.
- Enforce authentication for the Web application.
- Enable Web services security.
Prepare your WebSphere Integration Developer
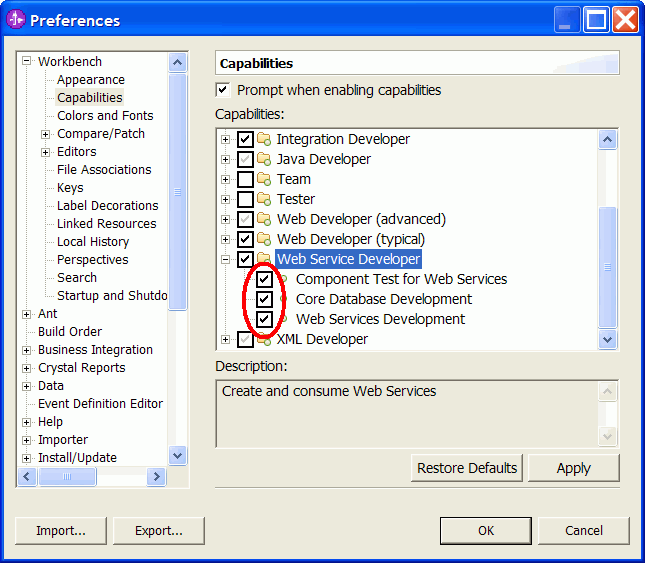
To work with Web services and J2EE applications, you have to enable some WebSphere Integration Developer capabilities which are not enabled by default.
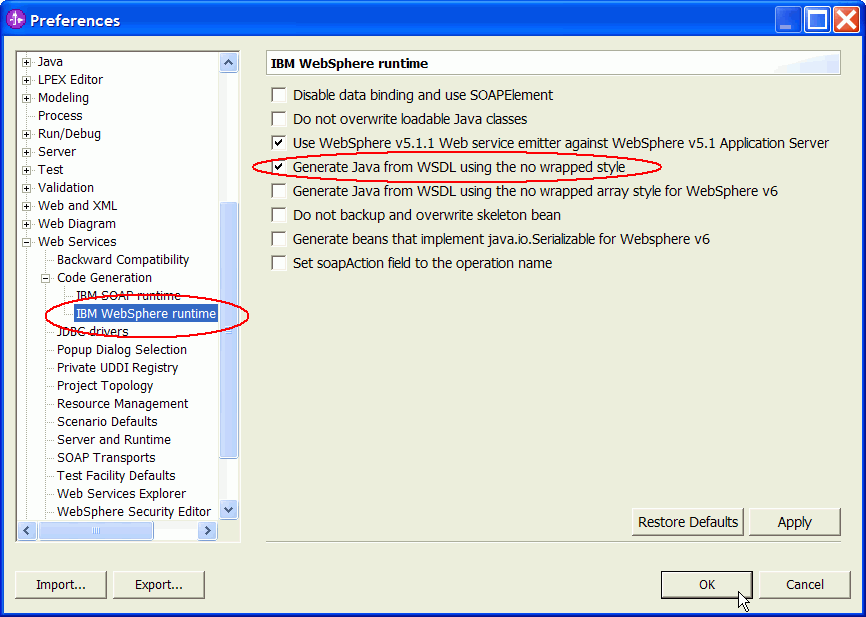
In addition, you have to adjust one option responsible for the way how the Java Proxy is generated from Web Services Description (WSDL) files.
To enable the required capabilities, follow these steps:
- From the Menu, select Window > Preferences.
- In the Preferences window, expand Workbench.
- Click Capabilities.
- Enable Advanced J2EE capabilities.
- Scroll down and enable Web Service Developer capabilities.
- Click OK.
- From the Menu, select Window > Preferences again. Now the section Web Services is shown.
- Expand Web Services > Code Generation.
- Select IBM WebSphere runtime.
- Enable Generate Java from WSDL using the no wrapped style.
- Click Ok.
Export WSDL files from WebSphere Process Server
In this section, we export the Web Services Description files (WSDL files) from the server on which we want to call the Web services interface later.
Note: During this sample, we restrict ourselves to the Business Flow Manager API (BFM API) which can be used to interact with the BPEContainer. If you rather want to use the Human Task Manager API (HTM API) which can be used to interact with the TaskContainer, all steps are conceptually similar, but you will export the WSDL files from the TaskContainer application instead.
To export the WSDL files for the BFM API, follow theses steps:
- Make sure your WebSphere Process Server is started.
- In a browser, open the administrative console. The default URL is
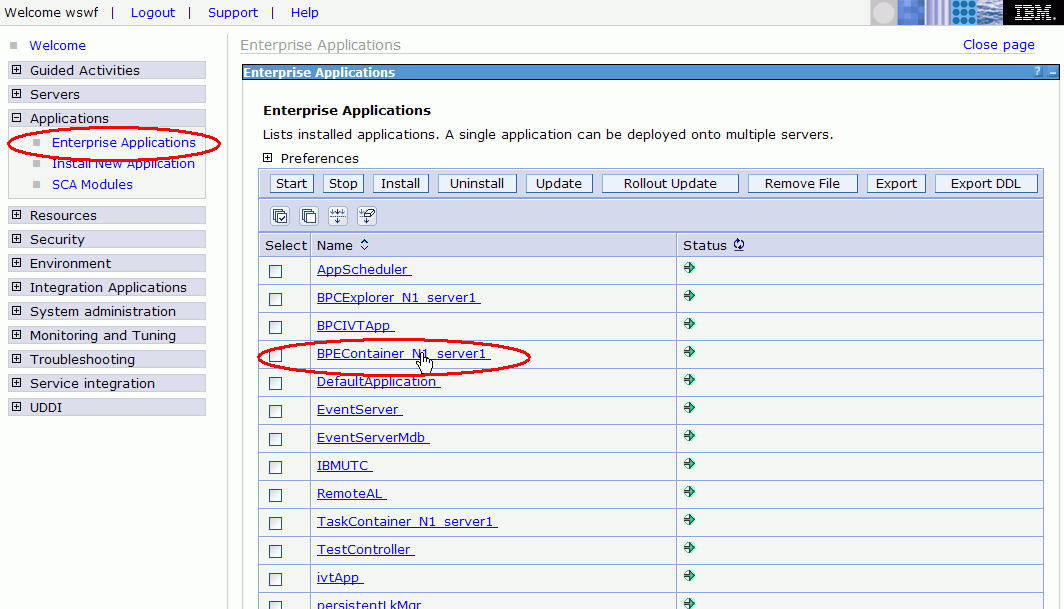
http://localhost:9060/admin. - In the navigation pane, select Applications > Enterprise Applications.
- Locate the application named
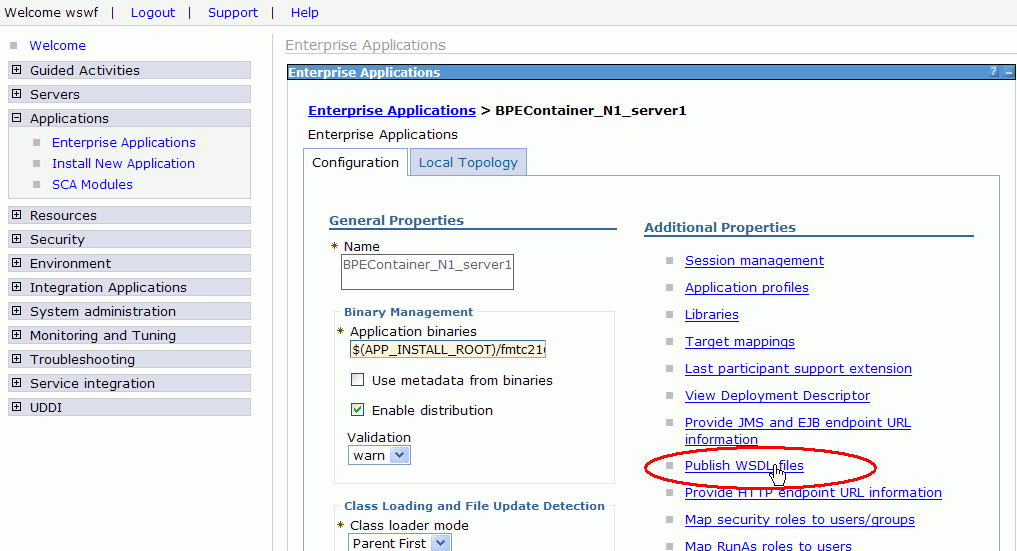
BPEContainer_{your_nodename}_server1 and click on this application name. - The configuration page for this application appears:
- Click on Publish WSDL files.
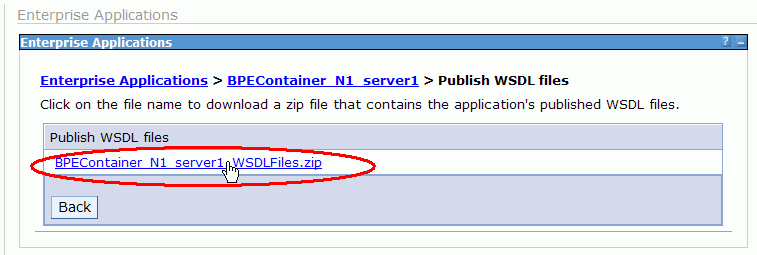
- A page for downloading a zip file appears:
- Click on the zip file name and save this zip file to a directory of your choice, for example
C:\temp\. - Using the unzip program of your choice, extract all the files inside this zip file, for example again into directory
C:\temp\. - In the subdirectory
BPEContainer_{your_nodename}_server1.ear you will find a nested directory tree; you will import the wsdl subtree into your Web Project later.
Create a new Web Project
We will create a simple Web client which uses the Web services interface. To do this, we first create the Web project named WebServiceClient. Follow these steps:
- Switch to the J2EE perspective. To switch to the J2EE perspective, select Window > Open Perspective > Other from the Menu. In the Select a Perspective dialog, mark Show all, then select J2EE, then click OK.
- In the Project Explorer, right-click Dynamic Web Projects.
- From the pop-up menu, select New > Dynamic Web Project.
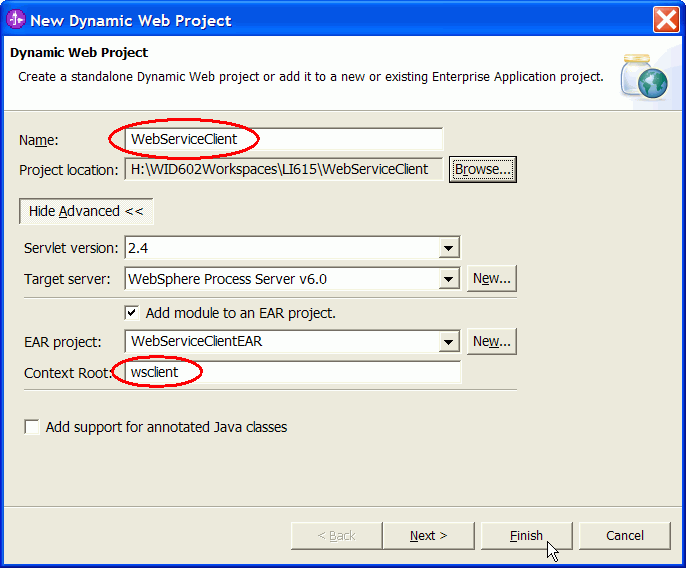
- In the New Dynamic Web Project window, enter
WebServiceClientas value for Name. - Click Show Advanced.
- In the Context Root field, enter
wsclient. - For all other fields, accept the default values.
- Click Finish.
- If the Confirm Perspective Switch dialog appears, click No.
Create the Web services Proxy
Import WSDL files
In this section, we use the Web Services description files (WSDL) which we unzipped earlier, to prepare the generation of the Java proxy. Later on, we can use Java methods to call the Web service operations in our client code.
First, we import the WSDL files to the Web project. Do the following steps:
- Switch to the J2EE perspective.
- In the Project Explorer, expand Dynamic Web Projects.
- Right-click your project WebServiceClient and select Import > Import.
- In the Import window, select File system and click Next.
- Next to the From directory field, click Browse.
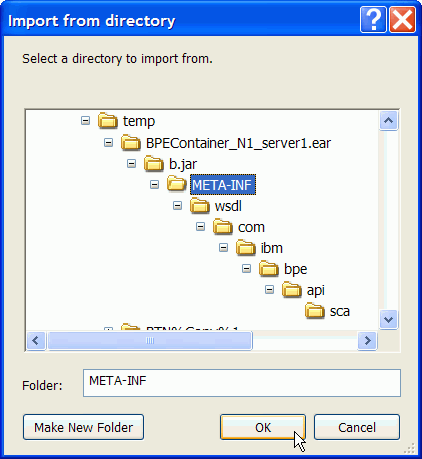
- In the Import from directory window, navigate to the directory which you have used in the section "Export WSDL files from WebSphere Process Server" above, for example
C:\temp\. - In the Import from directory window, further navigate to the subdirectory
BPEContainer_{your_nodename}_server1.ear\b.jar\META-INF : - With the META-INF directory selected, click OK.
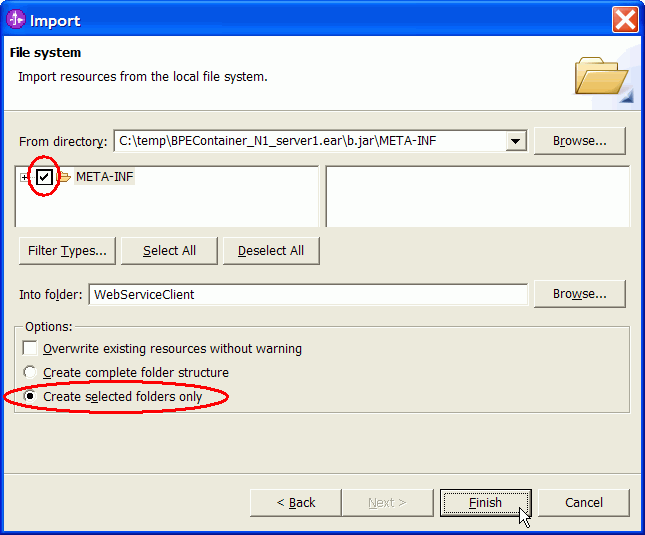
- In the Import window, check the checkbox next to META-INF subdirectory and make sure that the radio button is switched to Create selected folders only. The dialog window looks like this:
- Click Finish. This will create the folder wsdl and a subdirectory tree in your Web project.
Create Java Proxy
Next, we create a Java proxy from the imported WSDL files.
Note: Before performing the following steps, make sure that server WebSphere Process Server v6.0 is started.
Do the following steps:
- Switch to the J2EE perspective.
- In the Project Explorer, expand Dynamic Web Projects > WebServiceClient > wsdl > com > ibm > bpe > api > sca.
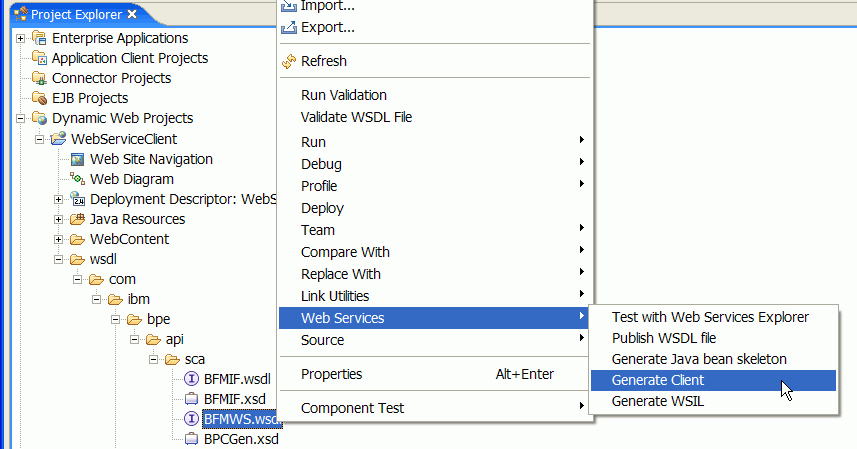
- Right-click on the file BFMWS.wsdl and select Web Services > Generate Client.
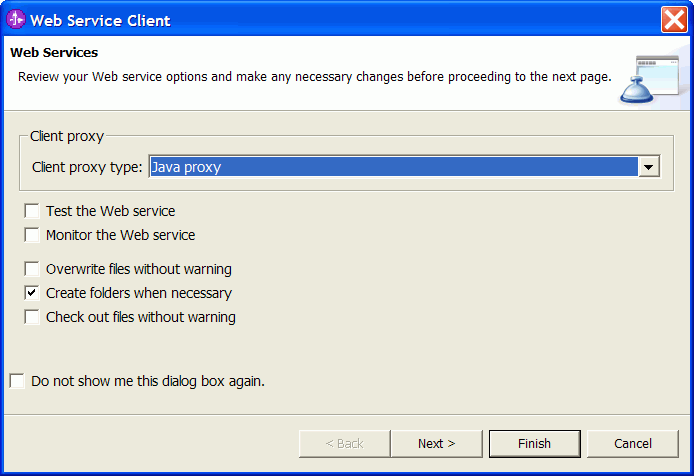
- Make sure the checkbox Create folders when necessary is checked and click Next.
- Accept the defaults on the Web Service Selection Page and click Next.
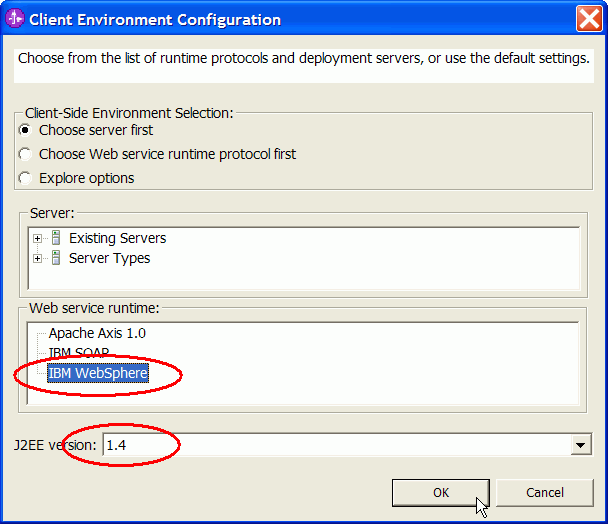
- In the Client Environment Configuration window, select Edit.
- As Web service runtime, select IBM WebSphere and as J2EE version select 1.4.
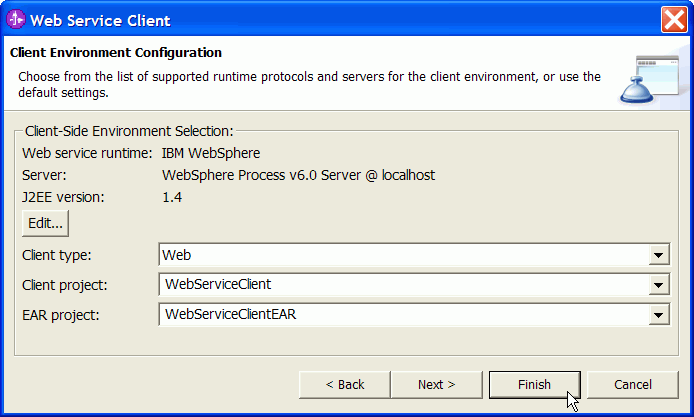
- Click OK. This will update the settings in the Web Service Client window similar to this:
- Click Finish. This will contact the server and generate several files in the Java Resources subdirectory.
- If prompted, allow to overwrite the file web.xml.
Now, the Java proxy has been generated, and the application WebServiceClientEAR has automatically been published to the server.
Create a simple Web Application
In this section, we create a very simple Web application, consisting of one HTML page and one Java Server Page (JSP).
Create a HTML page
Complete the following steps:
- Switch to the J2EE perspective.
- Switch to the Project Explorer view.
- In the navigation tree, expand Dynamic Web Projects.
- Right-click WebServiceClient and select New > HTML/XHTML File.
- In the File Name field, enter
index.htmland click Finish. The Page Designer window opens. - From the tabs [Design, Source, Preview] select the Source tab.
- Replace the default code by the following code:
- On the toolbar, click the Save button
 .
.
<!DOCTYPE HTML PUBLIC "-//W3C//DTD HTML 4.01 Transitional//EN">
<HTML>
<HEAD>
<META http-equiv="Content-Type" content="text/html; charset=ISO-8859-1">
<META name="GENERATOR" content="IBM Software Development Platform">
<META http-equiv="Content-Style-Type" content="text/css">
<LINK href="theme/Master.css" rel="stylesheet" type="text/css">
<TITLE>index.html</TITLE>
</HEAD>
<BODY style="background-color:#FFFFFF">
<CENTER>
<H1>Web Service API - Sample</H1>
<HR width="100%">
<BR><BR><BR>
<BR>Please press the button to see all process templates installed on the server:
<FORM action="invoke.jsp" method ="get">
<INPUT type="submit" value="List process templates"></FORM>
</CENTER>
</BODY>
</HTML>
The important code snippet here is the <FORM> element which triggers a call to the JSP which we will define next.
Create a JSP page
- In the navigation tree, right-click WebServiceClient and select New > JSP File.
- In the File Name field, enter
invoke.jspand click Finish. A Page Designer window opens. - From the tabs [Design, Source, Preview] select the Source tab.
- Just before the first <META> element insert the following line:
- In addition, replace the default <BODY>...</BODY> code by the following code snippet:
- On the toolbar, click the Save button
 .
.
<jsp:useBean id="MyBFMAccess" class="com.ibm.www.BFMIFProxy"></jsp:useBean>
This line allows to use the generated Java proxy in the following code.
<BODY>
<CENTER>
<H1>Web Service API - Sample</H1>
<HR width="100%"><BR><BR>
<%
try {
com.ibm.www.QueryProcessTemplates parameters = new com.ibm.www.QueryProcessTemplates();
com.ibm.www.QueryProcessTemplatesResponse bfmResponse = MyBFMAccess.queryProcessTemplates(parameters);
com.ibm.www.ProcessTemplateType[] templates = bfmResponse.getProcessTemplate();
if (templates == null || templates.length == 0) {
out.println("No process templates found on server.");
} else {
out.println(templates.length +" process template(s) found, details following:<BR><BR>");
out.println("<TABLE border='2'>");
out.println("<TR><TD><B>Name</B></TD><TD><B>Auto-delete</B></TD><TD><B>Long running</B></TD></TR>");
for (int i=0; i<templates.length;i++) {
out.println("<TR>");
out.println("<TD>" + templates[i].getName() + "</TD>");
out.println("<TD>" + templates[i].isAutoDelete() + "</TD>");
out.println("<TD>" + templates[i].getExecutionMode() + "</TD>");
out.println("</TR>");
} // end for
out.println("</TABLE>");
} // end if
} catch (Exception e) {
out.println("Error while doing call: "+e);
}
%>
<BR><BR><A href="index.html" target="_self">BACK</A>
</CENTER>
</BODY>
This code shows just the usage of one of the Web service operations, namely the queryProcessTemplates() operation.
Click on the links to see the complete source code of index.html and invoke.jsp.
A more comprehensive sample application consisting of the files startprocess.html, startprocess.jsp, and viewprocess.jsp is discussed in the further chapters of this sample, Code Review and Run the sample.
Enforce Authentication for the Web Application
In this section we add configuration information to the Web application, so all users using this Web application are enforces to authenticate prior to using the authentication. This is a prerequisite to use the Web services interface (which is a secured interface).
Create a new J2EE role
First, in our Web project we define our own J2EE role which represents the authorisation to access our pages. Follow these steps:
- Switch to the J2EE perspective.
- Switch to the Project Explorer view.
- In the navigation tree, expand Dynamic Web Projects > WebServiceClient.
- Right-click Deployment Descriptor: WebServiceClient and select Open With > Deployment Descriptor Editor.
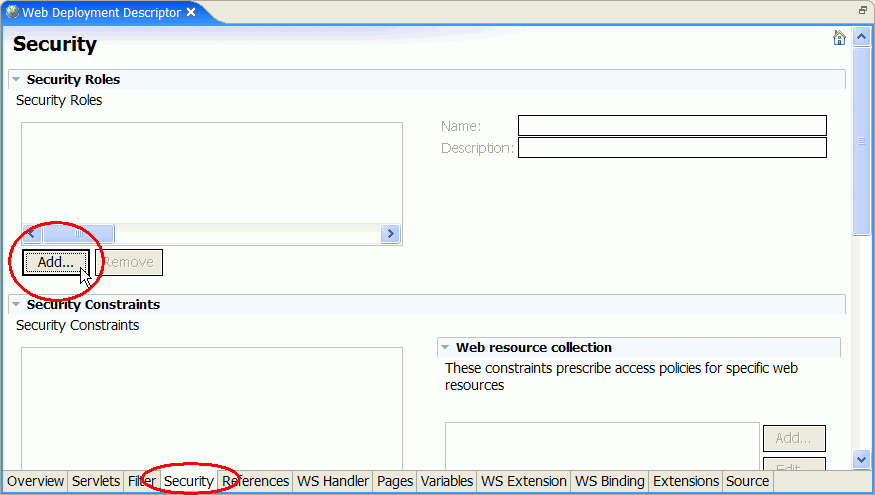
- In the editor select the Security Tab.
- In the Security Roles section, click Add.
- As Name, enter
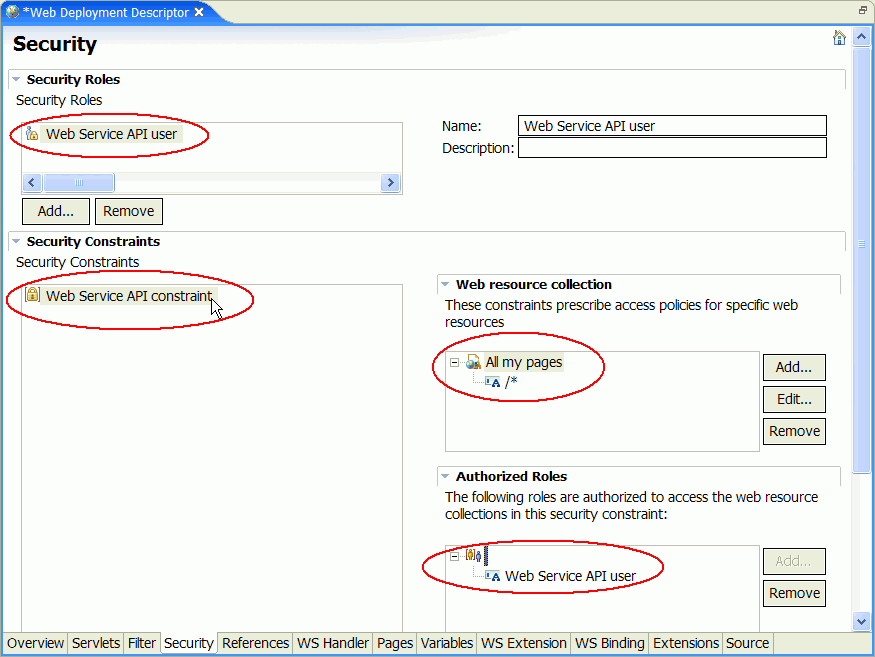
Web Service API userand click Finish. - Down in the Security Constraints section, in the lower left corner, click Add to add a new security constraint.
- As Constraint name, enter
Web Service API constraintand click Next. - As Resource name, enter
All my pages. - For entering the Pattern, click Add and enter the wildcard pattern
/*to cover all pages. - Click Finish.
- In the subsection Authorized Roles click Add to associate the new resource to the new J2EE role.
- Check the checkbox next to Web Service API user and click Finish.
- On the toolbar, click the Save button
 and close the Deployment Descriptor editor.
Your security settings should now look similar to this:
Map J2EE role to users
Next, in our application project we define that "all authenticated users" (and thus only authenticated users) are allowed to impersonate our new J2EE role. Follow these steps:
- Switch to the J2EE perspective.
- Switch to the Project Explorer view.
- In the navigation tree, expand Enterprise Applications > WebServiceClientEAR.
- Right-click Deployment Descriptor: WebServiceClientEAR and select Open With > Deployment Descriptor Editor.
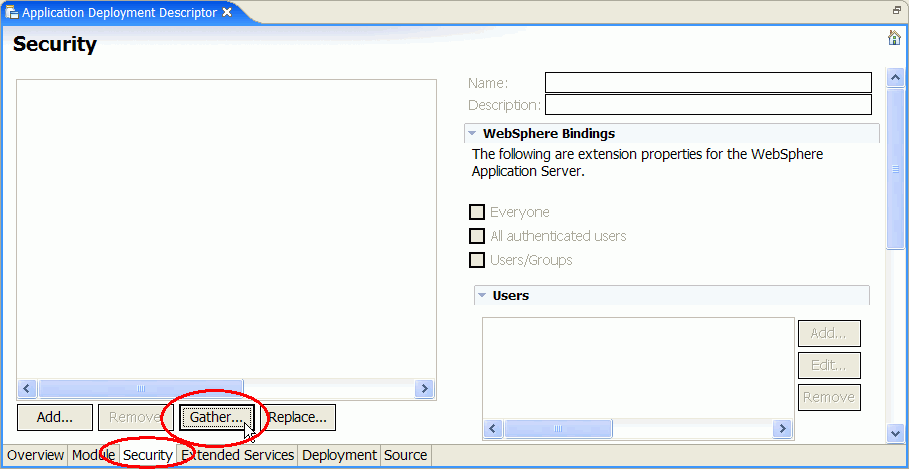
- In the editor, select the Security Tab.
- Click Gather to get a complete list of all J2EE roles defined in all modules inside this EAR project (in this sample just one role) .
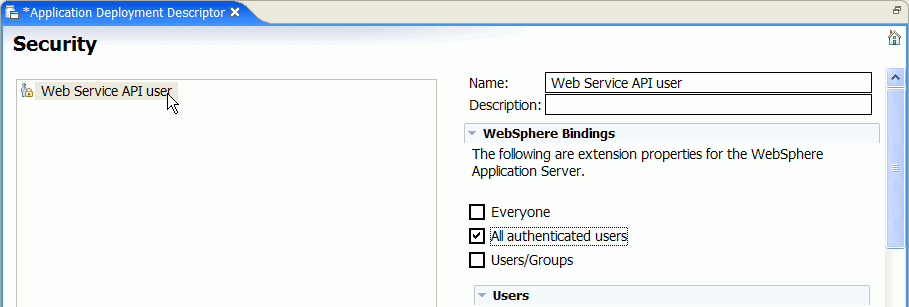
- Select the Web Service API user role in the list to enable the checkboxes.
- Check the checkbox All authenticated users.
- On the toolbar, click the Save button
 .
.
Your security settings should now look similar to this:
Due to the changes made in this section, the first request to a page of this Web application will automatically include a login dialog.
Enable Web Services Security
In this section we make sure that the credentials from the login dialog are passed properly to the secured Web services interface.
Follow these steps:
- Switch to the J2EE perspective.
- Switch to the Project Explorer view.
- In the navigation tree, expand Web Services > Clients.
- Right-click WebServiceClient: service/BFMWSService and select Open With > Deployment Descriptor Editor.
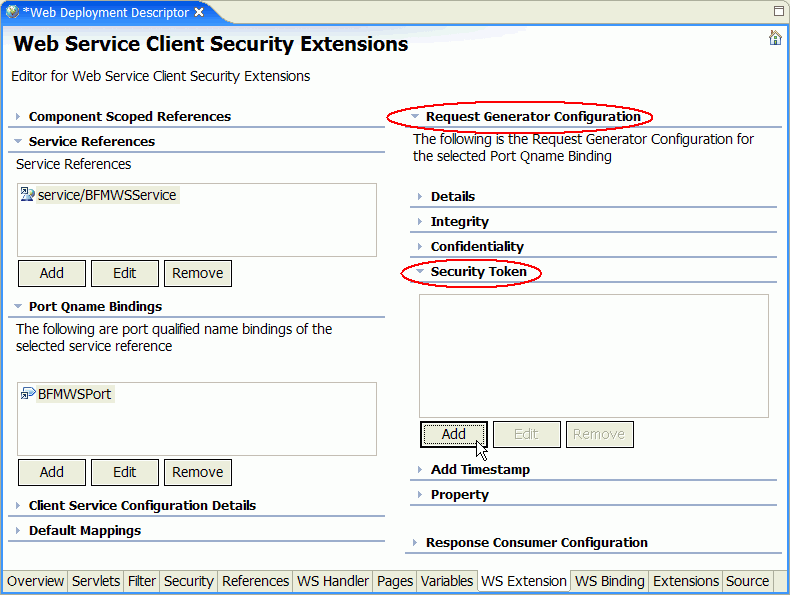
- In the editor select the WS Extension Tab.
- Make sure that service/BFMWSService is added to the Service References List.
- Make sure that BFMWSPort is selected in the Port Qname Bindings list.
- Expand Request Generator Configuration > Security Token and click Add.
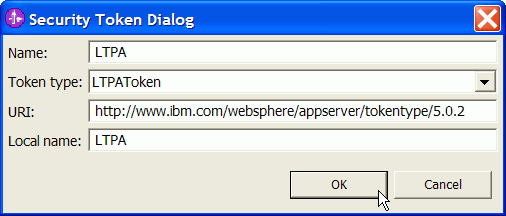
- In the dialog window, as the Name, enter
LTPA. - As token type, select LTPAToken, click Ok.
- In the editor select the WS Binding Tab.
- Make sure that service/BFMWSService is added to the Service References List.
- Make sure that BFMWSPort is selected in the Port Qualified Name Binding list.
- Expand Security Request Generator Binding Configuration > Token Generator and click Add.
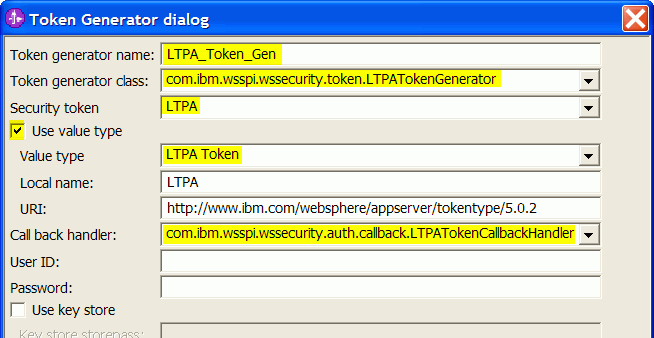
- Complete the Token Generator dialog:
- For Token generator name, specify
LTPA_Token_Gen. - For Token generator class, select com.ibm.wsspi.wssecurity.token.LTPATokenGenerator.
- For Security token, select LTPA.
- Check Use value type.
- For Value type, select LTPA Token.
- For Call back handler, select com.ibm.wsspi.wssecurity.auth.callack.LTPATokenCallbackHandler.
- Click OK.
- For Token generator name, specify
- On the toolbar, click the Save button
 .
.
Now you have made sure that your client will pass an LTPA token to the Web services interface.
Note that no further coding for accessing and examining the LTPA token is needed from your side, this is all done for you automatically by the WebSphere infrastructure.
For more details about securing Web services, you may refer to the developerWorks article http://www.ibm.com/developerworks/websphere/techjournal/0607_desprets/0607_desprets.html.
Next, you can do the export, deployment, and test of the application as described in detail in the Getting Started > Hello World sample.