To get started, open IBM Process Designer,
and import the *.twx file named:
BPMN20_Samples -
LaptopOrder_-_ad-hoc_adv_START.twx
We will explore two options with respect to
allow the cancellation or modification of the laptop order exploiting the
ad-hoc events. The first option is already created, and ready for execution.
After you have imported the *.twx file, open
the process application in Process Designer:

Let’s first have a look at Option 1:
In IBM Process Designer, click on processes,
and open the process named ‘LaptopOrder_EditAndFile’:

Look at the BPD. The swimlane at the bottom
is named ‘ad-hoc Actions’ and comes with two ad-hoc events.
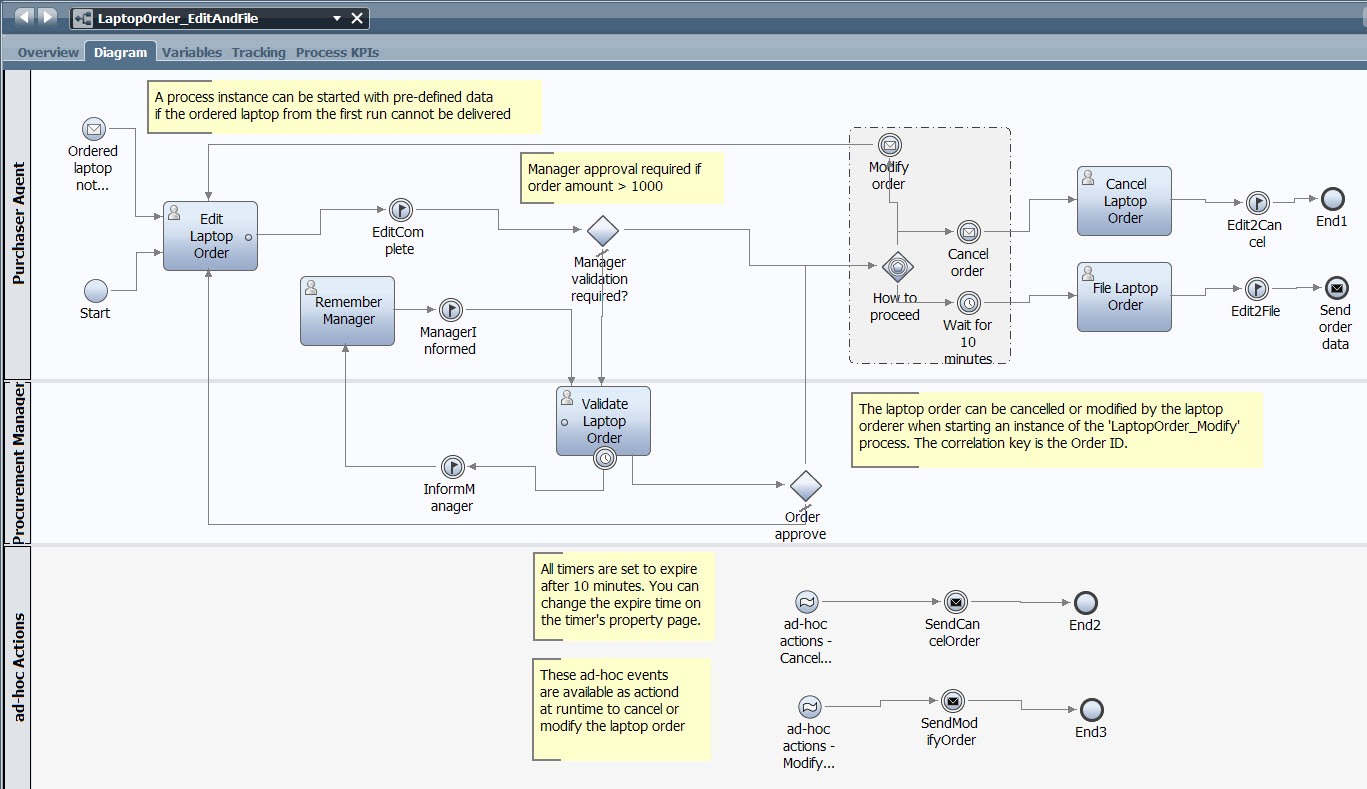
Click on the ad-hoc event named ‘ad-hoc
actions - Cancel Laptop Order’ and look at the properties. All you need to
specify for the ad-hoc event is its type, done on the implementation tab of the
start event. (Actually you are creating an ad-hoc start event by taking a start
event from the palette, then you are change the start event’s type to ‘ad-hoc
start event’ offered on the start event’s implementation tab.

This is it. Now you can start additional
process tasks, or anything else once this process instance is running.
Now, once the ad-hoc start events occurs, following the process flow, the following happens:
- If the ‘ad-hoc actions - Cancel Laptop Order’ event occurs, an intermediate message send event is created named ‘SendCancelOrder’ which is caught by the intermediated message receive event named ‘Cancel order’ modelled in the event gateway.
- If the ‘ad-hoc actions - Modify Laptop Order’ event occurs, an intermediate message send event is created named ‘SendModifyOrder’ which is caught by the intermediated message receive event named ‘Modify order’ modelled in the event gateway.
There is only
one disadvantage of this option 1, as well as with the ‘LaptopOrder_Modify’
scenario: In both cases, the cancellation or modifications are caught and
therefore consumed during the execution of the process instance once the event
gateway was reached by the process engine when navigating through the process
instance. This means e.g. that the procurement manager ‘Validate Laptop Order’
task is performed even if the purchaser agent has already cancelled is laptop
order. The process instance doesn’t simply know about the laptop order
cancellation, because the cancellation event is consumed after the ‘Validate
Laptop Order’ task is performed. This is not perfect, because there is no need
to perform a validation for an order that was already cancelled.
So while we can
simply offer actions on a process instance as shown here, the mechanism
presented in option 1 seeks for improvement.
Now, let’s have
a look at Option 2:
Now, you will
add BPMN objects to a BPD to implement option 2. To do so, open the BPD named
‘Int_LaptopOrder_EditAndFile’.

Look at the BPD:

This is almost the same process you are familiar from the BPD named ‘LaptopOrder_EditAndFile’, which two differences:
- The two tasks named ‘Validate Laptop Order’ and ‘Remember Manager’ are located in a subprocess task named ‘Validate Order’. This however has no effect on the execution of the business process.
- There are no ad-hoc tasks (yet)
Select a start event from the palette, and
drag and drop it to the ‘Ad-hoc Actions’ swimlane.

Go to the implementation tab of the start
event, and select ‘ad-hoc start event’ from the drop down list to specify the
start event type.

Rename the newly created ad-hoc start event ‘ad-hoc
actions - Cancel Laptop Order’.

Now switch to the ‘Pre and Post’ tab, and
click on the ‘+’ sign to add a Post Assignment.

Now you have an empty assignment line. Click
on the little icon, and from the list of available data elements select this
one: ‘tw.local.OrderProcessing.OrderCancelled’. Accept the selected operator, and enter
‘true’ on the right entry field. With that, we have specified the
‘OrderCancelled’ variable which is needed later.

Repeat these two steps to create a second
d-hoc start event named ‘ad-hoc actions - Modify Laptop Order’.

The post assignment to be added has to look
like the following:

This time, instead of adding the intermediate
message send events used in option 1, we will provoke an error event. From the
palette drag and drop an end event next to the ad-hoc start events.

Select the end event, switch to the
implementation tab, and select this to be an ‘Error’ event.

(There is no need to specify the error
exception details, as those are ignored until version 8). Name the error event
‘Ad-hoc End’

Now connect the ad-hoc start events with the
‘Ad-hoc End’ event.

Save your changes.
The error end event will simply terminate the
execution of the process instance. Now we need a mechanism to catch the error
in order to perform additional steps, in our case we need to handle the ad-hoc
actions done by the user.
From the palette, select an activity and drag
and drop it next to the ‘Ad-hoc End’ event.

Select the activity, and on the
implementation tab, make an activity of type ‘event subprocess’.

Name the event subprocess ‘Handle ad-hoc
events’.

There is no need to define additional
attributes for the event subprocess. Doubleclick in the event subprocess to see
and further specify its implementation.

First, change the upper swimlane to allow the
Purchaser Agent to perform tasks. Select the ‘Participant’ swimlane, from its
property page select the ‘Select’ button, then select ‘Purchaser Agent’ from
the list.

Name the swimlane ‘Purchaser Agent’.

Move the automatically created start and end
event down to the system swimlane.

Select the start event named ‘Handle ad-hoc
events_Start’, and look at the implementation tab to see that the event
subprocess will interrupt the execution of its parent process.

This is exactly what we want: The BPD ‘Int_LaptopOrder_EditAndFile’
is interrupted and no longer executed, and the event subprocess has to deal
with the correct completion of the process instance.
The event
subprocess has to handle two different events: The laptop order cancellation
request, and the laptop order modification request. The process variable ‘tw.local.OrderProcessing.OrderCancelled’ comes with all the information we need. To
evaluate the variable ‘tw.local.OrderProcessing.OrderCancelled’, add a decision node to the event
subprocess from the palette.

Name the gateway ‘Cancel?’.
Now drag and drop an activity from the
palette next to the gateway, and name it ‘Ad-hoc Cancel Order’.

Right click the activity to launch the
activity wizard.

On the activity wizard, select the activity
type to be a user task, click on ‘Attach an existing Service or Process’, click
on ‘Select’, select the second service named ‘Cancel Order’, then click
‘Finish’.

With this, if the user has selected the
ad-hoc action to cancel the order, the Order Cancel coach will be presented to
the user to confirm the cancellation. And in addition, we well see in the run
the sample section that the Cancel Order task is immediately available.
In case of the modification request, we will
simply launch a new process instance of the process named ‘Int_LaptopOrder_EditAndFile’
and reuse its already existing message start event named ‘Ordered laptop not
available’. (This does not reflect the real business reason for this process
instance creation, but for the sake of this sample it is fine.)
Select an
intermediate event from the palette and drag and drop it below the ‘Ad-hoc
Cancel Order’ task, and name it ‘ad-hoc Modify Order’.

Go to the
implementation tab and make this event a sending event:

For the message
trigger we have to select a UCA. Click on the ‘Select’ button and select the
UCA named ‘UCA_adhocModifyLaptop’

Now we need to
perform data mapping. Click on the data mapping tab, and select the ‘Order’
business object.

The intermediate
message send event is fully specified when you see this here:

Save your changes.
In order to allow to start a new instance of
the process named ‘Int_LaptopOrder_EditAndFile’ a message start event needs to be added to
the process listening to this message send event. In the ‘Int_LaptopOrder_EditAndFile’
process diagram, drag and drop a start event inbetween the existing start
events, name it ‘adhocModifyLaptop’, and take care that it is a message receive
start event.

On the
implementation tab, select the UCA named ‘UCA_adhocModifyLaptop’.

Data mapping has
to be done as well, perform the data mapping on the data mapping tab.

Save your changes.
In order to close the timing interval opened
with the ‘EditComplete’ tracking event, I want you to create a new tracking
event.
Drag and drop an intermediate event next to
the ‘Ad-hoc Cancel Order’ task, name it ‘Edit2Cancel’, and select ‘Tracking’
from the drop down list.
Save your changes. (If you don’t save your
work at this point, you won’t be able to select the tracking event in the next
steps…)

On the implementation tab, click select to
specify a tracking group, and select ‘EditAndFile_TrackingGroup’

The timing interval has yet to be specified.
On the left hand side, click on ‘Performance’, then on the ‘+’ sign, then click
on ‘Timing Interval’

Name the timing interval ‘Time2AdhocCancelRequest’
and click ‘Finish’

On the timing interval definition panel
select the start and end tracking event to specify the time interval using the
‘Add’ buttons.

Save your changes.
Now we need to
make the connections. Go back to the event subprocess BPD, and connect all BPMN
objects like this:

Now we need to
specify the conditions at the ‘Cancel?’ gateway.
Click on the
gateway and switch to the implementation tab. Click on the little icon next to
the left entry field and select the variable named ‘tw.local.OrderProcessing.OrderCancelled’.

Then select the ‘==’ operator, and enter its
value ‘false’.
When done, it will look like this:

Save your changes.
In addition, for
monitoring, the tracking information needs to be updated. Under File, click on
‘Update tracking definitions’.

Now, in order to
have the full chain of all message send and message receive events correct (for
the whole scenario), open the BPD named ‘LaptopOrder_EditAndFile’, and delete its
message start event named ‘Ordered laptop not available’. (Be sure to be in the
option 1 ‘LaptopOrder_EditAndFile’ BPD, and not in the option 2 ‘Int_LaptopOrder_EditAndFile’
BPD.)

With this change
in the ‘LaptopOrder_EditAndFile’ BPD we take care, that only always the option
2 ‘Int_LaptopOrder_EditAndFile’ BPD is started of the ordered laptop is not
available, which is evaluated in the BPD named ‘Int_LaptopOrder_EditAndFile’
Save your changes.
This is it. Your
BPD is ready for execution.