This part describes how to create an Advanced Integration Service (AIS) in IBM Process Designer (IPD), and how to implement the AIS in IBM Integration Designer (IID), and finally how to test what you have built.
The Advanced hiring sample is already completely implemented and ready for you to run it if you do not want to create and implement an AIS by yourself. So it is up to you to decide:
o If you want to run the sample immediately, move forward to the Run the Sample section in this document
o If you want to create and implement and test your own AIS, follow the steps described right here in the Build it Yourself section
In this sample, you will do the following:
-
Implement in IID the new Advanced Integration Service (AIS) created in IPD
-
Use the new AIS in IPD as implementation for an existing system task
Setup the tools to get started to build the sample
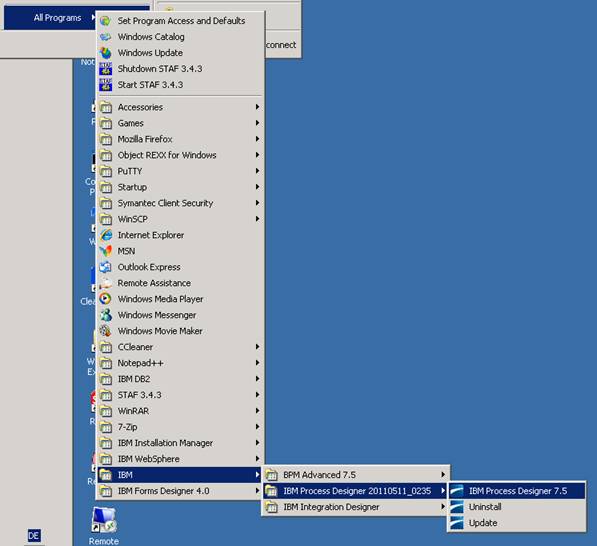
The sample requires first to start IPD, for example from the Windows program menu:
Before getting started, import the advanced-hiring-sample.twx into IBM Process Center.
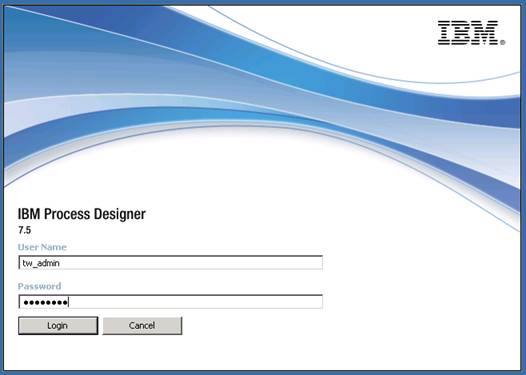
You are asked to logon (to IBM Process Center), enter tw_admin for userID and password.
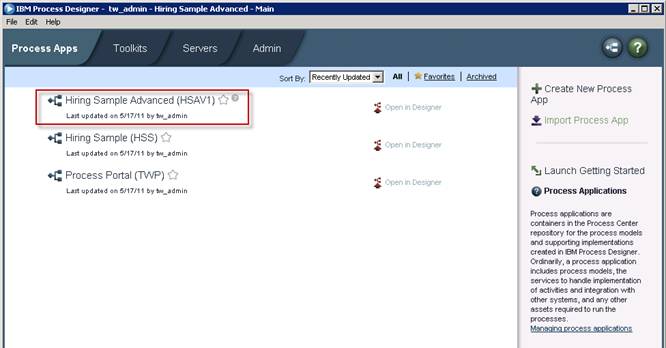
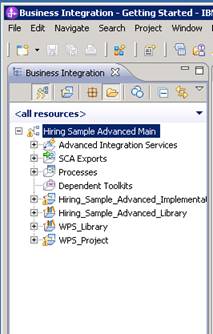
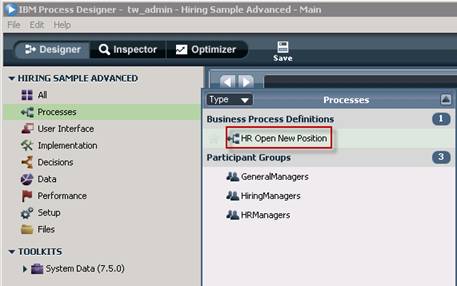
Once IPD is started, its Process Center view is opened, and if the advanced-hiring-sample.twx was already imported into IBM Process Center, you will see the Hiring Sample Advanced Process Application (PA) right here:
If you do not see the Hiring Sample Advanced PA, you need to import it.
Expecting that you have downloaded and saved the advanced-hiring-sample.twx from the download section here on the samples page to you local harddrive, perform the following steps to import the sample:
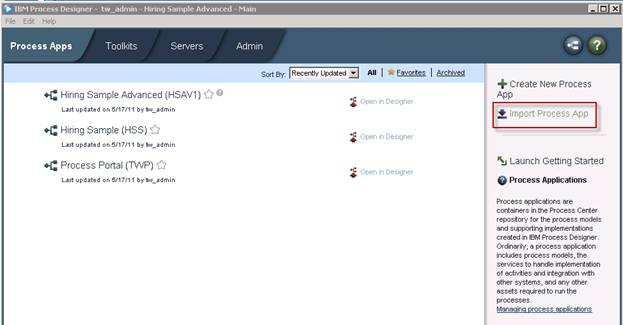
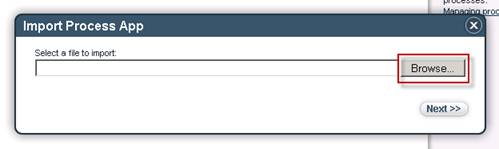
Import the
advanced-hiring-sample.twx by clicking on Import Process App:
Click on the browse button, select
the advanced-hiring-sample.twx from your local hard drive, and click
next:
The PA will be imported, and is then ready for you to be used in this exercise
There are multiple options to implement an AIS defined in IPD:
-
Option 1: An AIS created in IPD has to be implemented from scratch in IID (This is what you're doing here in the 'Build it Yourself' section.)
-
Option 2: An AIS created in IPD can be implemented with an existing implementation available in IID (You can read how this was done in the 'Explore List Sample' section.)
-
Option 3: An existing implementation in IID can be made visible to IPD and used in IPD immediately (In this case however, mediations may be required to map between input and output business objects used by the AIS)
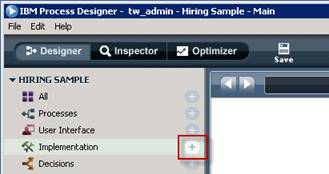
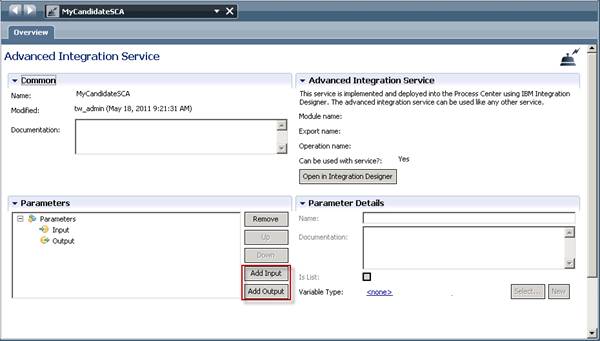
____ 1. Create a new Advanced Integration Service (AIS)
___a. Open the PA by clicking on Open in Designer, next to Hiring Sample Advanced

___b.
Move
the mouse over the Implementation folder and click on
the + sign:
___c.
Click
on Advanced Integration Service:
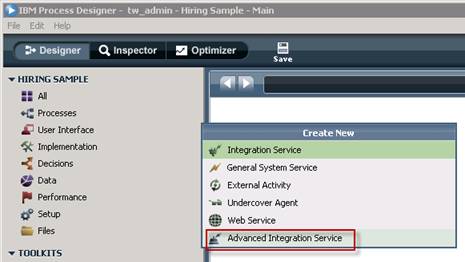 .
.
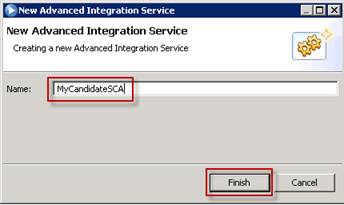
___d.
In the
New Advanced Integration Service dialog box, enter a
name (e.g.
MyCandidateSCA) for the new service, and click finish:
___e. In the definition dialog of the MyCandidateSCA you have to add the input business data object you pass to the service, and the output data object you retrieve from the service.
___f.
To add
the input business data object, click on Add input:
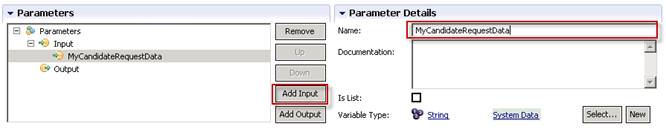
___g.
In the
Name filed, add a name for the input (e.g. MyCandidateRequestData):
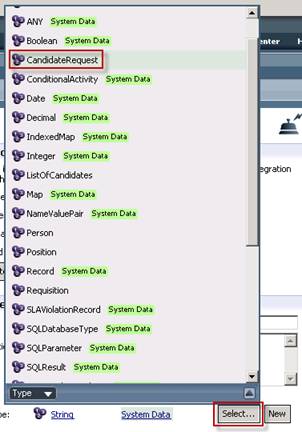
___h.
Now
click on Select to defined the data type of your input variable. Click on CandidateRequest
: 
___i.
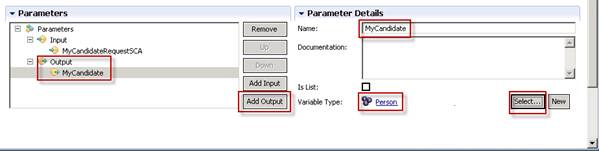
Repeat
the steps f to h to add an output named MyCandidate of type Person
___j.
Click
Save
___k. This is all what needs to be done in IPD at this time.
____ 2. Implement in IID the new Advanced Integration Service (AIS) created in IPD
___a. This newly created AIS is not implemented in IBM Integration Designer (IID).
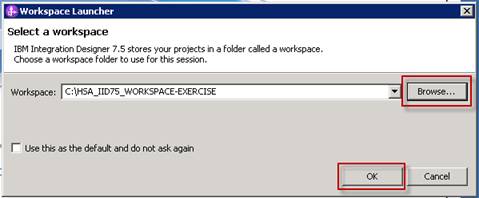
___b.
First
create a new empty directory that will be used to hold the projects workspace,
for the sake of the exercise, name it HSA_IID75_WORKSPACE-EXERCISE
(you can take any other name as well, but this is the workspace you
will have to open a few steps later)
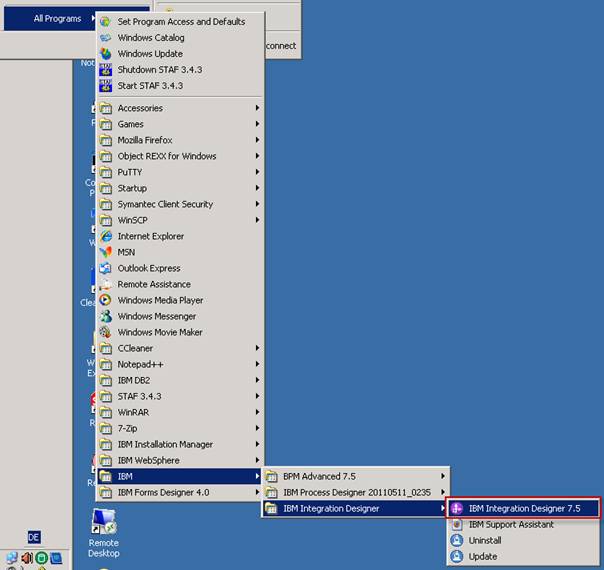
___c.
If IID
is not opened yet, open it from the windows menu, similar to this:
___d.
Select
the newly created directory as the workspace, and click OK:
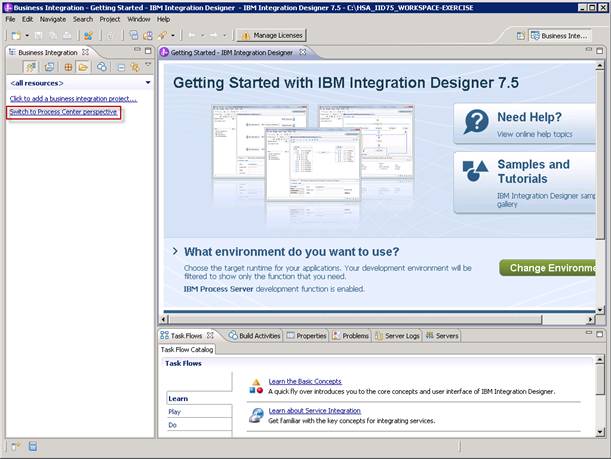
___e.
IID
opens the empty workspace presenting the getting started page. However, in v75,
IID can connect to IBM Process Center, which holds the Process Applications
designed in IBM Process Designer. To connect to IBM Process Center, click on Switch to Process Center Perspective:
___f.
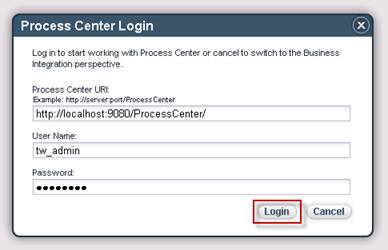
Enter
the IBM Process Center URL, and use tw_admin for userID and password. The
default IBM Process Center URL is the one shown here in the screenshot. When
completed, click Login:
___g.
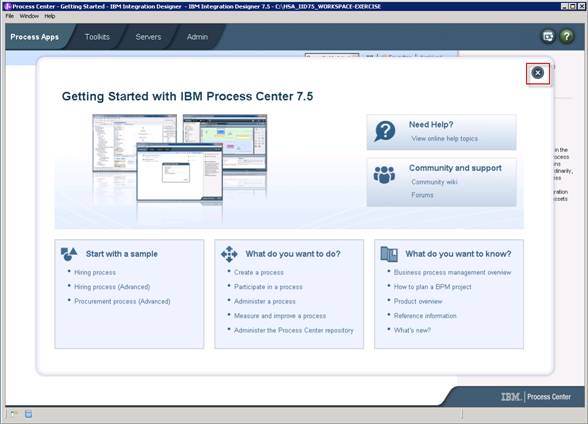
IID
opens now the IBM Process Center perspective, which is exactly the same as
presented in IPD. Close the Gettings Started window to see the available Process
Applications:
___h.
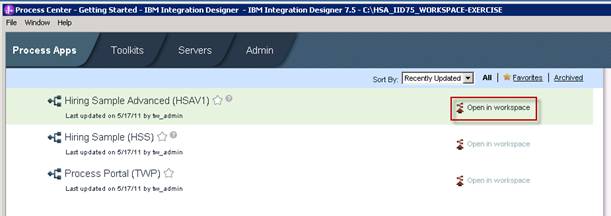
Have a
look at the Process Applications, and look for the Hiring Sample Advanced PA.
On the right hand side, click on Open in Workspace:
___i.
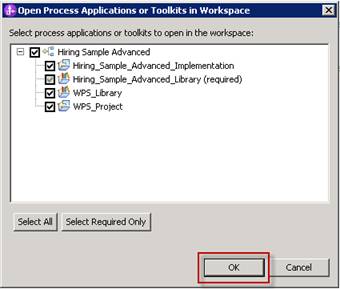
Accept
the seletion and click OK:
___j. IID now opens the Hiring Sample Advanced project in the Business Integration perspective. This is the basic development environment to implement e.g. business processes exploiting BPEL. You may have to wait a few seconds until the workspace is completely built. (look at the progress indicator in the bottom right corner)
___k.
You may
or may not further explore the Advanced Hiring Application:
___l. For the sake of this exercise, now we want to implement the newly created AIS.
___m.
Click on the Advanced Integration
Service folder and
look for your AIS:
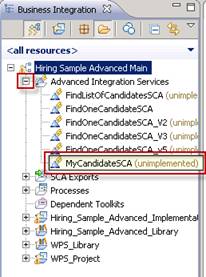
___n. Among other AIS services, which are not yet implemented, the one you have created in IPD named MyCandidateSCA is not yet implemented as well, and therefore flagged unimplemented
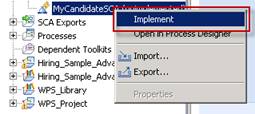
___o.
Rightclick
the MyCandidateSCA, and click Implement:
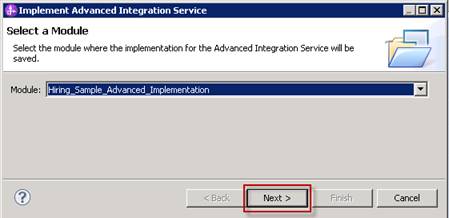
___p.
Accept
that the implementation will be done in this Process Application and click Next:
___q.
You
will create a very simple BPEL process as implementation for this AIS,
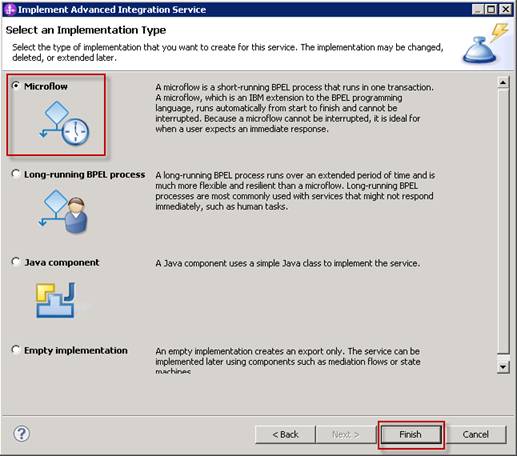
therefore select Microflow and click Finish:
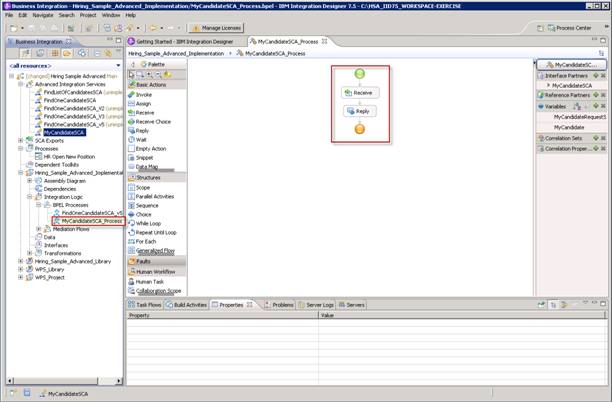
___r.
IID
generates a new BPEL process (with the characteristics of a microflow), and
opens the BPEL process order to further design the BPEL process. You can as
well see this BPEL process listed in the project tree:
___s.
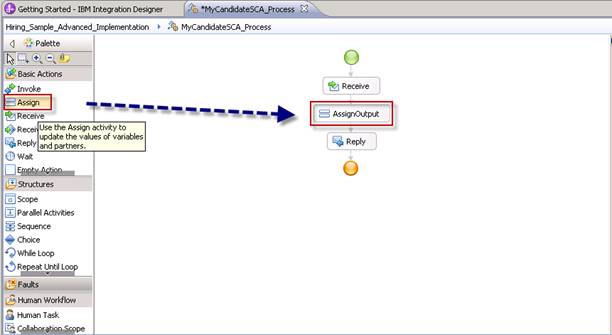
One of
the most simply implementations of this BPEL process is to quickly assign date
to its output data container. To do so, drag and drop a
BPEL assign node
between the Receive and Reply nodes of the BPEL process, and rename the Assign
node to AssignOutput:
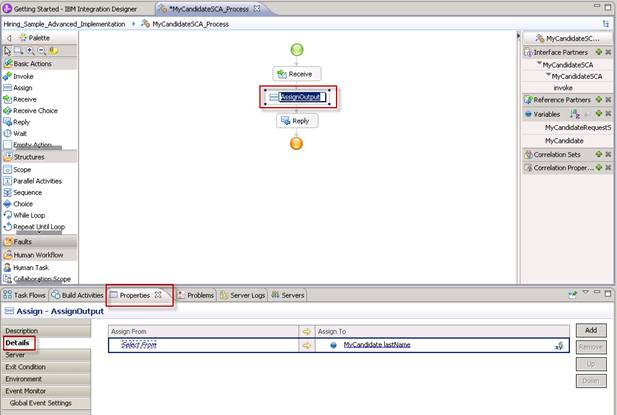
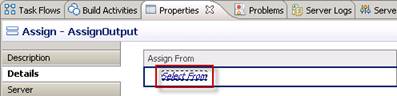
___t.
Now select the AssignOutput node, look at the Properties
window, and switch to the Details tab:
___u.
In the Assign From
tab, click on the Select From link:
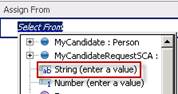
___v.
Click
on String
(enter a
value):
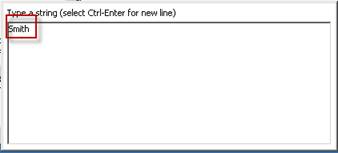
___w.
In the
next dialog, enter Smith (or your favorite lastname), and hit the return key:
___x.
Now you
have a string with the value Smith) as the first entry on the Assign From
side:
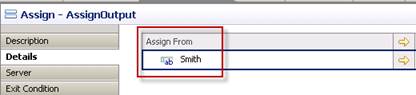
___y. Now select to what variable Smith should be assigned to.
___z.
In the Assign To
list, click on the first entry, and select MyCandidate :
Person, from their select lastname : string:
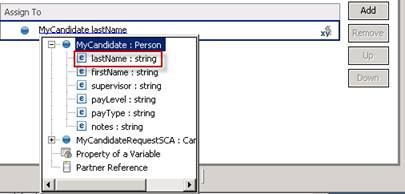
___aa. You have created your first
assignment, now click the Add button to define another assignment:

___bb. An empty assignment is
created:

___cc. Now perform the steps u to
aa to assign John as My Candidate first name, and Bob Miller as MyCandidate
supervisor:

___dd. You might have noticed, that the MyCandidate data structure of type Person comes with six data elements. The next three elements should now be copied from the BPEL process input data object to its output data object. As long as you assign string to string, this does work without problems.
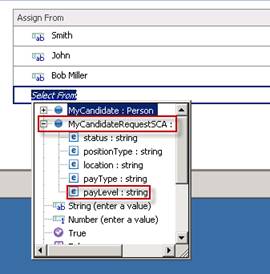
___ee. Click Add to add another empty assignment
___ff.
Click
on the Select From entry, open the MyCandidateRequestSCA data object (which is the BPEL process
input data structure), and click on payLevel : string
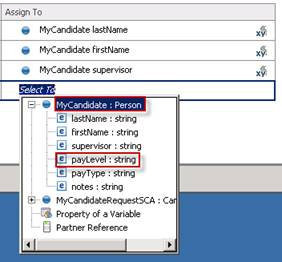
___gg. Click on the Select To entry, open the MyCandidate : Person data object (which is the BPEL process
output data structure), and click on payLevel : string
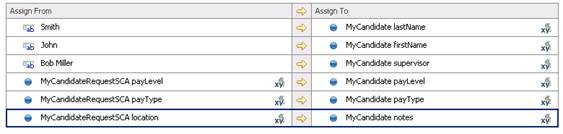
___hh. Repeat the steps ee to gg to perform the following two assignments:
___a. MyCandidateRequestSCA payType to MyCandidate payType
___b. MyCandidateRequestSCA location to MyCandidate notes
___ii.
Finally,
your assignments will be look like this:
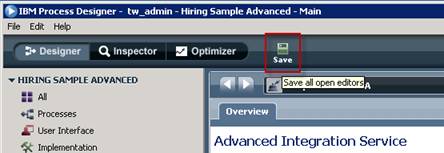
___jj.
Click
the save button in IID:
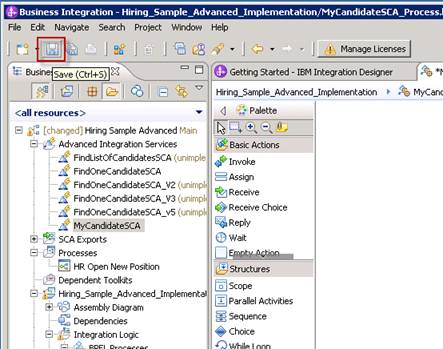
___kk. This completes the implementation of the AIS as a (very simple) BPEL process.
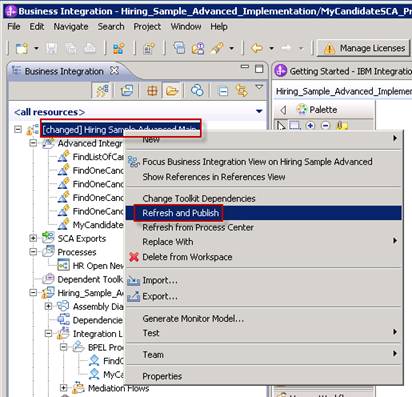
___ll.
However
this change is not yet published to IBM Process Center. You can see this by
the [changed] statement in front of the Hiring Sample Advanced project:

___mm.
To
publish your changes, right click the project and select Refresh and Publish:
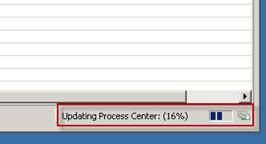
___nn. The progress indicator in
the bottom right corner show the progress of the publication:
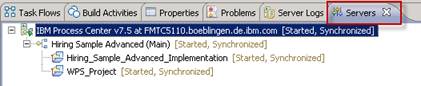
___oo. If
this completes, have a
look at the server tab to see that the (updated) Process Application is
running:
___pp. This completes the implementation of the AIS, and your done with the work in IID. In the next steps, we will use this new AIS as an implementation of a system task in IPD
____ 3. Use the new AIS in IPD as implementation for an existing system task
___a.
Switch
back to IBM Process Designer, and open the process HR
Open New Position:
___b.
Select the FindCandidates task
and look at its properties:
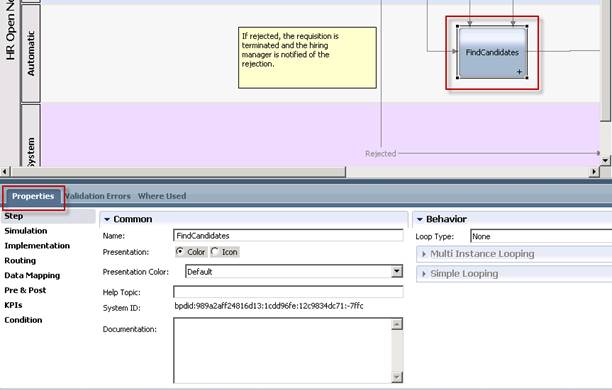
___c.
Switch
to the implementation tab:
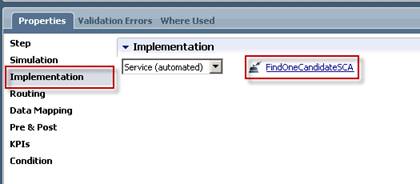
___d. Currently, as the implementation for this task, the service FindOneCandidateSCA is selected. This is the AIS that is called when running the sample in the Run the sample section of this document.
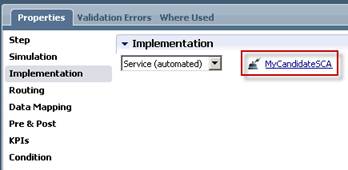
___e.
For
now, you want to call the service you have just implemented in IID. To do so ,
click the Select button and select your AIS
named MyCandidateSCA: 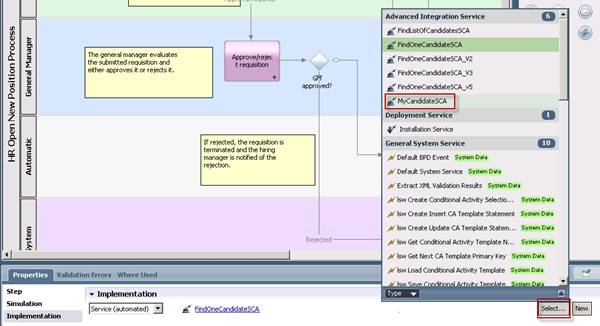
___f.
The
result is, that now your AIS will be invoked when the process is run:
___g.
Now,
switch to the Data Mapping tab:
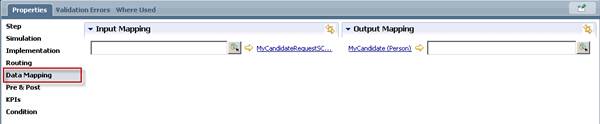
___h. The mapping from the process variables to the AIS variables is empty, because of the new implementation assignment.
___i.
Now you
need to map the right process variable ot the AIS input variable. Click on the tiny little icon and select the process
variable of type
CandidateRequest: 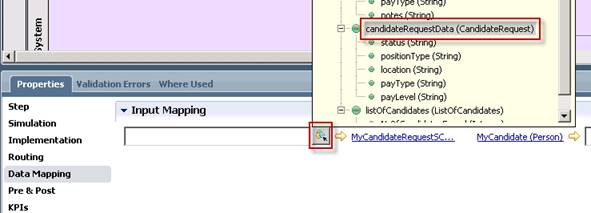
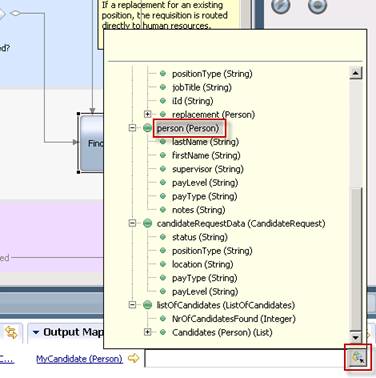
___j.
Repeat
this to map the AIS output to the corresponding process variable:
___k. Click the save button:
___l.
___m. This completes this part of the exercise, and you are now ready to run the process using your AIS implementation to return a candidate.
___n. Perform the steps in the Run the sample section to run your process! (Part 3, section 2 of this document)
___o. COMMENT: When invoking your AIS, always the same candidate will be returned (simply because you always perform the same assignment ). If you want to see different candidates to be returned, select the AIS named FindOneCandidateSCA again, perform the data mapping again, click save, and run the sample again. (this is all what you have done here in section 3 to assign your AIS service implementation)
This is it! We will show other AIS implementations styles (options 2 and 3
quickly described in the beginning of the Build the sample section) over
time