Windows dump collection setup
Setup for Windows Server 2008 and newer versions
Background
On current versions of Microsoft Windows, saving of application dumps is confgiured via the 'LocalDumps' regsitry keys on the system in order to generate the dump files needed for problem analysis and save them locally on the server. This setup step must be performed prior to recreating the problem scenario.
mod_whatkilledus / mod_backtrace alternative
Note: PI97314 added a diagnostic module named mod_backtrace to Windows
installations in 8.5.5.14 and 9.0.0.9. Append the following stanza to httpd.conf
to capture a text description of crashes that may speed up analysis by support:
LoadModule backtrace_module modules/debug/mod_backtrace.so
LoadModule whatkilledus_module modules/debug/mod_whatkilledus.so
WKUDisableWindowsErrorBox ON
Making the change
In the event of a child process crash, logs/whatkilledus.log will contain
a description of the crash.
The LocalDumps configurations can be made to apply globally for all applications on the system or for specific applications. The instructions below will configure dumps specifically for the 'IBM HTTP Server' (IHS) application. If you already have global LocalDumps settings, those settings will continue to be in effect for other applications, but will be overridden for IHS by the settings below.
Logon to the server system as Administrator or a user that has administrator privileges.
Create a directory into which any generated dump files are to be placed.
'C:\crashdumps' for example. (Make sure all users can write to this directory.)Add the needed 'LocalDumps' entries into the Windows registry.
The entries can be added to the registry by either of two techniques. They can be added by using the Windows Registry Editor (regedit) if you are comfortable using that tool. Alternatively, 'reg' commands have been provided which can be copied and executed at a Windows command prompt to add the entries. Both methods are described below.Update the registry using 'reg' commands
To use this technique, you should open an Administrator Command prompt window with elevated privileges.
This can be done by Rt-clicking a 'Command Prompt' icon (ex: under'Start->All Programs->Accessories') and selecting 'Run as administrator'.Copy and paste each of the following commands into the Administrator command prompt window, and then press Enter to execute the command.
You should see a message like"The operation completed successfully."after the completion of each command:
(Note: The third command assumes you created a dump directory named 'C:\crashdumps'. If you are using a different directory then adjust that value as needed.)reg add "HKEY_LOCAL_MACHINE\SOFTWARE\Microsoft\Windows\Windows Error Reporting\LocalDumps" /f
reg add "HKEY_LOCAL_MACHINE\SOFTWARE\Microsoft\Windows\Windows Error Reporting\LocalDumps\httpd.exe" /f
reg add "HKEY_LOCAL_MACHINE\SOFTWARE\Microsoft\Windows\Windows Error Reporting\LocalDumps\httpd.exe" /v DumpFolder /t REG_EXPAND_SZ /d "C:\crashdumps" /f
reg add "HKEY_LOCAL_MACHINE\SOFTWARE\Microsoft\Windows\Windows Error Reporting\LocalDumps\httpd.exe" /v DumpType /t REG_DWORD /d "1" /fUpdate the registry using the Windows Registry Editor (regedit)
Start regedit
Navigate to
HKEY_LOCAL_MACHINE\SOFTWARE\Microsoft\Windows\Windows Error ReportingCreate a
LocalDumpskey underWindows Error Reportingif it doesnt already exist.
To create the key, Rt-clickWindows Error Reportingand selectNew->Key, then enter"LocalDumps"as the key name.Create a
httpd.exekey underLocalDumpsif it doesnt already exist.
To create the key, Rt-clickLocalDumpsand selectNew->Key, then enter"httpd.exe"as the key name.Create a
DumpFolderkey underhttpd.exewith a value ofC:\crashdumps(or whatever directory you created to store the dump files into)
To create the key:
-Rt-clickhttpd.exeand selectNew->Expandable String Value
-EnterDumpFolderas the key name
-Double-click the new key name to provide its value and enter the pathname of the directory to be used to store the dump files (ex:C:\crashdumps)Create a
DumpTypekey underhttpd.exewith a value of1(which indicates to generate a Minidump dump file)
To create the key:
-Rt-clickhttpd.exeand selectNew->DWORD (32 bit) Value
-EnterDumpTypeas the key name
-Double-click the new key name to provide its value. Select theDecimaloption forBase, then enter1forValue data.
Upon completion of adding the entries into the Windows registry, they would look like the following if viewed used the Windows Registry Editor (regedit):
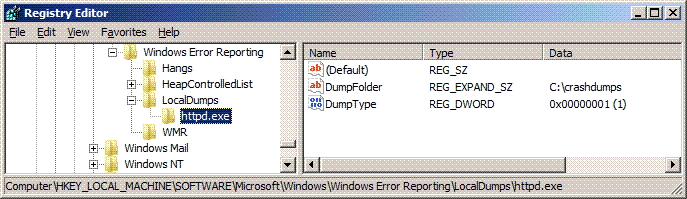
Once configured, anytime an IHS process crashes, a user mode dump file
should be generated (with a name like 'http.exe.4359.dmp') and stored
in the specified directory. The default is a limit of 10 dump files, at
which point the oldest dump file would be purged to make room for the
newest. The setting above will generate a 'Minidump' dump file. This
type of dump was chosen because it is much smaller than a 'Full dump'
dump file yet will often contain sufficient info to help identify the
problem. On occasion, it may be necessary to obtain a 'Full dump' dump
file. These dump files are larger but contain more information. The size
of the dump file will depend on the IHS configuration being used, how
many modules are loaded, etc.
To configure for a 'Full dump' if requested by IBM support
To obtain a 'Full dump' dump file, you will need to set the value of the
'DumpType' entry to '2'. You can either use regedit to manually
modify this entry (see above info for the location), or use the
following technique to execute a 'reg' command at a Windows command
prompt to make the update:
Open an Administrator Command prompt window with elevated privileges.
This can be done by Rt-clicking a 'Command Prompt' icon (ex: under'Start->All Programs->Accessories') and selecting 'Run as administrator'.Copy and paste the following command into the Administrator command prompt window, and then press Enter to execute the command:
reg add "HKEY_LOCAL_MACHINE\SOFTWARE\Microsoft\Windows\Windows Error Reporting\LocalDumps\httpd.exe" /v DumpType /t REG_DWORD /d "2" /f
You should see a message like"The operation completed successfully."after completion of the command.
To adjust the max number of dump files if requested by IBM support
By default, up to 10 dump files can be created at which point the oldest dump files will start being overwritten as new ones are created. If for some reason, there is a need to gather more than 10 dump files, the count can be adjusted as follows. Note that the provided command will double the dump count to 20. The '20' in the command can be adjusted to another value as requested or needed.
Open an Administrator Command prompt window with elevated privileges.
This can be done by Rt-clicking a 'Command Prompt' icon (ex: under'Start->All Programs->Accessories') and selecting 'Run as administrator'.Copy and paste the following command into the Administrator command prompt window, and then press Enter to execute the command
reg add "HKEY_LOCAL_MACHINE\SOFTWARE\Microsoft\Windows\Windows Error Reporting\LocalDumps\httpd.exe" /v DumpCount /t REG_DWORD /d "20" /f
You should see a message like"The operation completed successfully."after completion of the command.
Setup for Windows Server 2003 and earlier versions
The Dr.Watson tool supplied with Windows must be configured to save information about program crashes and hangs. This setup step must be performed prior to recreating the problem scenario.
Start
DRWTSN32.EXEfrom a command prompt. The Dr.Watson configuration dialog will be displayed and will look similar to the following: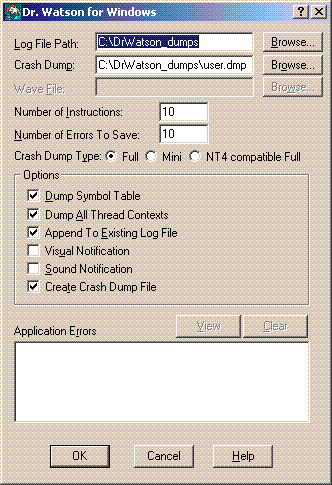
Set the Log file and Crash dump paths to the desired locations. Make a note of these values for later use.
After a crash has occurred, thedrwtsn32.loganduser.dmpfiles will be retrieved from those locations.Ensure that '
Number of Instructions' is at least 10.Ensure that '
Number of Errors to Save' is at least 10.Select '
Full' for the'Crash Dump Type'option.
(This option will not appear for Windows 2000)Enable the following options (by selecting the associated checkboxes):
Dump Symbol tableDump All Thread ContextsAppend to Existing Log FileCreate Crash Dump File
We recommend that the following option be disabled so that IBM HTTP Server recovers as quickly as possible after a crash:
Visual Notification
Click
'OK'to save these settings.Enable Dr.Watson as your default Windows debugger by entering the following at a command prompt:
drwtsn32 -i
(This will make the necessary changes in the Windows registry.)