Connecting expansion enclosures to the control enclosure

If you have installed expansion enclosures in the rack, you must connect them to the control enclosure.

This task applies if you are installing one or more expansion enclosures.Each control enclosure in the system can manage two sets of expansion enclosures; each set can consist of a maximum of 10 expansion enclosures. Therefore, each control enclosure can manage up to 20 expansion enclosures. A system that contains two control enclosures can have up to 40 expansion enclosures.

The number of SAS chains and enclosures varies per each type of system, as shown in Table 1.
Table 1. Summary of SAS chains and enclosures
System Expansion ports Number of SAS chains supported Control enclosures per system Expansion enclosures per chain Maximum Number of Enclosures
Lenovo Storage V3700 V2 and Lenovo Storage V3700 V2 XP Port 1 only 1 1 10 11
Lenovo Storage V5030 and Lenovo Storage V5030F Port 1 and Port 2 2 1 10 21

Each set of expansion enclosures is connected together sequentially through the IN and OUT SAS ports, forming a chain with a control enclosure at the end of the chain.

Note: When connecting SAS cables between enclosures, you must follow a list of guidelines to ensure that your configuration is valid. Do not begin connecting the cables until you have read SAS cabling guidelines.

To install the cables, complete the following steps.

  1. Using the supplied SAS cables, connect the control enclosure to the expansion enclosure at rack position 1, as shown in Figure 1.
    1. Connect SAS port 1 of the upper node canister in the control enclosure to SAS port 1 of the left expansion canister in the first expansion enclosure.
    2. Connect SAS port 1 of the lower node canister in the control enclosure to SAS port 1 of the right expansion canister in the first expansion enclosure.
    Figure 1. Connecting the SAS cables
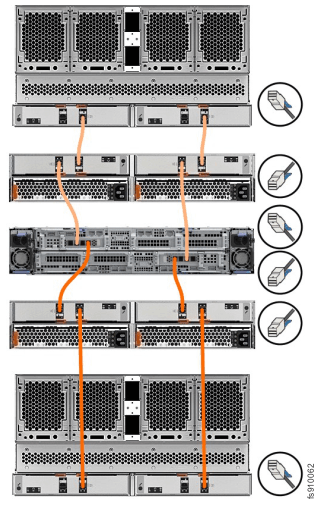
    Image of control and expansion enclosures connected by expansion enclosure attachment cables

  2. Using the supplied SAS cables, connect the control enclosure to the expansion enclosure at rack position 1, as shown in the following figures.
    1. Connect SAS port 1 of the left node canister in the control enclosure to SAS port 1 of the left expansion canister in the first expansion enclosure.
    2. Connect SAS port 1 of the right node canister in the control enclosure to SAS port 1 of the right expansion canister in the first expansion enclosure.

    Figure 2 shows how to connect SAS cables on a Lenovo Storage V3700 V2 system.

    Figure 2. Connecting the SAS cables to a Lenovo Storage V3700 V2 system
    Lenovo Storage V3700 V2 control and expansion enclosures that are connected by expansion enclosure attachment cables

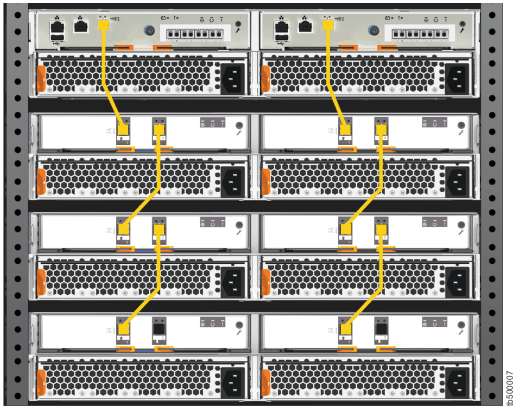
    Figure 3 shows how to connect SAS cables on a Lenovo Storage V3700 V2 XP system.

    Figure 3. Connecting the SAS cables to a Lenovo Storage V3700 V2 XP system
    Lenovo Storage V3700 V2 XP control and expansion enclosures that are connected by expansion enclosure attachment cables

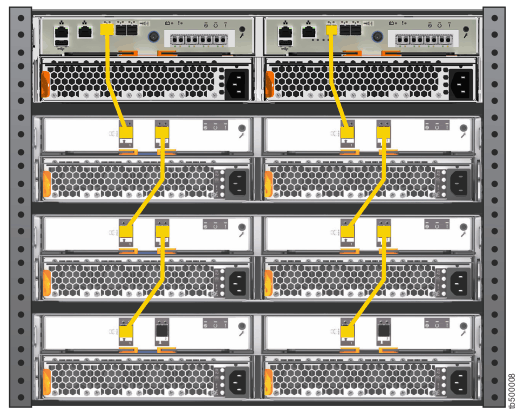
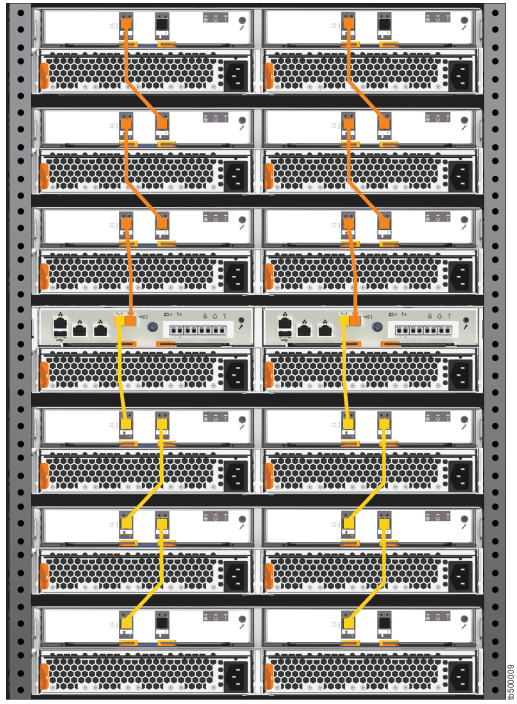
    Figure 4 shows how to connect SAS cables on a Lenovo Storage V5030 or Lenovo Storage V5030F system. In this figure, two expansion chains are connected to the Lenovo Storage V5030 system.

    Figure 4. Connecting the SAS cables to a Lenovo Storage V5030 system
    Lenovo Storage V5030 control and expansion enclosures that are connected by expansion enclosure attachment cables

  3. To add a second expansion chain to the Lenovo Storage V5030 control enclosure, use the supplied SAS cables to connect the control enclosure to the expansion enclosure at rack position 2, as shown in Figure 4.
    Note: Lenovo Storage V3700 V2 and Lenovo Storage V3700 V2 XP systems support only one expansion chain.
    1. Connect SAS port 2 of the left node canister in the control enclosure to SAS port 1 of the left expansion canister in the second expansion enclosure.
    2. Connect SAS port 2 of the right node canister in the control enclosure to SAS port 1 of the right expansion canister in the second expansion enclosure.
  4. To add a second expansion enclosure chain to the control enclosure, use the supplied SAS cables to connect the control enclosure to the expansion enclosure at rack position 2. Refer to Figure 1 for an example.
    1. Connect SAS port 3 of the upper node canister in the control enclosure to SAS port 1 of the left expansion canister in the second expansion enclosure.
    2. Connect SAS port 3 of the lower node canister in the control enclosure to SAS port 1 of the right expansion canister in the second expansion enclosure.
  5. If more expansion enclosures are installed, connect each one to the previous expansion enclosure in a chain; use two Mini SAS HD to Mini SAS HD cables, as shown in Figure 4.
  6. If additional expansion enclosures are installed, connect each one to the previous expansion enclosure in a chain; use two Mini SAS HD to Mini SAS HD cables, as shown in Figure 1.
    Note: A control enclosure can support up to 20 expansion enclosures (10 above the control enclosure and 10 below the control enclosure).
  7. If two control enclosures are installed (Lenovo Storage V5030 and Lenovo Storage V5030F only), repeat this cabling procedure on the second control enclosure and its expansion enclosures.
  8. If additional control enclosures are installed, repeat this cabling procedure on each control enclosure and its expansion enclosures.