To build the human interaction sample, follow these steps:
- Create a new module.
- Define the interfaces.
- Develop the business process.
- Adjust Business Space settings.
- Assemble the SCA module.
- Test the process in the integrated test environment.
- Assemble the enterprise application.
- Install the Human Interaction process to WebSphere® Process Server.
- Uninstall the Human Interaction process from WebSphere Process Server.
Create a new module
To create a new module, complete the following steps:
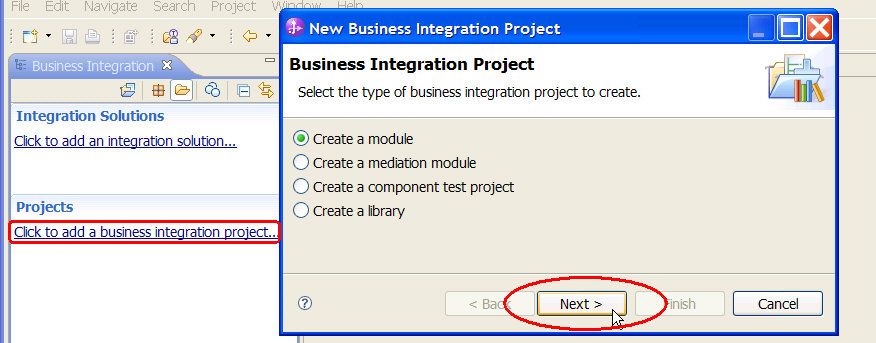
- In the Business Integration view, click Click to add a business integration project under Projects.
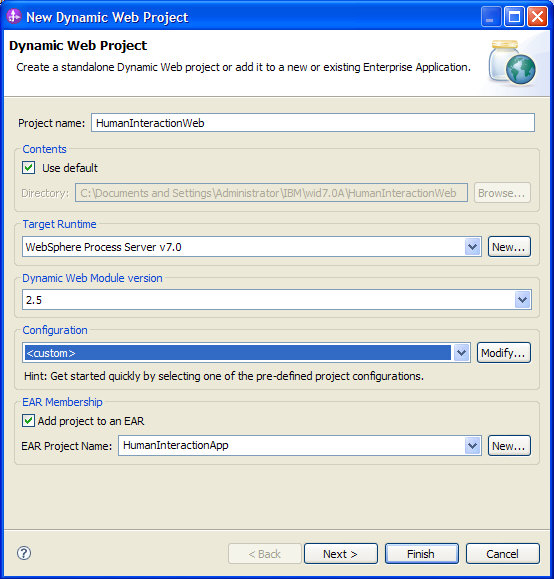
(Alternatively: from the menu bar, select File > New > Module). - The New Business Integration Project window opens. Make sure Create a module is selected.
- Click Next.
- In the Module Name field, enter
HumanInteraction. - Click Finish.
The New Module window opens.
Define the interfaces
This sample requires two interfaces: one for the process and one for the human task. To create each interface, complete the following steps:
- In the Business Integration view, right-click HumanInteraction > Interfaces.
- From the context menu, select New > Interface. The New Interface Wizard window opens.
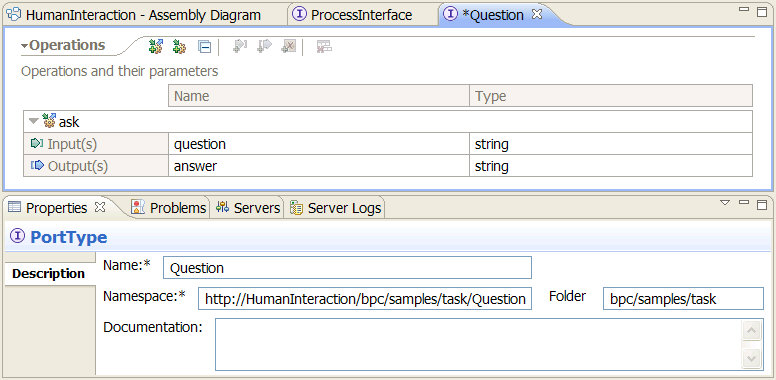
- In the Folder field, enter
bpc/samples/task. - In the Name field, enter
ProcessInterface. - Click Finish.
- Repeat the steps above for the second interface. Use the following values for Folder=
bpc/samples/taskand Name=Question.
Now, add operations to your interfaces. To add operations to an interface, complete the following steps:
- In the interface editor, click the Add Request Response Operation button
 .
. - To edit the name of the operation, click the operation name. See the table below for the operation names you need to specify.
- To edit the name of an input message, click the message name. See the table below for the message names you need to specify.
- To edit the type of an input message, click the message type, and select a type from the list. See the table below for the types you need to specify (in this sample, all types are string, which is the default).
- Repeat steps 4 and 5 to edit the name and type of the output message.
In the folder bpc/samples/task, create the interfaces that are listed in the following table:
| Interface | Namespace | Operation Name | Message | Name | Type |
|---|---|---|---|---|---|
| ProcessInterface | http://bpc/samples/task/ProcessInterface | process | Input | input | string |
| Output | output | string | |||
| Question | http://bpc/samples/task/Question | ask | Input | question | string |
| Output | answer | string |
Now your interface editor will look similar to this:
On the toolbar, click the Save button  .
.
Develop the business process
Create a new business process
To create the new business process, complete the following steps:
- Switch to the Business Integration view.
- In the navigation tree, right-click HumanInteraction > Integration Logic.
- From the context menu, select New > Business Process. The New Business Process window opens.
- Select the radio button New default Business Process.
- In the Folder field, enter
bpc/samples/task. - In the Name field, enter
HumanInteractionProcess. - Accept the default value for the namespace.
- Click Next.
- In the Select a Business Process Type panel, select Long-running process.
- Click Next.
- In the Select an Interface panel, select Select an interface.
- Click Browse. The Interface Selection window opens.
- Select ProcessInterface, then click OK.
- Make sure that process is selected as operation.
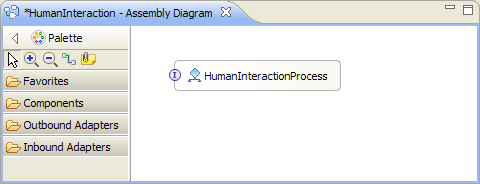
- Click Finish. The business process editor opens.
- Open the Properties view and proceed to the Details section.
- From the Automatically delete the process after completion list, select No.
- Keep the remaining default values.
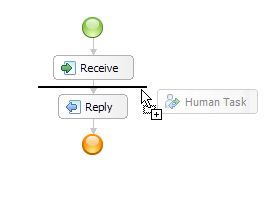
Add a human task activity to the process
To add a human task activity to your process, follow theses steps:
- Click the human task activity icon
 on the palette. This icon can be found here.
 - In the business process editor, click the connection between Receive and Reply:
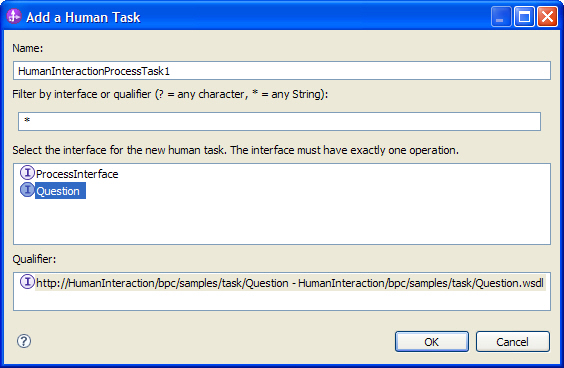
- Select Question, and click OK.
- Close the HumanInteractionProcessTask1 editor.
- In the HumanInteractionProcess editor, select the HumanTask component.
- Rename the human task activity from HumanInteractionProcessTask1 to
AskQuestion. - On the toolbar, click the Save button .
The human task activity will be added and the Interface Selection window opens automatically.
The Human Task editor opens:
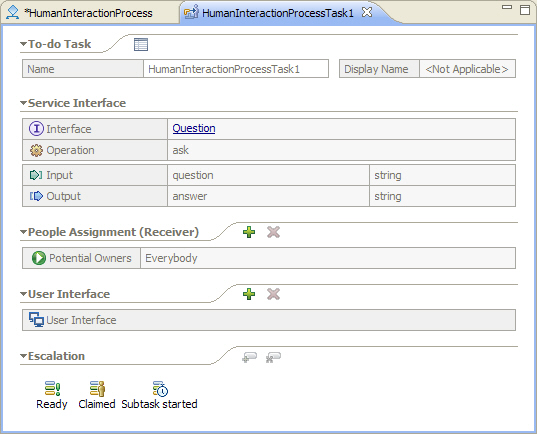
Since you've already selected the Question interface, the ask operation is chosen by default (it's the only operation defined).
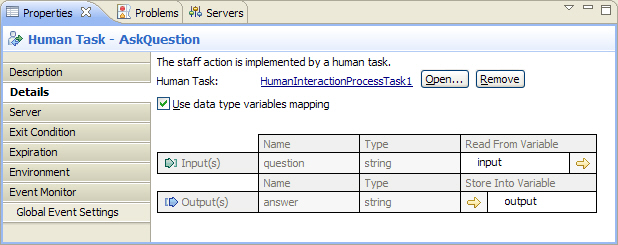
Implement the human task activity
To complete the implementation of our human task activity, you have to specify the process variables for the activity. Follow these steps:
- In the business process editor, click AskQuestion.
- In the Properties view, click the Details tab.
- Click
 under Read From Variable. A popup with available variables opens.
 - Select input.
- Click under Store Into Variable. A popup with available variables opens.
- Select output.
- On the toolbar, click the Save button .
 symbol next to User Interface and select HTML-Dojo (for use in Business Space).