To build the service invocation sample, follow these steps:
- Generate a Web Service for a Java bean.
- Create a new module.
- Import the Web Service interface.
- Create a new business process interface.
- Build the business process.
- Wire the business process to the Web Service.
- Test the application.
Develop the Web Service (bottom up)
Create a dynamic web project
To create the HelloService dynamic web project, complete the following steps:
- Switch to the Java EE perspective. To switch to the Java EE perspective, select Window > Open Perspective > Other from the Menu. In the Open Perspective dialog, select Java EE and click OK.
- In the Enterprise Explorer view, right-click the canvas.
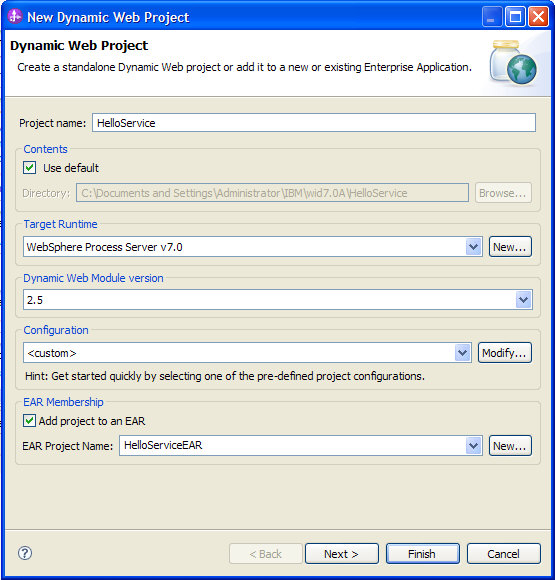
- From the pop-up menu, select New > Dynamic Web Project. The New Dynamic Web Project window opens.
- In the Project name field, enter
HelloService. - For Project contents, keep the default setting.
- Select
WebSphere Process Server v7.0as the Target Runtime. - Select
2.5for the Dynamic Web Module version. - Select
customfor the Configuration. - Make sure Add project to an EAR is selected. Leave the default value.
- Click Finish.
If the Open Associated Perspective dialog appears, click Yes.
Create a Java Bean implementation of the Web Service
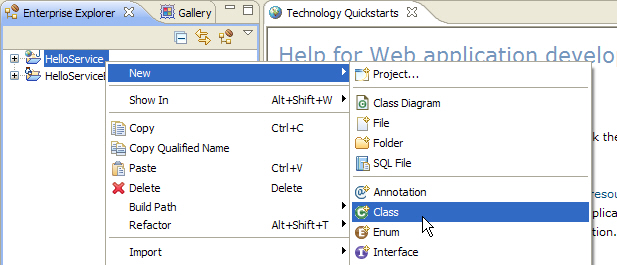
- In the Enterprise Explorer view, right-click HelloService.
- From the pop-up menu, select New > Class.
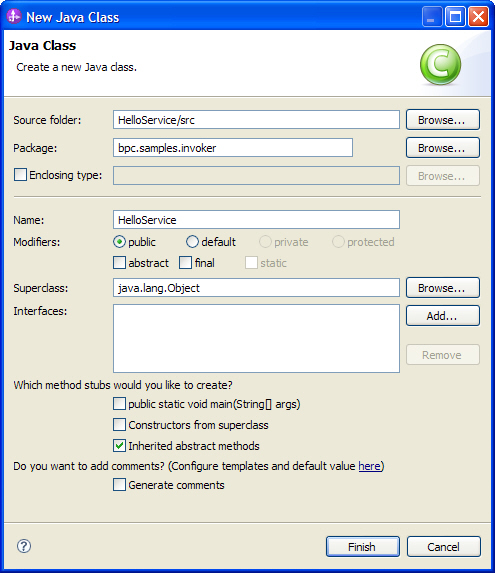
- In the Package field, enter
bpc.samples.invoker. - In the Name field, enter
HelloService. - Click Finish.
- Complete the implementation of HelloService by adding the following method:
- On the toolbar, click the Save button
 .
.
The New Java Class window opens.
The HelloService.java editor opens.
Note: If the HelloService.java editor is not opened by default, the file is located at Enterprise Explorer > HelloService > Java Resources: src > bpc.samples.invoker.
public String hello(String name){
System.out.println("HelloService.hello(String name): value of name: " + name);
if( name == null || name.equals("") ){
return "Hello World";
}
else{
return "Hello " + name;
}
}
Generate a Web Service for a Java class
Note: Before performing the following steps, start server WebSphere Process Server v7.0.
To generate the Web Service for the HelloService class, complete the following steps:
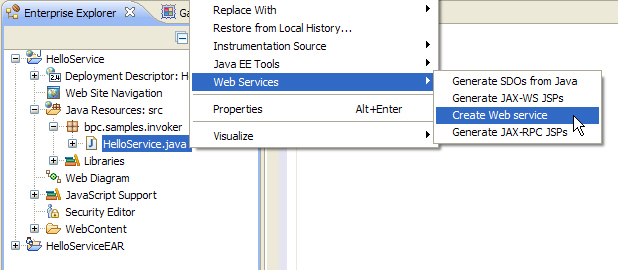
- In the Enterprise Explorer view, expand HelloService > Java Resources > bpc.samples.invoker.
- Right-click HelloService.java.
- From the pop-up menu, select Web Services > Create Web service.
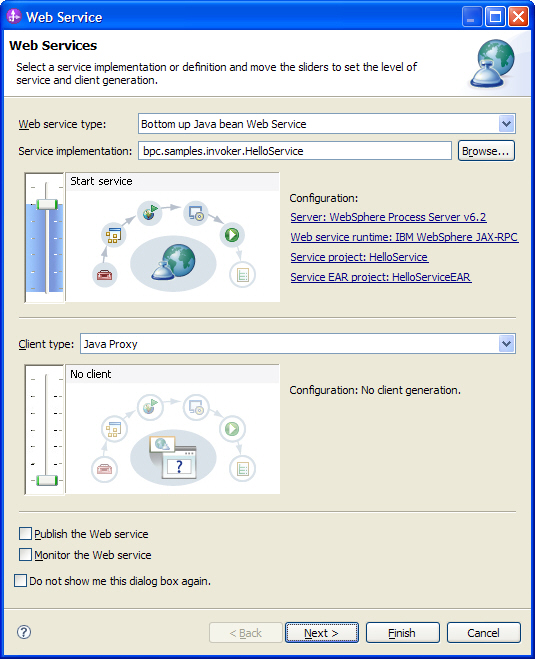
- In the Web service type section, make sure
Bottom Up Java bean Web Serviceis selected. - Accept all other values.
- Click Next.
- On the Service Endpoint Interface Selection page, accept the default values.
- Click Next.
- On the Web Service Java Bean Identity page, accept the default values.
- Click Next.
- Wait for the Web Service publishing to finish.
- On the Web Service Publication page, accept the default values.
- Click Finish.
The Web Service window opens.
Develop the business process
Create a new process module
To create a new module, complete the following steps:
- Switch to the Business Integration perspective.
- In the Business Integration view, right-click the canvas.
- From the pop-up menu, select New > Module.
- In the Module Name field, enter
Invoker. - Click Finish

The New Module window opens.
Import the Web Service interface
To import the InvokerService interface, complete the following steps:
- Switch to the Business Integration view.
- Find out your current workspace directory by clicking File > Switch Workspace. You may copy this path for later use into your clipboard, then click Cancel.
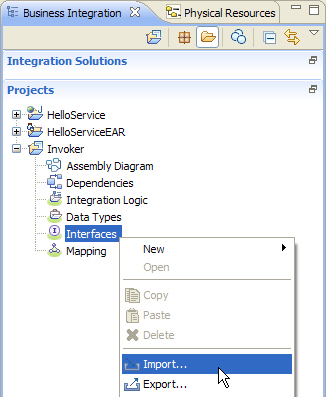
- In the navigation tree, expand Invoker and right-click Interfaces.
- From the pop-up menu, select Import.
- Expand Business Integration and select WSDL and XSD as input source.
- Click Next. The Import page opens.
- Select Local WSDL or XSD file, or both and click Next.
- In the Source directory field, paste the name of your workspace directory.
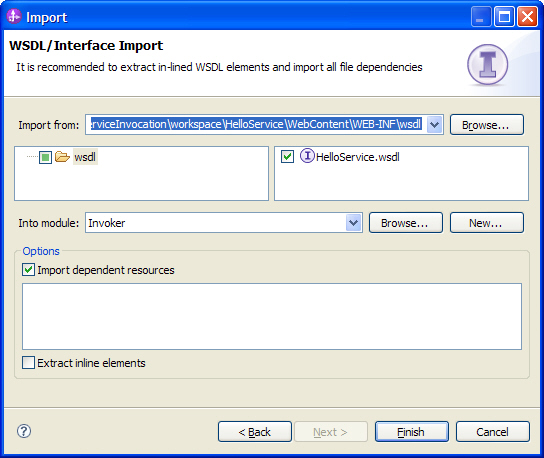
- Browse to the HelloService web project, choose folder HelloService/WebContent/WEB-INF/wsdl. Click OK
- Select HelloService.wsdl.
- Click Finish.
The Import window opens.
Create the business process interface
To create the business process interface, complete the following steps:
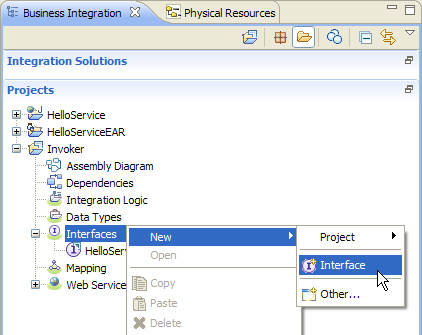
- In the Business integration view, right-click Invoker > Interfaces.
- From the pop-up menu, select New > Interface.
- In the Name field, enter
InvokerProcess. - In the Folder field, enter
bpc/samples. - Accept the default value for the namespace.
- Click Finish. The interface editor opens.
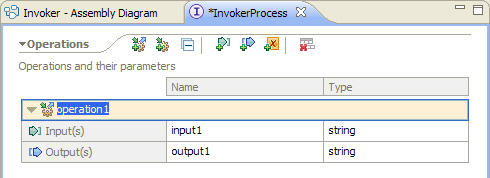
- Right-click on the canvas and select Add Request Response Operation, or just click the appropriate icon
 .
. - On the toolbar, click the Save button and close the interface editor.
The New Interface Wizard window opens.
Build the business process
Create a new business process:
- In the Business Integration view, right-click Invoker > Integration Logic.
- From the pop-up menu, select New > Business Process.
- In the Name field, enter
InvokerProcess. - In the Folder field, enter
bpc/samples. - Accept the default value for the namespace.
- Click Next.
- In the Select a Business Process Type panel, select Microflow.
- Click Next.
- In the Select an Interface panel, select Select an interface.
- Click Browse and select the InvokerProcess interface. Click OK.
- Make sure that operation1 is selected as operation.
- Click Finish. The business process editor opens.

The New Business Process window opens.
Add a Reference Partner to your process:
- In the navigation tree of the Business Integration view, expand Invoker > Interfaces.
- Drag the HelloService interface and drop it to the canvas of the business process editor of the InvokerProcess.
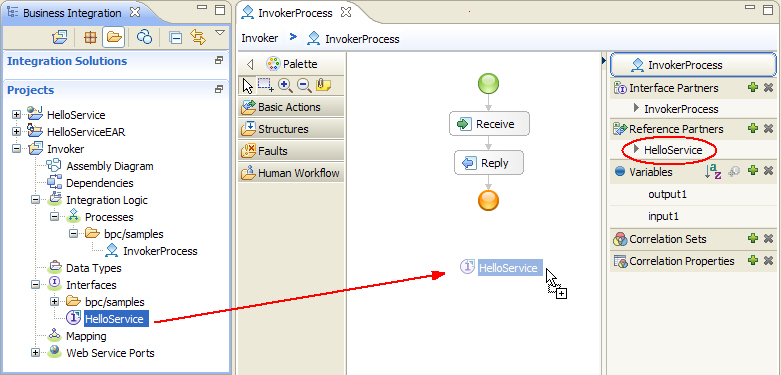
This operation does not change anything on the canvas, but rather adds the reference partner HelloService (circled red) with the appropriate reference interface.
Add an Invoke activity to your process:
- In the business process editor, select the Invoke activity icon
 from the palette. This icon can be found here.
 - In the business process editor, click the link between the Receive and Reply activities.
- An Invoke activity
 is added.
 - Replace the default Display Name Invoke by the name
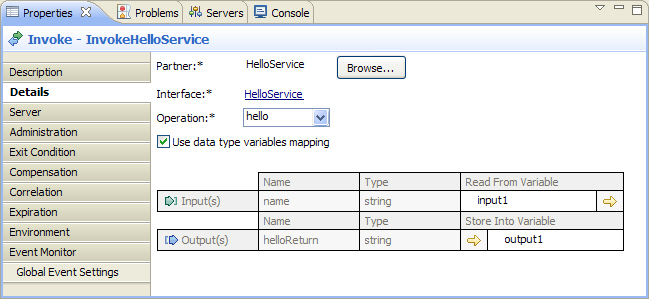
InvokeHelloService. The Display Name field can as well be changed in the Description section of the Properties view; a change of the display name will as well update the Name field. - In the Properties view, click the Details tab.
- To select a reference partner, click Browse. The Select a Partner window opens.
- Select HelloService, then click OK.
- Next you have to select the operation; since the interface contains hello as the only operation, this operation is preselected.
- Make sure Use data type variables mapping is enabled.
- Click
 under Read From Variable. A popup with available variables opens.
 - Select input1.
- Click under Store Into Variable. A popup with available variables opens.
- Select output1.
- On the toolbar, click the Save button .
Module assembly
To finish the implementation of the invoker process, you have to create the module assembly. Complete the following steps:
- In the Business Integration view, double-click Invoker > Assembly Diagram. The assembly editor opens.
- In the Business Integration view, expand Invoker > Integration Logic > Processes > bpc\samples.
- Drag and drop the InvokerProcess process to the assembly editor. The invoker process
 is added.
 - In the Business Integration view, expand Invoker > Interfaces.
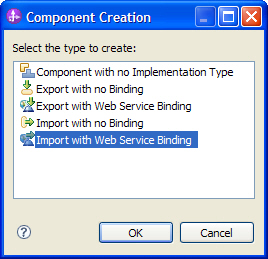
- Drag the HelloService interface to the assembly editor. The Component Creation window opens.
- Select Import with Web Service Binding.
- Click OK.
- A new window HelloServiceImport1 Web Service Import... opens.
- Select Use an existing web service port. Click Browse.
- From the popup, select HelloService and click OK.
- When the Transport Selection for HelloServiceImport1 window appears click OK.
- Click OK.
- The import
 is added to the editor.
 - In the assembly editor, click HelloServiceImport1 to select the new import element.
- Click again on the import element and overtype the default name HelloServiceImport1 by
HelloService. - Move the cursor over the InvokerProcess component, then move it right to the reference section labelled 1..1, then move it further right until you see a wire symbol:
- Click once, then click on HelloService. This creates a wire between the two components. (Note that as an alternative way for wiring, you could right-click on InvokerProcess and select Wire to Existing.)
- On the toolbar, click the Save button .