The XSLT Mapping File Migration Sample uses the StockQuote Sample from version 6.0.2 to show how to migrate the XSLT map files from version 6.0.2 to version 7.0.
The following will be required to run this sample:
- WID version 6.1 or above.
This is for doing the actual migration steps. - The StockQuote Sample Gallery web application.
This is to run the sample after the migration and can be installed with the WebSphere ESB runtime. - The XSLT Mapping File Migration Sample project interchange file.
This file contains the version 6.0.2 of the StockQuote Sample and can be downloaded here.
This document covers the following areas:
- Importing the project interchange file.
- Doing the migration steps.
- Building the application.
- Deploy the application to the server.
- Testing/Running the application.
Import the project interchange file
Go to the Download section for the instructions to download and import the project interchange file.
Doing the migration steps
There are two ways of migrating the mapping files to the new format.
Migration via the properties panel
- In the Business Integration view, open the mediation flow by double clicking on Stock Quote -> Integrate Logic -> Mediation Flows -> StockQuote_MediationFlow.
Click on getQuote under the Stock Quote service, this will open the StockQuote_MediationFlow in the Mediation Flow Editor.

- There are four XSL Transformation nodes used in the Stock Quote Sample. Two in the request flow and two in the response flow.

Select the TransformToDelayed node in the request flow. - Goto to the Properties view. It is available from Window -> Show View -> Properties menu.
- Click on the Details tab to show the detail properties for this node.

- The top of the pane shows that this mapping file is of old format. Click the Migrate button next to the Mapping file: entry field.
This will migrate the current mapping file to the new mapping file format.

- Repeat the above steps for the other three XSL Transform nodes.
Migration via the Mapping Migrator
The advantage of using the Mapping Migrator is that it can migrate all the old mapping files at the same time.
- From the StockQuote project folder double click any one of the old mapping files from Mapping -> XML Maps -> xslt.
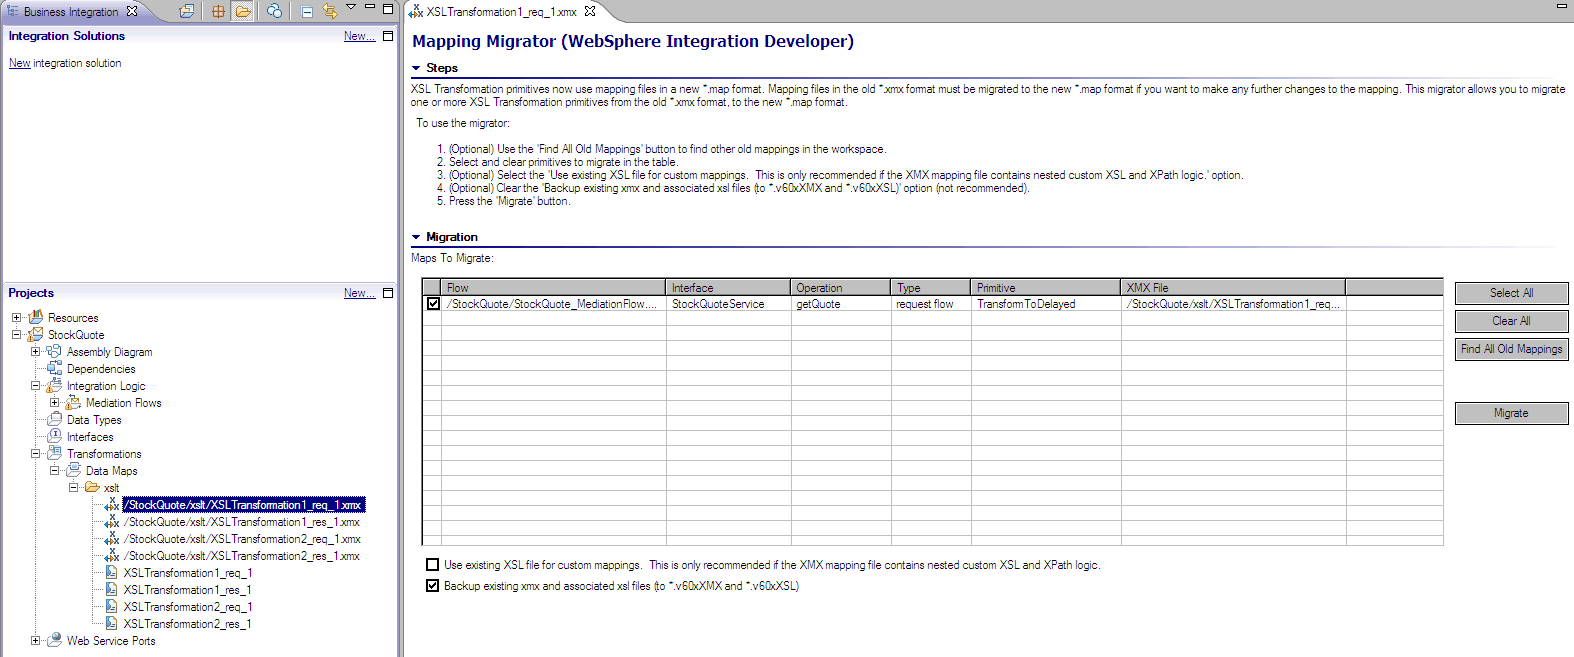
This will open the mapping file in the Mapping Migrator. - Click on the Find All Old Mappings button to find all the mapping files that needs migrating.

- Click on the Select All button to select all four mapping files.

- Click on the Migrate button to migrate all four mapping files.
- A Summary dialog will open to inform the migration was successful.

Click the OK button to close the dialog.
This completes the migration steps.