Build it yourself
In order to build and test the sample, a running instance of WebSphere Integration Developer v7.0 including an appropriate WebSphere Process Server unit test environment (UTE) installation is required.
To build the sample, the following steps need to be taken:
- Create a module named 'TestModule'.
- Create an interface named 'SimpleInterface'.
- Create a business process named 'SimpleProcess'.
- Enable event creation in the business process.
- Assemble the sample.
Create a module named 'TestModule'
Open the File menu in WebSphere Integration Developer, select New and then Module. The Create Module dialog box will appear as shown below.
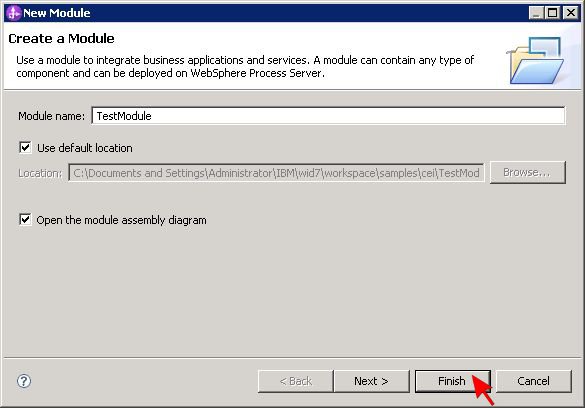
Enter TestModule as the module name, leave the remaining values unchanged and press the Finish button. A new module will be opened for editing in WebSphere Integration Developer.
Create an interface named 'SimpleInterface'
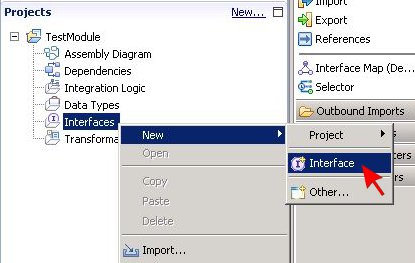
Expand module TestModule in the Projects panel on the left side, right-click on Interfaces and then select New > Interface from the resulting context menu.
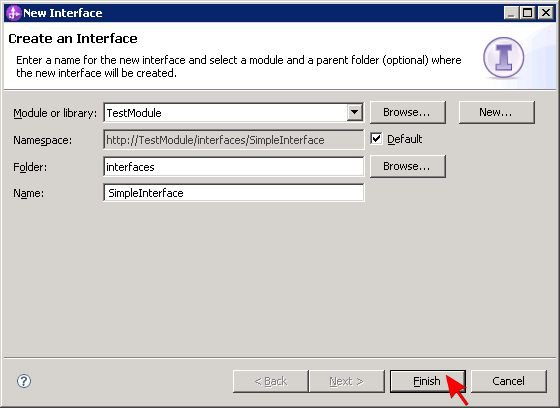
A New Interface dialog box will pop up. Enter interfaces for the folder and SimpleInterface for the name, then press the Finish button.
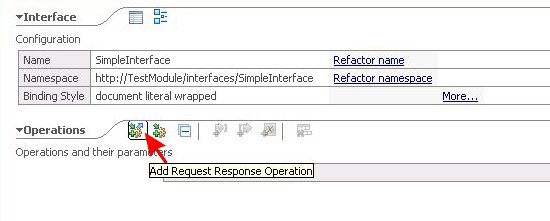
When the new interface has been created and opened for editing, click on the first icon button in the Operations section to add a request response operation.
Change the operation name from operation1 to getNumber, the input name from input1 to automaticallyGenerated and the output name from output1 to luckyNumber. Besides, select boolean as the input type and int as the output type instead of the given default type string.
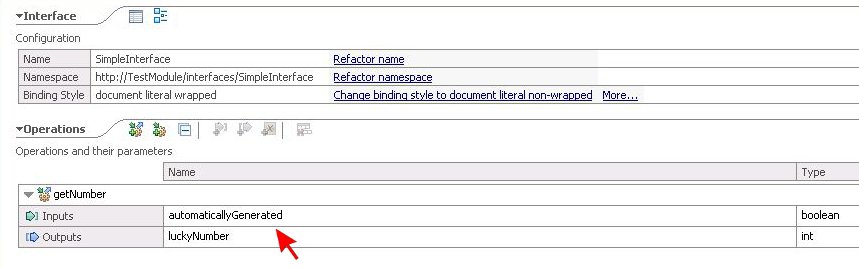
Afterwards, save the interface definition.
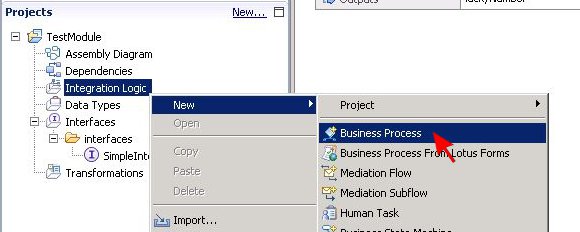
Create a business process named 'SimpleProcess'
In the Projects panel, right-click on Integration Logic under module TestModule and select New > Business Process from the context menu.
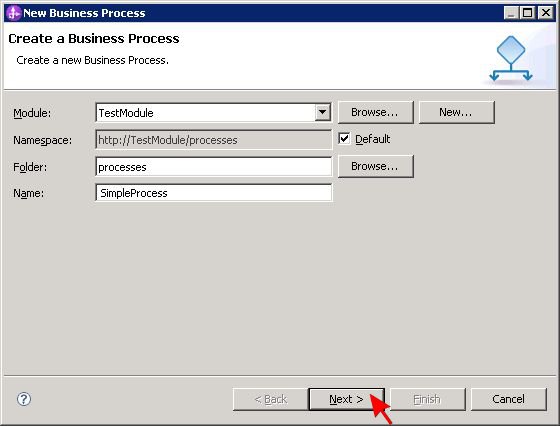
In the New Business Process dialog box, enter processes for the folder and SimpleProcess for the name. Don't change anything else and click on the Next button.
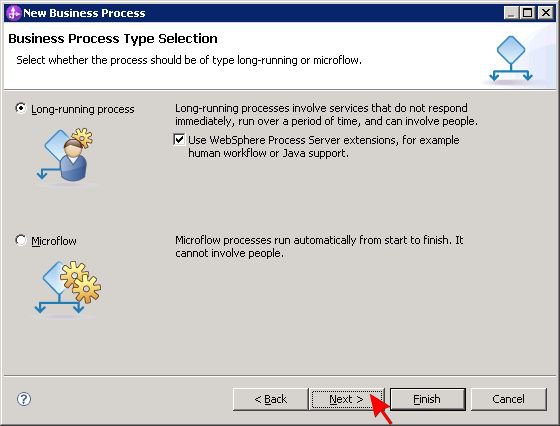
Choose a long-running process by selecting the corresponding radio button on the following dialog box page and make sure the use of WebSphere Process Server extensions is also enabled by means of a check mark in the displayed checkbox. Then push the Next button.
On the third page, opt for selecting an interface instead of generating a new one. Click the lower radio button and press the Browse... button to pick the previously defined SimpleInterface as the interface to be used. Press Finish to close the dialog box.

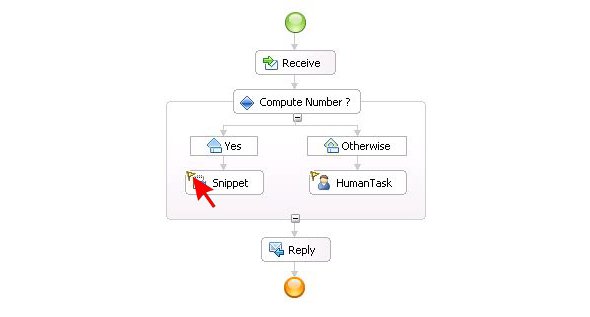
The new process SimpleProcess will be opened in the process editor. A flow diagram is shown that only contains a Receive and a Reply activity at this point. Go to the palette on the left side and use the mouse to drag a Choice activity from the Structures section and drop it right between the Receive and the Reply activity. When done, click on the activity name Choice to change it to Compute Number?. The new name will be helpful to point out the purpose of this element. Then right-click on the activity and select Add an Otherwise Element from the appearing context menu.
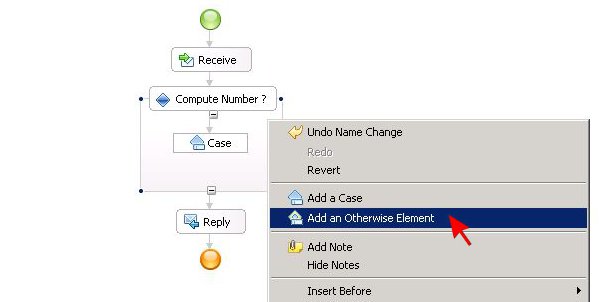
The Compute Number? activity now has two case elements, one labeled Case and one labeled Otherwise. Click on the one labeled Case to rename it to Yes.
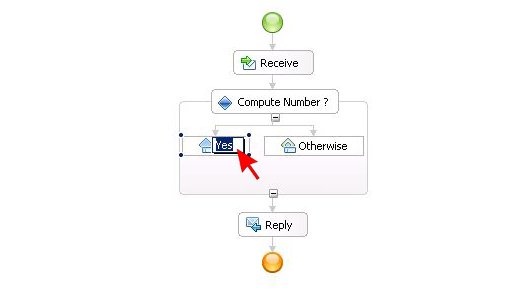
With the Yes element still having the selection focus, take a look at the Properties tab in the lower part of WebSphere Integration Developer window. Access the details for case Yes. There is a link to Create a New Condition. Click on it to discover a drop-down list with available terms to be used.

In order to compose the new condition, pick automaticallyGenerated, == and true one after the other from the drop-down list. Afterwards, click anywhere outside of the drop-down list to conclude the definition. The resulting expression should be automaticallyGenerated==true as shown in the following picture.

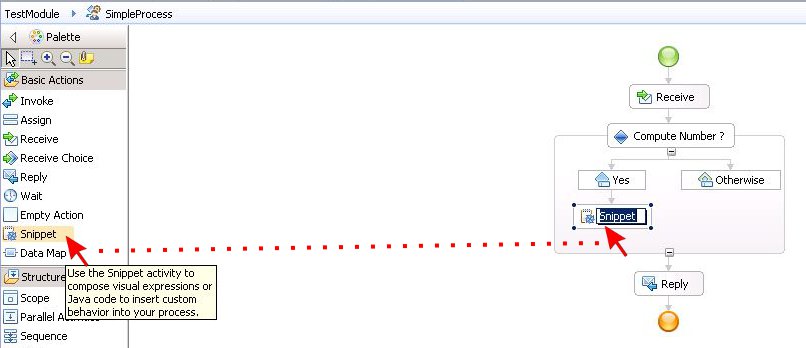
Go back to the palette, take a Snippet from the Basic Actions section and put it into the flow diagram, right below the Yes case.
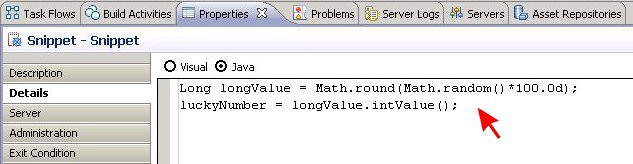
With the snippet being selected, return to the Properties tab and open the snippet details. There are two radio buttons that can be used to switch between different implementation types. By default, Visual is preselected. Click on the radio button for Java to choose the other type. A pop-up message will inform about the consequences of that change. Press Yes to confirm that you would like to continue.

Enter the following two lines of Java code into the text field below the radio buttons:
Long longValue = Math.round(Math.random()*100.0d);

luckyNumber = longValue.intValue();
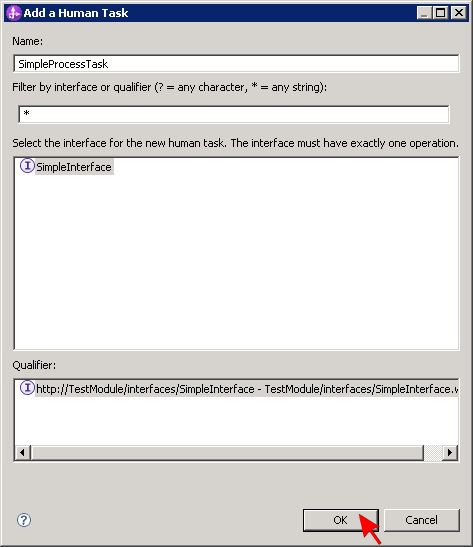
Go back to the process palette again, take a Human Task from the Human Workflow section and put it into the flow diagram, right below the Otherwise case. Dropping the human task element will immediately open a dialog box titled Add a Human Task. Change the suggested name to SimpleProcessTask and make sure that SimpleInterface is selected as the interface to be used. Then press OK.
The human task editor will open up automatically. Since there is no reason to make any changes to the newly generated human task, just close the editor
to return to the business process editor.
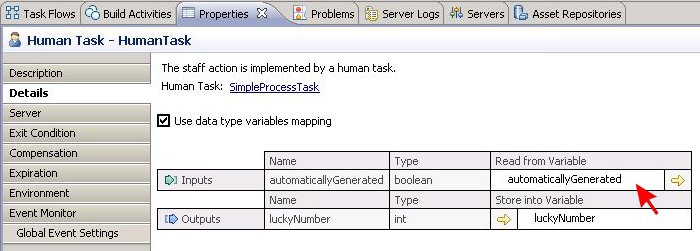
Click on the human task in the flow diagram to select it and then go to the Properties tab to view the task details. In the Details section of
the properties, put a check mark into the checkbox labeled Use data type variables mapping. This will cause a table to appear. Click on the two links
labeled (None) in the table and pick automaticallyGenerated and luckyNumber as the input and output variables respectively.
Select Save from the File menu to save the entire business process but do not close the process editor.
Enable event creation in the business process
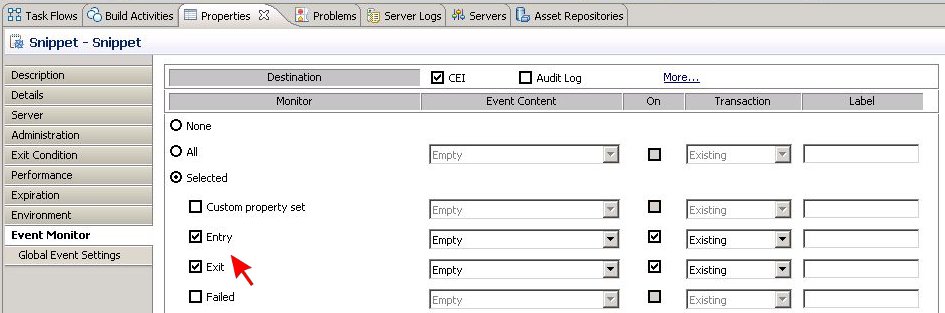
Select the snippet element in the flow diagram and take another look at its properties. In the Properties tab, open section Event Monitor. Click on the radio button labeled Selected and then put check marks into the checkboxes labeled Entry and Exit. This selection will result in events being created whenever the process flow enter or leaves the snippet. Make sure that the CEI checkbox at the top of the panel is also checked.
Now select the human task in the flow diagram to modify its properties as well. Open section Event Monitor in the Properties tab and click on the radio button labeled Selected. The events for human tasks are slightly different, so put check marks into the checkboxes labeled Assigned, Created and Exit. Again, make sure that the CEI checkbox at the top of the panel is checked, too.
When done, save your changes to the business process and close the process editor.
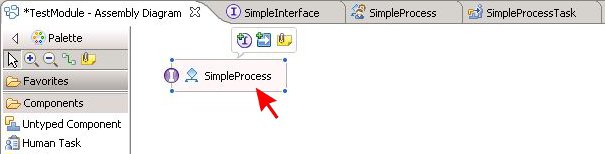
Assemble the sample
Open the assembly diagram for module TestModule by double-clicking on the corresponding node in the Projects panel. Drag the business process SimpleProcess onto the diagram canvas and save the assembly diagram afterwards.
The module is now ready to be tested. The next step is to run the sample.