This chapter describes the steps to upgrade the simple version of the application designed in the previous chapter Build it Yourself to issue some more advanced Web service API calls. This advanced version will use two more dialog windows: one new window is designed to take input from the end user, create a business object with these input data, and start a long-running process. Another new window is designed to query the process state and to display the output returned by the process once the process has finished.
In detail, in this chapter the following steps are described:
- Import the prepared workspace for this sample.
- Generate a helper class from the data definition files.
- Design a new window for starting a process.
- Design another new window for displaying the process result.
- Add a button for starting the advanced sample the from initial window.
Note: Make sure that you have completed all steps in the previous chapter Build it Yourself before you proceed.
Import workspace
The advanced version of the client will use a particular business process template on the server side.
To define a business process and the appropriate data definitions is not the focus of this sample, but rather covered in
several other samples in the "Getting Started" section.
Thus, the definitions required for this sample sample are predefined as ZIP file in Project Interchange format. To use these definitions, go to the chapter Download of this sample
and import the webServiceAPISampleDotNET.zip file as described in the first section "WebSphere Integration Developer 7.0 project".
Generate helper class
In this section, we extract the data definition information from WebSphere Integration Developer and use it to generate a helper class. This helper class will assist us to serialize data from C# classes into XML data and to deserialize XML data into C# classes again.
Do the following steps:
- In WebSphere Integration Developer, open the Business Integration perspective.
- Switch to the Business Integration view.
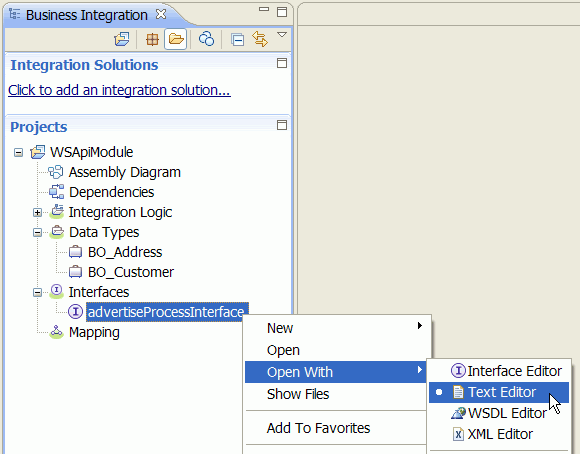
- In the navigation tree, expand WSApiModule > Data Types.
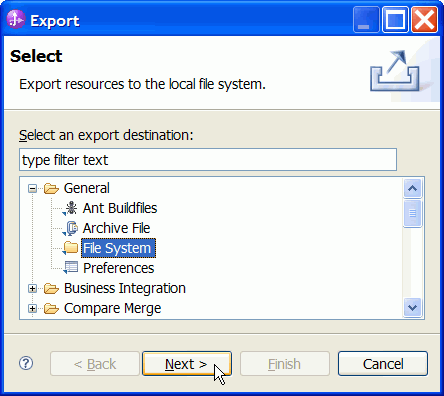
- Right-click BO_Address and select Export. The Export dialog opens:
- Expand General, select File system and press Next.
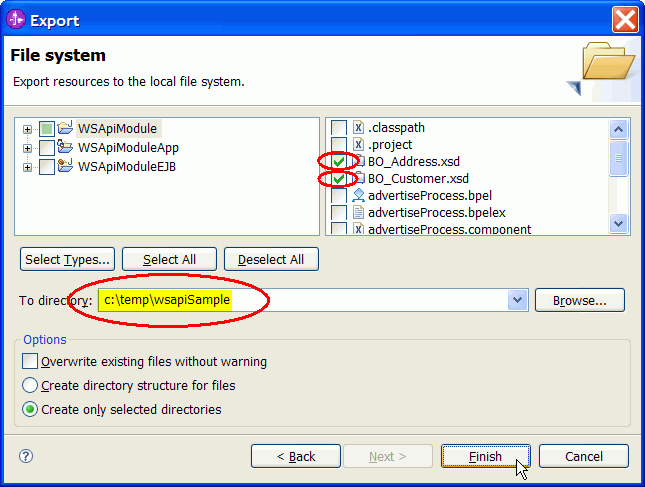
- In the Export dialog window, in addition to
BO_Address.xsd, check the checkbox next toBO_Customer.xsd. - In the field To directory select a temporary directory of your choice.
- Click Finish.
You now have exported the definition files for the business objects used in this project.
Next, you will export the input message definition and the output message definition from the WSDL file
that defines the process interface.
Do the following steps:
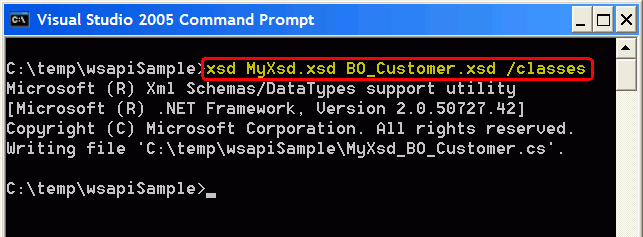
- Using Operating System commands, create a new empty XSD file in the same temporary directory used for the previous export step. In this sample, the file name
c:\temp\wsapiSample\MyXsd.xsd - In the WebSphere Integration Developer navigation tree, expand WSApiModule > Interfaces.
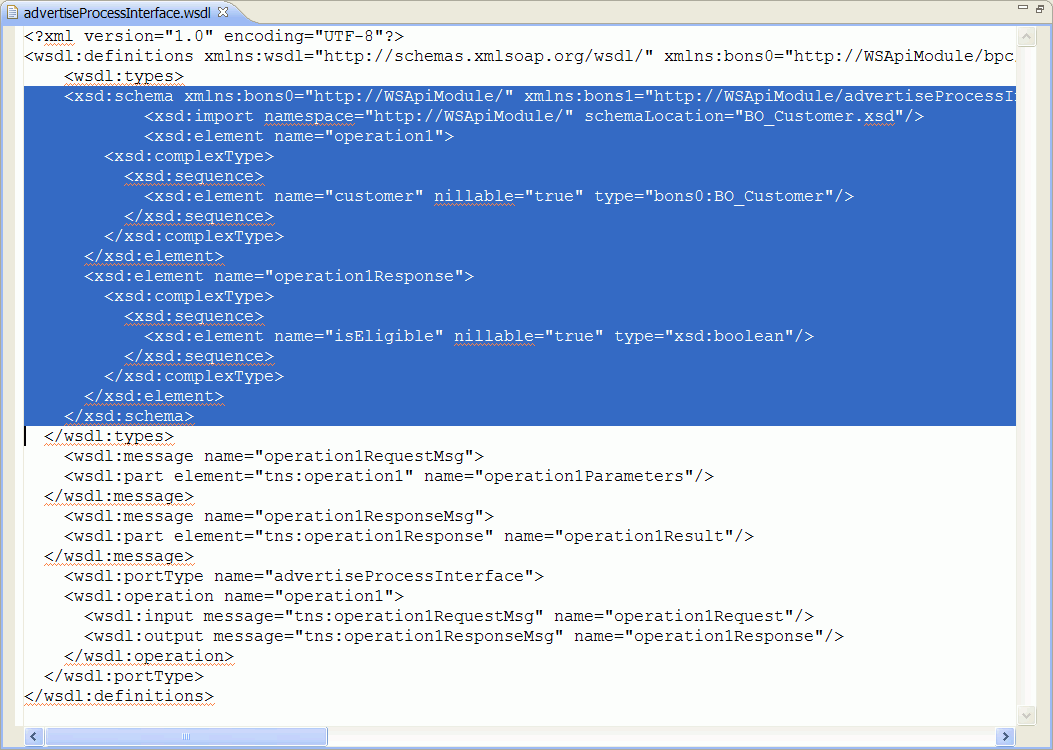
- Right-click advertiseProcessInterface and select Open with > Text Editor.
- Copy the contents of all child elements of the
<wsdl:types>element, paste it into the filec:\temp\wsapiSample\MyXsd.xsd - On Operating System level, select Start > All Programs > Microsoft Visual Studio 2005 > Visual Studio Tools > Visual Studio 2005 Command Prompt. This opens a command window from which the program
xsd.execan be called. - In the command window, change current drive and current directory to the temporary directory used in the previous steps.
- Type the following command:
xsd MyXsd.xsd BO_Customer.xsd /classes - In Microsoft Visual Studio, select Project > Add Existing Item.
- Select the newly created helper class and click Add.
The source of the wsdl file for the process interface is now visible in the editor.
Now we have created a helper class we can use for serialization and deserialization which we can import into our .NET project. This file might look similar to this one: MyXsd_BO_Customer.cs.

The methods defined in the helper class can now be used in the client application code.
Create additional windows for the client application
In this section, we add two more windows to our client application.
Design the window for starting a process
Complete the following steps:
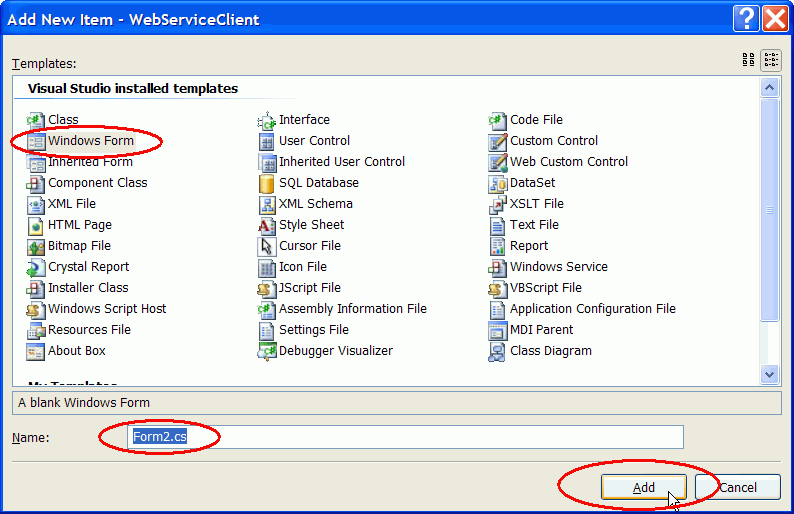
- In Microsoft Visual Studio, select Project > Add Windows Form.
- In the Templates selection window, use the defaults and click Add.
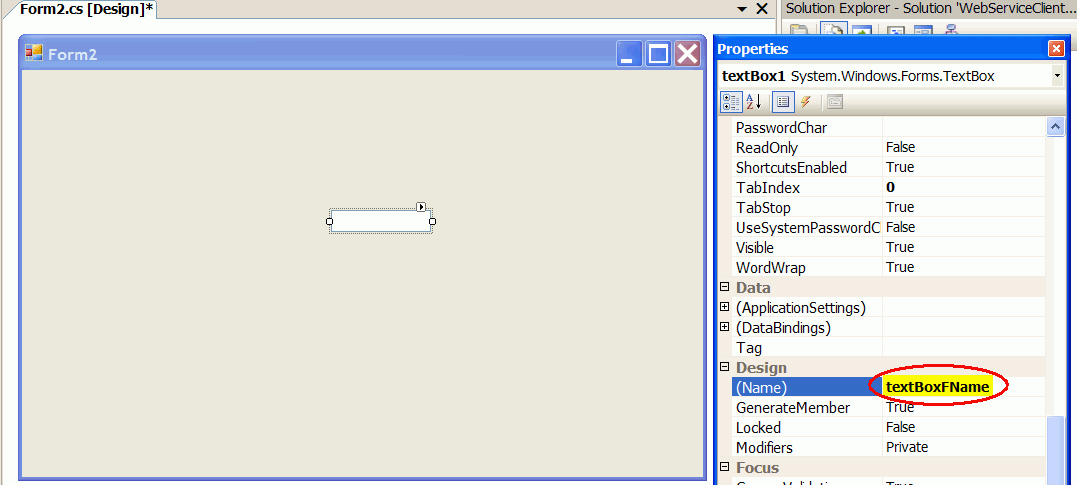
- Enlarge the window and add a TextBox control.
- Right-click the new TextBox control to open the Properties dialog, and change the Name to
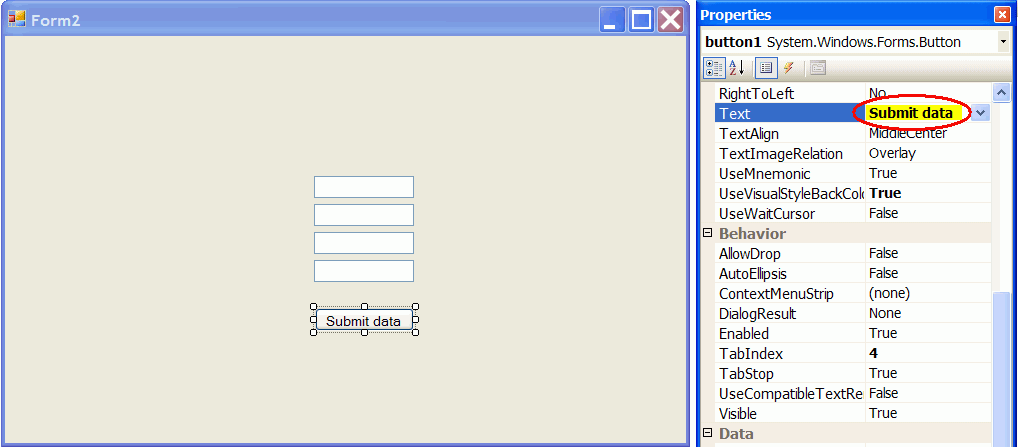
textBoxFName. - Create three more TextBox controls with the names
textBoxLName,textBoxSName, andtextBoxCName. - Add a Button control and enlarge it.
- Right-click the new Button control to open the Properties dialog and change the Text to
Submit data. (Change only the Text field, do not change the Name field for the button.) - Double-click the Button control to associate this push button to the method button1_Click. In addition, this double-click opens the file Form2.cs and creates the method button1_Click with empty body.
- Delete the content of file Form2.cs completely and insert the content of this predefined version: Form2.cs. This adds the implementation of the method button1_Click, some auxiliary functions, variables, and adds two parameters to the constructor of Form2.
- Optionally, add labels as suggested in the following screenshot:
- On the toolbar, click the Save All button
 .
.
A new form with name Form2 is displayed in the Design view.

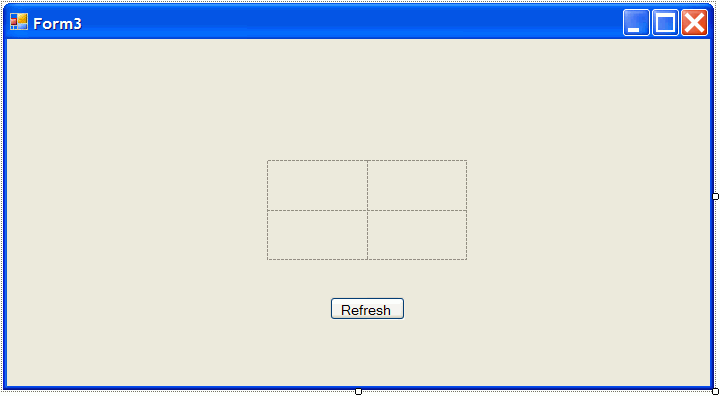
Design the window for displaying process results
Complete the following steps:
- In Microsoft Visual Studio, select Project > Add Windows Form.
- In the Templates selection window, use the defaults and click Add. A new form with name Form3 is displayed in the Design view.
- Enlarge the window and add a TableLayoutPanel control.
- Add a Button control, open the Properties dialog and change the Text to
Refresh. (Change only the Text field, do not change the Name field for the button.) - Double-click the Button control to associate this push button to the method button1_Click. In addition, this double-click opens the file Form3.cs and creates the method button1_Click with empty body.
- Delete the content of file Form3.cs completely and insert the content of this predefined version: Form3.cs. This adds the implementation of the method button1_Click, some auxiliary functions, variables, and adds three parameters to the constructor of Form3.
- Optionally, add the label Process Instance Details to the window layout.
- On the toolbar, click the Save All button .

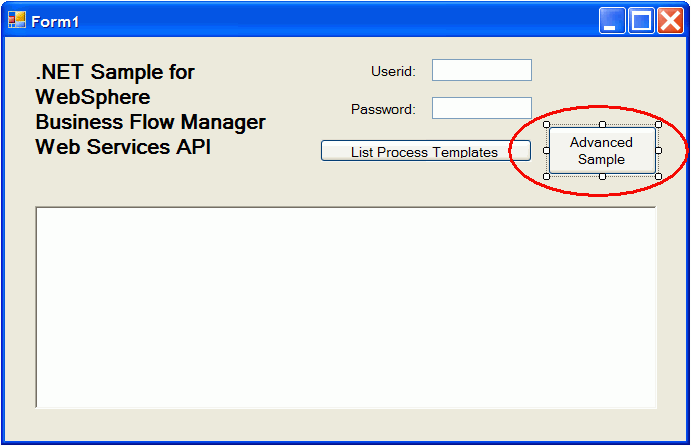
Add a button for starting the advanced sample
Finally, a new button is created in the window Form1 which will be used to start the advanced sample.
Complete the following steps:
- In Microsoft Visual Studio, select View > Solution Explorer.
- In the Solution explorer window, open Form1.cs with the CSharp Form Editor (Default).
- Add a Button control, open the Properties dialog and change the Text to
Advanced Sample. (Change only the Text field, do not change the Name field for the button.) - Double-click the Button control to associate this push button to the method button2_Click. In addition, this double-click opens the file Form1.cs and creates the method button2_Click with empty body.
- To implement the body of the method button2_Click, add the following lines between the curly braces:
- On the toolbar, click the Save All button .
try
{ // Instantiate the proxy
BFMWSService myService = new BFMWSService();
richTextBox1.Clear();
// Get userid and password values and wrap it as UsernameToken
UsernameToken myToken = new UsernameToken(textBoxUserid.Text,
textBoxPassword.Text, PasswordOption.SendPlainText);
Form2 f2 = new Form2(myService, myToken);
f2.Show();
}
catch (Exception exc)
{ // Whenever an error occurred, let the user know the details
MessageBox.Show(exc.Message, "Error running advanced sample",
MessageBoxButtons.OK, MessageBoxIcon.Error);
richTextBox1.Text = " ... advanced sample failed with exception: " + exc.GetType();
}
The bottom of your editor window will now look similar to this:
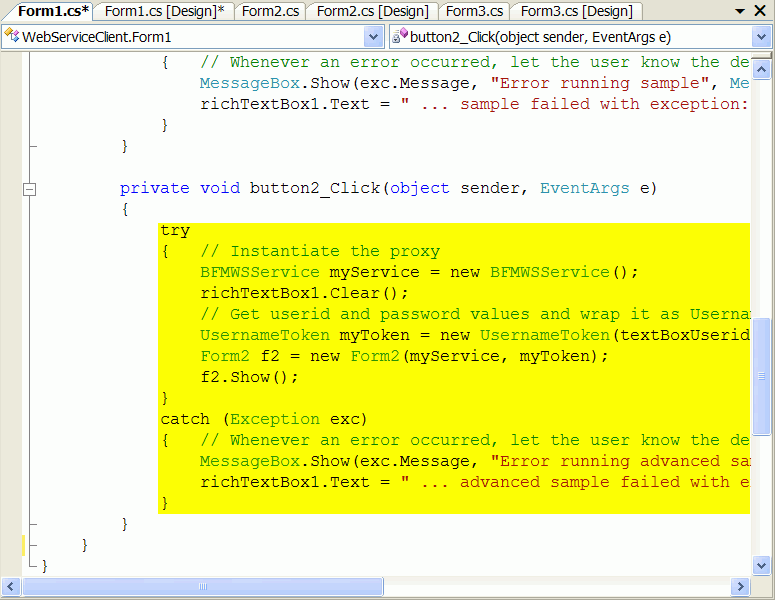
Click on this link to see the complete source code of the new Form1.cs version.
You have now finished the implementation of the advanced client application. Optionally, you can now use
Then proceed to the next chapter Run the sample to work with the application.