< Previous | Next >

Adding monitoring details

In this lesson, you will add events, triggers, and KPIs to the monitor model.

Events are requests or responses sent from one component to another. A trigger is a mechanism that detects an occurrence and can cause additional processing to occur in response. For example, you could define a trigger that causes a metric to be updated, a counter to increment, or a stopwatch to halt each time a task ends. Key performance indicators (KPIs) are quantifiable measurements of the improvement or deterioration in the performance of an activity that is critical to the success of a business.
  1. Click KPI Model tab and expand OrderHandling KC.
  2. Click on the Average Process Duration Trigger 1. For Trigger condition, enter the expression Average_Process_Duration ge dayTimeDuration('P3DT1H').
  3. Click on the Percentage of Orders Shipped Trigger 1. For Trigger condition, enter the expression Percentage_of_Orders_Shipped < 85.
  4. Click Average process Duration (one of the KPIs) and examine how the KPI is calculated. How the KPI gets its value is shown under KPI Value. The metric and the aggregate function are shown under KPI Details. Everything is set up already.
  5. Click Percentage of Orders Shipped. There is no metric available to calculate this KPI. You need to create a KPI for the number of shipped orders and another KPI for the total number of orders. From that you can calculate the percentage of orders shipped.
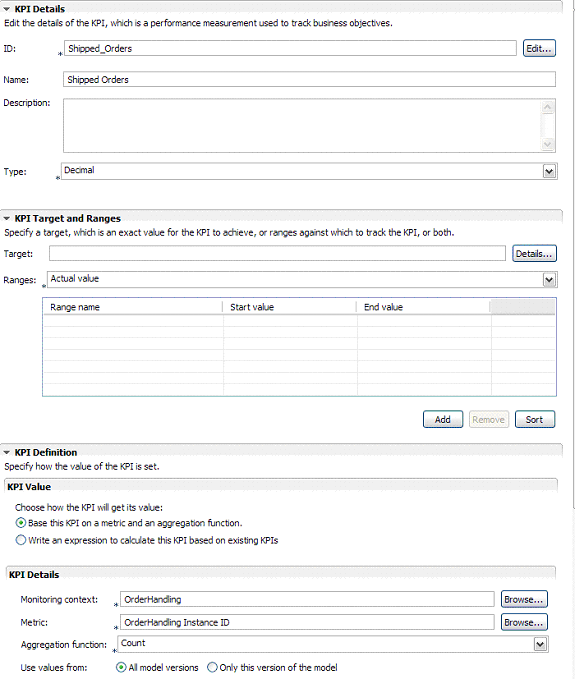
  6. Create the Total Number of Orders KPI by right-clicking OrderHandling KC and selecting New > KPI. For the name, enter as Total Number of Orders and click OK.
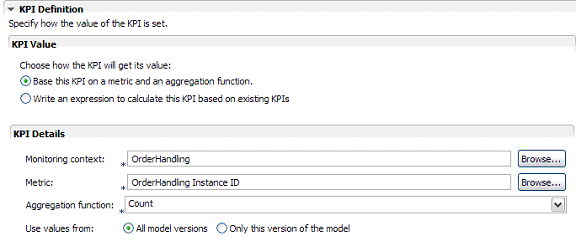
    1. Under KPI Value select Base this KPI on a metric and an aggregation.
    2. Under KPI Details, select OrderHandling as the monitoring context.
    3. Select OrderHandling Instance ID as the metric.
    4. Select Count as the aggregation function and leave everything else as it appears by default.
    KPI Definition window
  7. Create the Shipped Orders KPI by right-clicking OrderHandling KC and selecting New > KPI. Enter name as Shipped Orders and click OK.
    1. Under KPI Value, select Base this KPI on a metric and an aggregation.
    2. Under KPI Details, select OrderHandling as the monitoring context.
    3. Select OrderHandling Instance ID as the metric.
    4. Select Count as the aggregation function and leave everything else as it appears by default.
      Note: This KPI should be counting only shipped orders. Under Data Filter you will need to filter only the shipped orders. For that you need to create a new metric called Order Status. You will create the Order Status metric in the next step and later complete the Data Filter for this KPI.
    KPI Details Ranges window
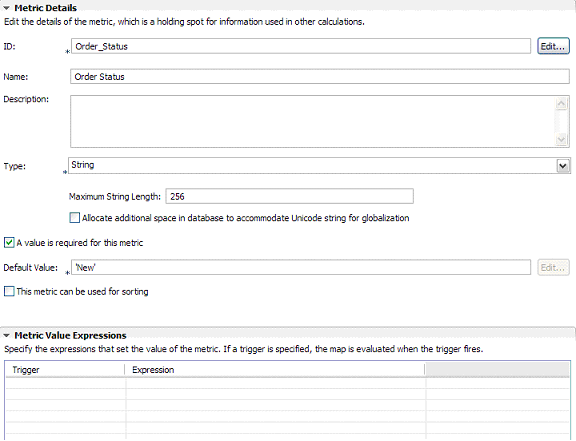
  8. Create the Order Status metric.
    1. Click the Monitor Details Model tab and right-click the OrderHandling monitor context. Select New > Metric.
    2. Enter Order Status as the name and leave String as the type. Click OK.
    3. Select A value is required for this metric because a dimension uses this metric and it requires a value for dimensional analysis.
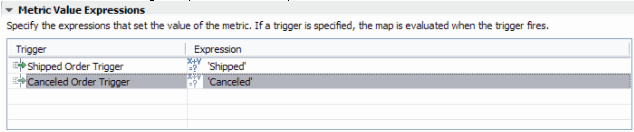
    4. For the default value, enter 'New' with the single quotation marks. You need to create triggers to set the value of the metric. See the next step to see how to create triggers. You select the triggers later.
    Metric Details window
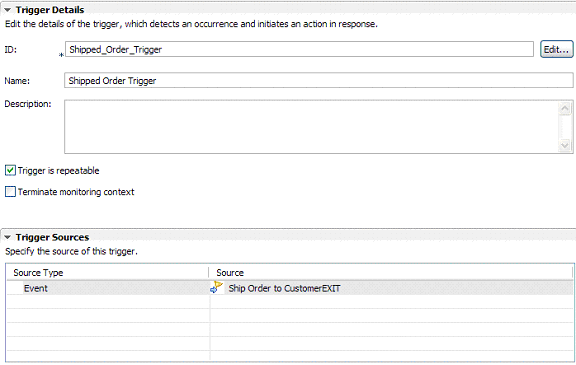
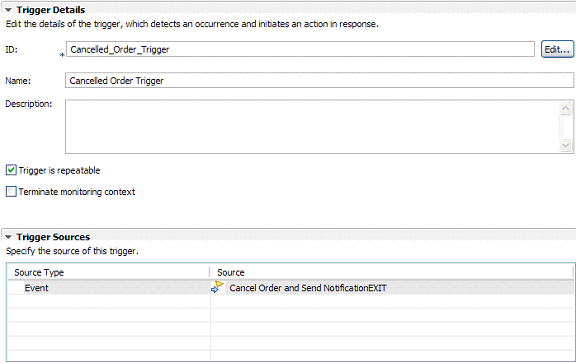
  9. Create the Shipped Order and the Canceled Order triggers.
    1. In Monitor Details Model tab, right-click the OrderHandling monitoring context and select New > Trigger.
    2. Enter Shipped Order Trigger as the name and click OK.
    3. Under Trigger Sources, click Add. Click Other source type and select OrderHandling > Ship Order to Customer > Ship Order to CustomerExit. Click OK.

      Trigger Detail window

    4. In Monitor Details Model tab, right-click the OrderHandling monitoring context and select New > Trigger.
    5. Enter Canceled Order Trigger as the name and click OK
    6. Under Trigger Sources, click Add. Click Other source type and select OrderHandling > Cancel Order and Send Notification > Cancel Order and Send NotificationExit. Click OK.
      Trigger Details window
  10. Complete the Order Status metric.
    1. Click Order Status. Under Metric Value Expressions, click Add and then click Trigger Cell and select Shipped Order Trigger.
    2. Under Expression, enter ‘Shipped' including the single quotation marks.
    3. Repeat steps a and b to add Canceled Order Trigger as the trigger value and ‘Canceled' including the single quotation marks for the expression.

    Metric Value Expressions Shipped Order Trigger window
  11. Complete the Shipped Orders KPI.
    1. Click the KPI Model tab and then click Shipped Orders.
    2. Under Data Filter, click Add and select Order Status as the metric. Click OK.
    3. Under values type ‘Shipped' with the single quotation marks.
    Data Filter Order Status window
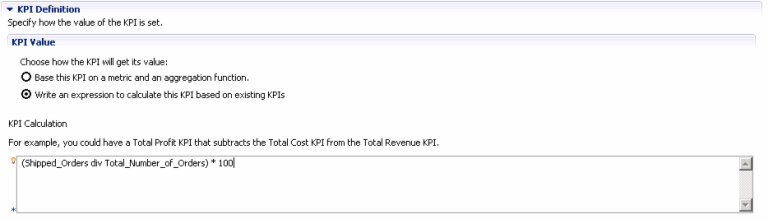
  12. Complete the Percentage of Orders Shipped KPI
    1. Click Percentage of Orders Shipped.
    2. For KPI Value, select Write an expression to calculate this KPI based on existing KPIs.
    3. For KPI Calculation, enter ( Shipped_Orders div Total_Number_of_Orders ) * 100. You can use context assistant to complete the expression inside the parentheses.
    KPI Details Percentage of Orders Shipped window
< Previous | Next >