Build it yourself
1. Install Query Table Support Pac and Sample Process Application
a. Access and download the Query Table Builder Resources
- Access the PA71:
Business Process Manager Advanced - Query Table Builder and download the pa71_3.0.zip file to a
temporary directory.
- Access, read or browse through the PA71_GettingStarted.pdf
for pre-requisites, installation, utilization and concepts of the
query table builder.
- Follow the instructions of the Getting Started document to
install the query table builder to the Integration Developer.
You also can use Integration
Developer > Help
> Install New Software > Add ...
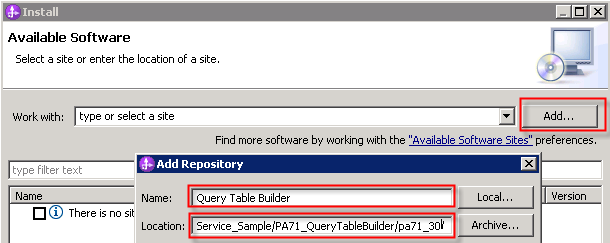
Enter the Name Query Table Builder
and navigate to the local temporary directory where you downloaded and
extracted the support pac.
Press Ok.
- Wait for the installation of the query table builder to finish.
b. Import and install the Process App provided
- Download the import file of the process application named Procurement_Sample_Test1_SS5.twx
to a temporary directory.
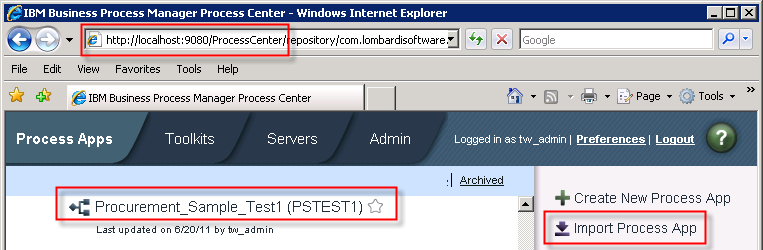
- Open the Process Designer or the Process Center Admin
console via http://localhost:9080/ProcessCenter/. Logon using the
userid
tw_admin and password tw_admin.
- Click Import Process App.
Navigate to the directory where you saved the process application and import this file.
Wait for the import to complete.
- Start the IBM Integration Developer (IID). Select an existing or
new workspace. The IID opens in the Business Integration Perspective.
Switch to the Process Center perspective. Open Window > Open
Perspective > Process Center.
Navigate to and select the Procurement_Sample_Test1 (PSTEST1) process app. Click Open in Designer.
The process app is downloaded to your IID workspace.
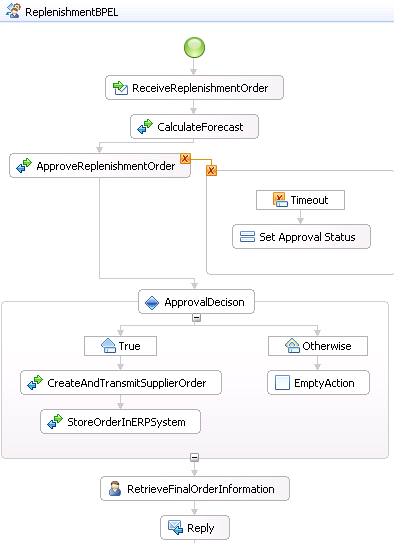
- Familiarize with the BPEL process.
Open the Procurement_Sample_Test1 process app. Navigate to the
Procurement_Sample_BPELProcess_Module > Integration Logic > BPEL
Processes > ReplenishmentBPEL. The BPEL editor opens.
c. Install and start the Web Application
Web projects are not "life cycle aware". So if you
want multiple snapshots of a Process Application to contain the same
Web Project you'll need to use a single separately deployed Web App.
This is directly deployed as a J2EE web application and, shared across
the Process Application snapshots.
- Download the
file Procurement_Sample_BPELProcess_FormsEAR.ear.
Make sure that the type of the saved file in the file system is ".ear".
- Open your preferred internet browser and enter the url for the
Administrative Console: https://localhost:9043/ibm/console/logon.jsp
The login window opens. Enter the userid tw_admin
and password tw_admin. Press Log in.
- Within the Admin Console select Applications > New
Application > New Enterprise Application.
The "Preparing for the application install" window opens.
Browse and navigate to the directory where you have stored the
downloaded resources. Select Procurement_Sample_BPELProcess_FormsEAR.ear.
Press Open. Press Next.
- Stay with Fast Path. Press Next.
Keep the settings for Step 1: Select installation options.
Press Next.
For Step 2: Map modules to servers select the flag
for the Procurement_Sample_BPELProcess_Web. Press Next.
For Step 3: Summary press Finish.
Wait for the EAR file being installed.
Press Save after the application was successfully
installed.
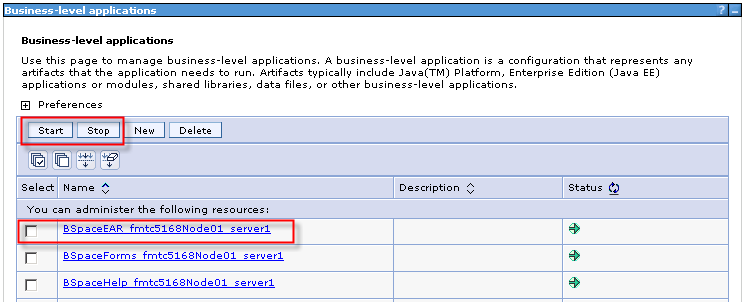
- Start the Web Application
The Procurement_Sample_BPELProcess_FormsEAR.ear
was installed but not automatically started. Navigate to Applications
> Application Types > Business Level Applications.
Select the flag for the FormsEAR application.
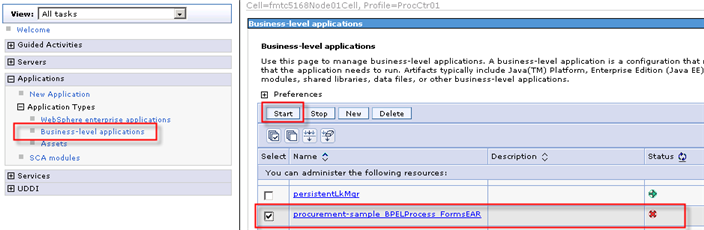
Press Start.
The window confirming the Procurement_Sample_BPELProcess_FormsEAR
started successfully shows up.
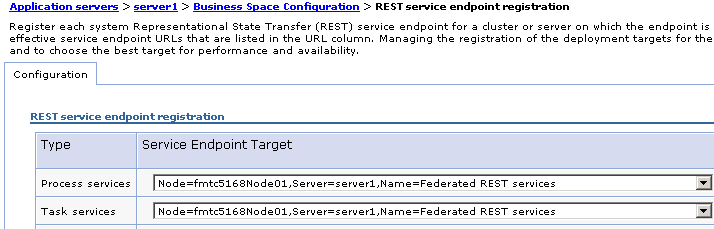
d. Verify REST Endpoints
In order to federate BPD and BPEL processes and tasks in Business
Space, IBM Business Process Manager Advanced must be installed and
Business Space must be configured.
The process and task engines can be configured on multiple
deployment targets in a cell. Each REST API in IBM Business Process
Manager has a unique REST service endpoint that is registered during
the configuration of the REST APIs. Each endpoint is identified by a
type and a name and contains the host name, port and context root under
which a rest API can be accessed. The endpoints are used by clients,
such as Business Space, to find the correct endpoint URL. With a new
installation, Business Space is configured by default to use the
Federated REST services.
To verify or change the target REST service endpoint used by
widgets in Business Space, complete the following steps:
- Log on to the administrative console
- Select Servers > Server Types >WebSphere
application servers > servername > Business Integration
> Business Space Configuration > System REST service endpoint
registration for a single-server installation, or for a
cluster set-up, select Servers > Clusters > WebSphere
application server clusters > clustername > Business
Integration > Business Space Configuration > System REST service
endpoint registration.
2. Create Saved Search using Business Data and Filters for BPD
Human Tasks
When users work with lists they often need to see only a subset of
tasks or processes and business data included in the list. In Process
Portal, users can create saved searches that include search conditions
as well as business data. Administrators can share saved searches
making them available to all users.
In Business Space, the Processes and Tasks list widgets use saved
searches to display processes and tasks associated with a BPD. By
default, they use the All default saved search, which does not include
any search condition or business data. To include conditions and
business data, such as customer information, you can define your own
saved searches, share them, and configure the widgets in Business Space
to use them.
a. Define Business Attributes used in a Search
To include the business information like the orderID in the Tasks
widget
for
the Procurement Sample application you specify data
available for searches.
-
Open the Process Designer and the process app
Procurement_Sample_Test1.
In the navigator select Process and open the Business Process
Definition for the ReplenishmentBPD
process. The BPD opens in the
Diagram view.
-
Select the Variables tab.
Expand Variables > Local >
Input > ReplenishOrderData(ReplenishOrderBO). Select the orderID (String) attribute.
See that the orderID under Business
Data Search an set the flag under Available in Search. Stay with
the Search Alias as orderID.
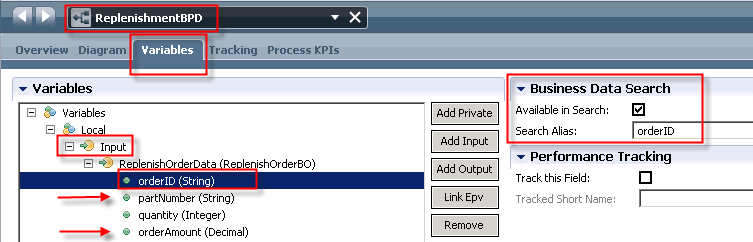
-
Repeat this step for the partNumber (String) to be Available in
Search with Search Alias: partNumber.
-
Repeat this step for the orderAmount (Decimal to be Available in
Search with Search Alias: orderAmount.
-
Allow users to access the business data by exposing it in the
process details.
Switch to the Overview tab and
ensure the the BPD Exposes business
data to All Users.
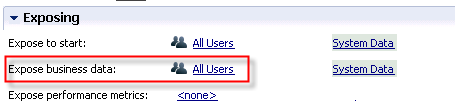
Press Ctrl + S to save the BPD.
b. Create and share a Saved Search
As you will likely want to provide the same customized business
space to many users, you need to share the saved searches. Only
administrators can share saved searches in Process Portal. Complete the
following steps to create and share a saved search which filters
process apps for the Acronym PSTEST1 and display of the business data
orderID, partNumber and orderAmount.
- Log in to Process Portal using the url
http://localhost:9080/portal/ using a userid
tw_admin and
password tw_admin.
The My Tasks page and the Inbox opens.
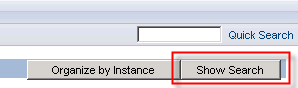
- Click Show Search
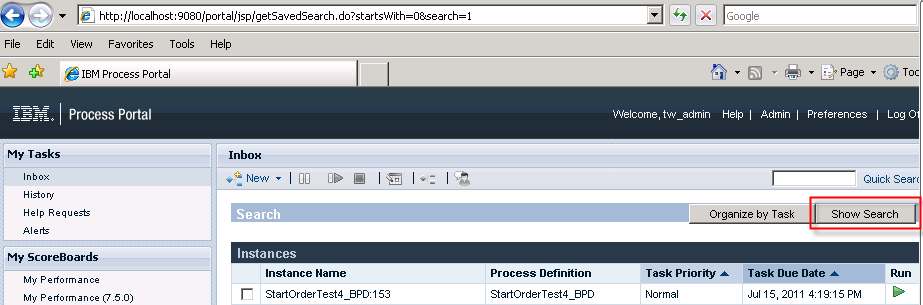
The Search Condition Window opens.
One Search Condition with Task
Status - Equals - New or Received is listed.
- Define Saved Search to filter on all task that belong to the
process app with acronym PSTEST1
Press the Add New Condition
and
replace << Choose One >> by Process App
keep Equals as comparison
parameter and
enter PSTEST1 as acronym name
for the process app to be used in this filter.

Press More
to show the available columns.
The search conditions that you specify
here are applied as filters in Business Space, which cannot be changed.
However, you can specify additional filters using the column headers in
the list widgets.
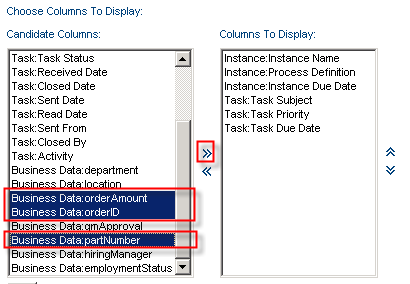
- Select the columns of interest and add them to the Columns
To Display.
The business data field you created previously is
also available in the Candidate Columns list and
should be added.
Select Business Data: orderID,
Business Data: partNumber,
and Business Data: orderAmount.
Press the ">>" to move
these attributes to the Columns to
Display area.
Note:
Although you can define default
sorting
criteria and number of items per page for the saved search, these are
not used in Business Space but in Process Portal. However, the number
of items is
automatically fitted to the view by default.
-
Move the Business Data: orderID,
Business Data: partNumber,
and Business Data: orderAmount
within the Columns to Display area up to the top and
in the sequence of orderID,
partNumber and orderAmount.
- Move further Task properties to the Columns to Display via
">>" and
arrange them via the move up / move down arrows similar to this
sequence shown in the screenshot below.
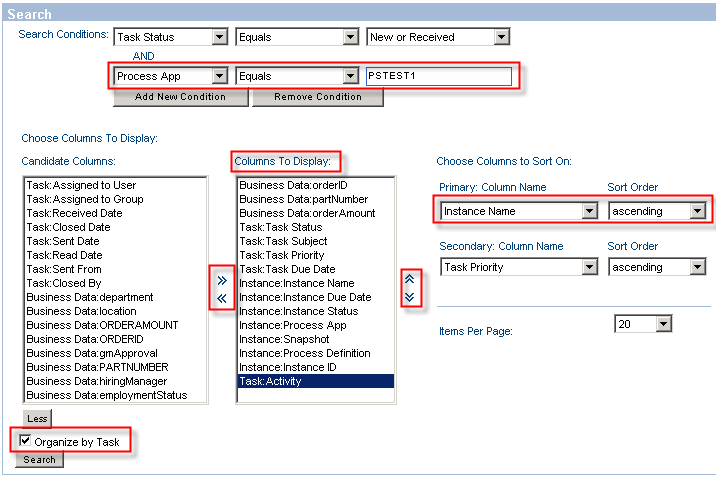
- Set the flag for Organize
by Task.
This property
determines whether the saved search is available in the Tasks widget or
in the Processes widget (flag not set).
Specify Chose Columns to Sort On
with Primary: Column Name: Instance
Name and Sort Order: ascending.
Currently you can't save this search. After you have executed this
search (query) the first time and you are satisfied with the results
the Save Search is displayed again.
- Press Search.

- Modify the search until your are satisfied with the result set
and arrangement of columns.
Press Show Search.
- Press Search to run the
search and check
the
result.
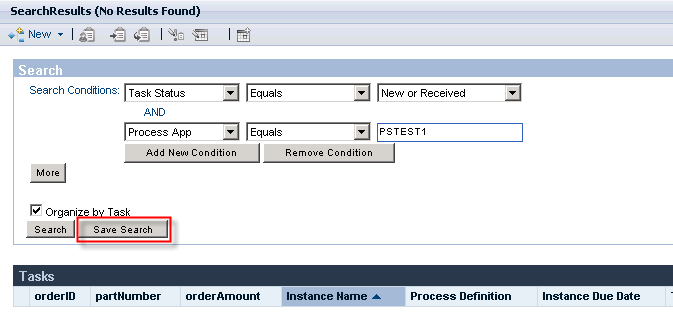
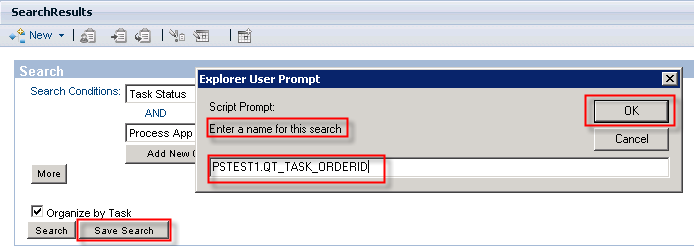
- Click Save Search to save the search.
An Explorer Prompt pops up.
Enter the name of the search, which for the use in a federated query
must follow the naming convention of a BPEL query table, i.e. using a
prefix and name, everything in capital letters. Enter the name PSTEST1.QT_TASK_ORDERID. Press OK.
- Share the search with other endusers.
Click the PSTEST1.QT_TASK_ORDERID search
shown in the
Navigator again.
Click Show Search.
When you are satisfied with the search results and specification click Share
this Search to make it
available to all users.

The saved search, including the business data, is available to all
users.
To use the Saved Search in Business Space you will have to update
the Tasks List widget settings. This is covered in section Configure the Tasks List.
Before we do this we have to define the Query Table for the tasks
managed by the BPEL engine.
3. Develop,
Deploy and Test Query Table in the IBM Integration
Developer
Query tables support task and process list queries on data that is
contained in the Business Process Choreographer database. This includes
human task data and business process data that is managed by Business
Process Choreographer, and external business data. Query tables provide
an abstraction on the data that can be used by client applications. For
further information refer to the Getting Started document, to the
section in the Information Center Query tables in Business Process Choreographer, as
well as to a Query Table Sample for reference.
In this sample we build a query table that filters the tasks the
belong to BPEL processes part of the
Procurement_Sample_Test1 (PSTEST1) process app. We are specially
interested in the orderID, partNumber and orderAmount attributes of the
ReplenishOrder business object used as process variable.
a. Create a Query Table
(QT)
To create a query table, perform following steps:
- In IID Business Integration Perspective select Window
> Open Perspective > Other ... > Query Tables.
- Select File > New > Project > Module. The Create a
Module window open. Enter Module name: MyQueryTables.
Press Finish.
Stay in the Query Tables perspective.
Note:
It is not required that the query table definition belongs to a Module
or Process App as you might want to use the same generic query table
across multiple Modules or multiple Process Apps.
- In the navigation tree right-click on the
MyQueryTables folder project. Select File
> New > Composite Query Table for
Business
Space.

The Composite Query Table Definition for Business Space opens.
- Ensure that Procurement_Sample_BPELProcess_Module is selected and
shown in parent folder.
Change the name of the Query Table name from PREFIX.NAME to PSTEST1.QT_TASK_ORDERID.
PSTEST1 is the acronym of the process app we use but it is not required
that this acronym is used as prefix. As this query table is used for
federation we have to use the same name as for the Saved Search.
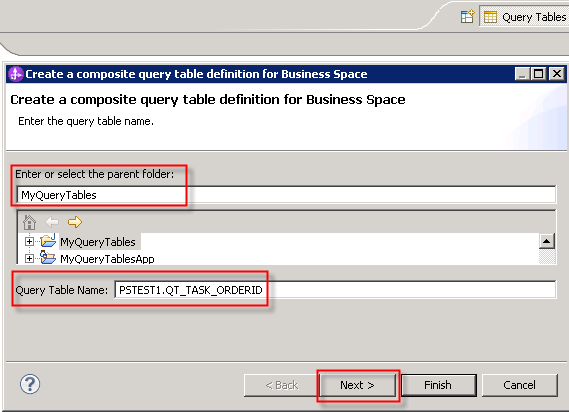
Click Next.
The Create a composite query table
definition for Business Space window opens.
- Select the radio button for Tasks
as you specify the the Task List
columns for the inquiry work baskets.
Press Finish.
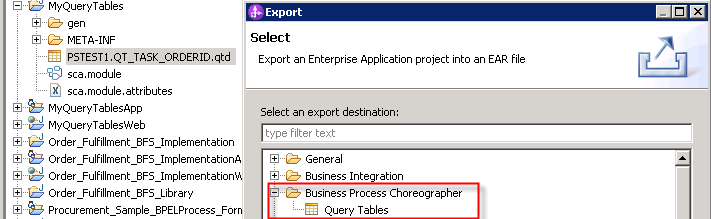
The Query Table specification page PSTEST1.QT_TASK_ORDERID.qtd
with the
primary query table TA (TASK) opens.
Note:
Query tables that will be used in Business Space have to fulfill
certain criteria. Query tables for the widget Tasks List require:
- The primary query table has to be TASK.
- The attributes KIND and STATE of the primary query table TASK
have to be added to the query table.
To enable drill down scenarios
that include the tasks associated with a process instance, add the
attributes CONTAINMENT_CTX_ID and TKTID. Additionally, for displaying
details in the Tasks List it is recommended to add IS_WAIT_FOR_SUB_TK.
b. Specify
filter criteria based on Process App
Acronym and Task State
Specify task status against primary table and acronym of the process
app from a secondary table as filter criteria.
- Specify a filter criteria on task level so that only task in
state "ready" or "claimed" are displayed.
click the green primary table
TA (TASK).
Under Properties > Details
enter as Filter: STATE=STATE_READY OR
STATE=STATE_CLAIMED.

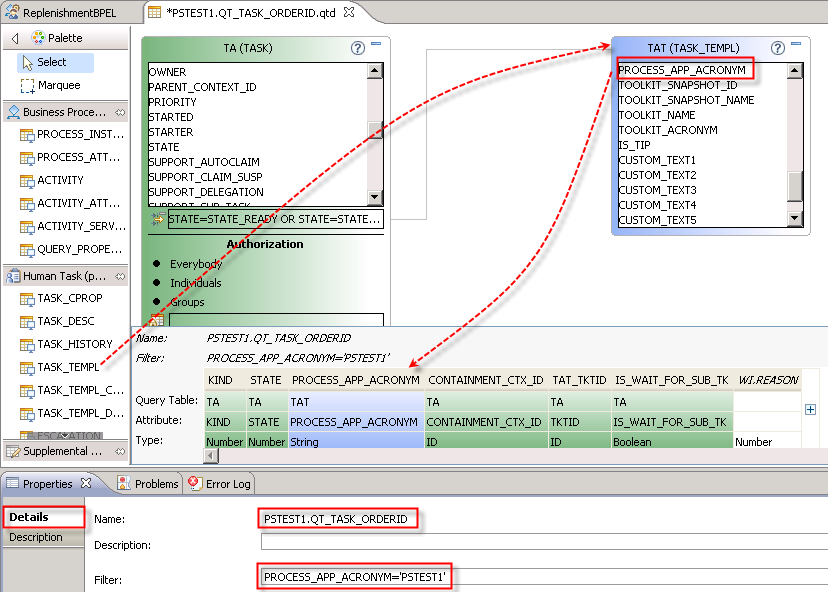
- The Process App Acronym attribute is not part of the primary Task
table, but of the Task Template
secondary table.
Drag & drop the Human Task
(predefined) > TASK_TEMPL table from
the Palette to the canvas. The table is connected to the primary TA
(TASK) table.
- Within the TAT (TASK_TEMPL) scroll to the PROCESS_APP_ACRONYM.
This attribute is used within the filter criteria.
Drag & Drop the PROCESS_APP_ACRONYM attribute to the query table
right infront the CONTAINMENT_CTX_ID column.
- Click on the canvas to specify filter criteria for the entire
query
table named PSTEST1.QT_TASK_ORDERID.
Under Properties > Details
enter as Filter: PROCESS_APP_ACRONYM
= 'PSTEST1'
-
Next we want to specify additional Task attributes we want to
retrieve and
display for the enduser in Business Space. In this sample we want to do
it for demo purpose to map certain task properties.
Drag & drop the TASK_DESCription secondary table to the
canvas. Drag the DISPLAY_NAME from the TAD table to the first position
of the query table itself.
From the green TA (TASK) primary table select the DUE date and the
PRIORITY property to the query table as well.
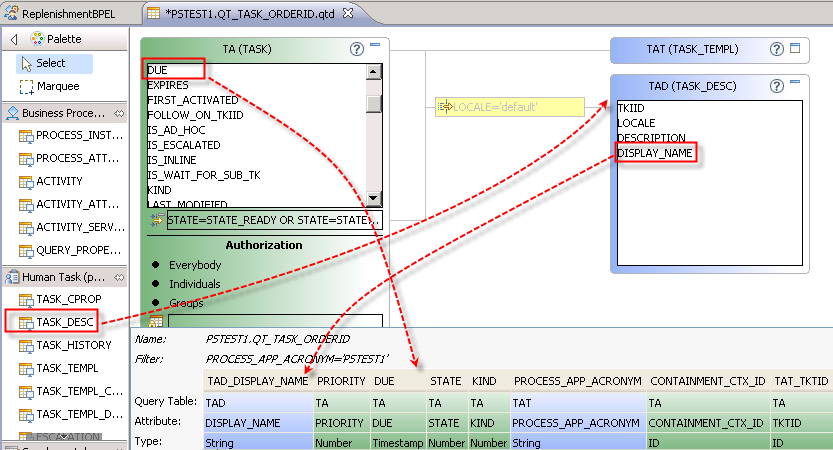
Select the TAD_DISPLAY_NAME column. Under Properties > Description > Display
Name enter Task Name.
In the same manner specify the Display
Name for DUE to Due Date
and for PRIORITY to Priority.
Same for PROCESS_APP_ACRONYM to Process
App Acronym.
Press Ctrl + Save to save the
query table specification.
c. Specify
Business Common Attributes
A query property
determines which parts of a global variable are accessible in the
runtime environment with the query() API function. You can define query
properties on your global variables. Query properties can be
included in runtime queries using the API function. You can also use
query
tables to expose the query properties to the business user in Business
Space.
- Specify the attributes in the BPEL process to be exposed to the
Task List.
Switch to the Business Integration Perspective. Access the BPEL process
for the ReplenishmentBPEL process.
Expand Variables. Double-click
the ReplenishOrder variable
which opens the Properties page.
Select Query Properties and
press Add ... .
- The Add a Query Property window opens.
Enter the Name orderID and
select orderID : string from
the expanded ReplenishOrderBO.
Press OK.
- Add two more attributes to the Query Properties:
partNumber with
ReplenishOrderBO - partNumber : string and
orderAmount with
ReplenishOrderBO - orderAmount : double

Press Ctrl + S to save your
work.
- Specify the query properties
related to the Task that you want to have displayed in the Task List if
the Business Space.
- Return to the Query
Tables perspective.
- Add the orderID attribute as an additional parameter to the
primary
query table.
Select the QUERY_PROPERTY table from the navigation bar under Business Processes (predefined).
Drag and drop in on the canvas.
This supplemental query property gets
joined / linked with the primary query table.
Select the STRING_VALUE
in the QP (QUERY_PROPERTY) table.
Drag and drop it to query table to the first position (column).
Under Properties > Details
change the name from STRING_VALUE to BDORDER_I_D.
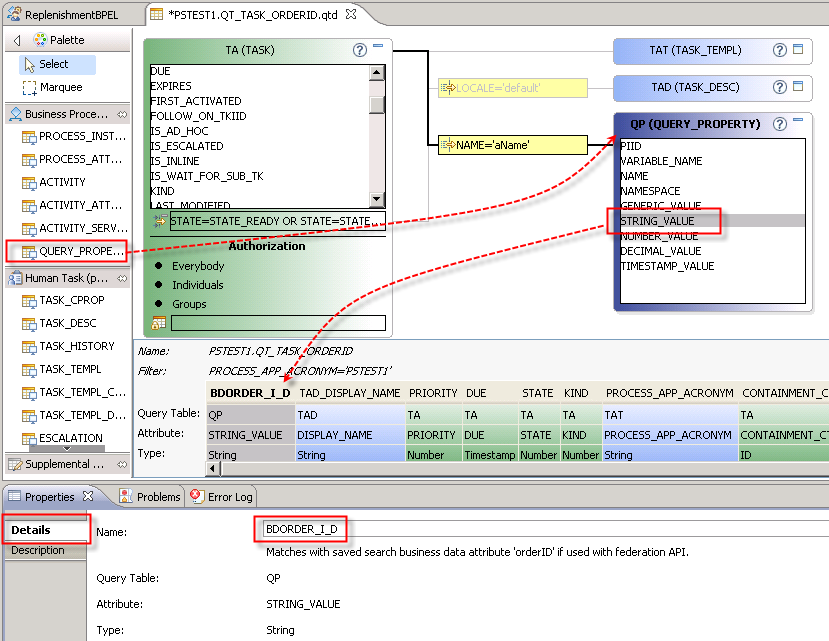
- Select Properties > Description. Change the Display Name to OrderID. This will be the display
name used in Business Space.
 a process
Note:
Federating business data
attributes
You often have a need to include business data in task and process
lists. Saved searches and query tables allow you to do this.
The BPD REST services provide
an attribute name that is derived from
the name of a business data column as follows:
• An underscore is prefixed by an underscore.
• Uppercase letters are prefixed by an underscore.
• Lowercase letters are converted to uppercase.
• The name is prefixed with BD.
Examples:
• customerName = BDCUSTOMER_NAME
• CustomerName = BD_CUSTOMER_NAME
• customer_name = BDCUSTOMER__NAME
• customer_Name = BDCUSTOMER___NAME
• CUSTOMERNAME = BD_C_U_S_T_O_M_E_R_N_A_M_E
To federate business data attributes between saved searches and query
tables, you need to use the matching
attribute name in the query table.
- Modify the Selection Criteria
of the query property. Select the connection NAME='aName'.
Under Properties > Details >
Selection Criteria
replace aName by orderID.

- Repeat the steps 4.2 - 4.4 for the Query Property QP1 with partNumber (STRING_VALUE), second
position, Details > Name:
BDPART_NUMBER, display name Part
Number as well.
- Repeat the steps 4.2 - 4.4 for the Query Property QP2 with orderAmount
(DECIMAL_VALUE), third position, Details > Name: BDORDER_AMOUNT display
name Order Amount as well.
- Finally your diagram looks the following and has three
additional columns.
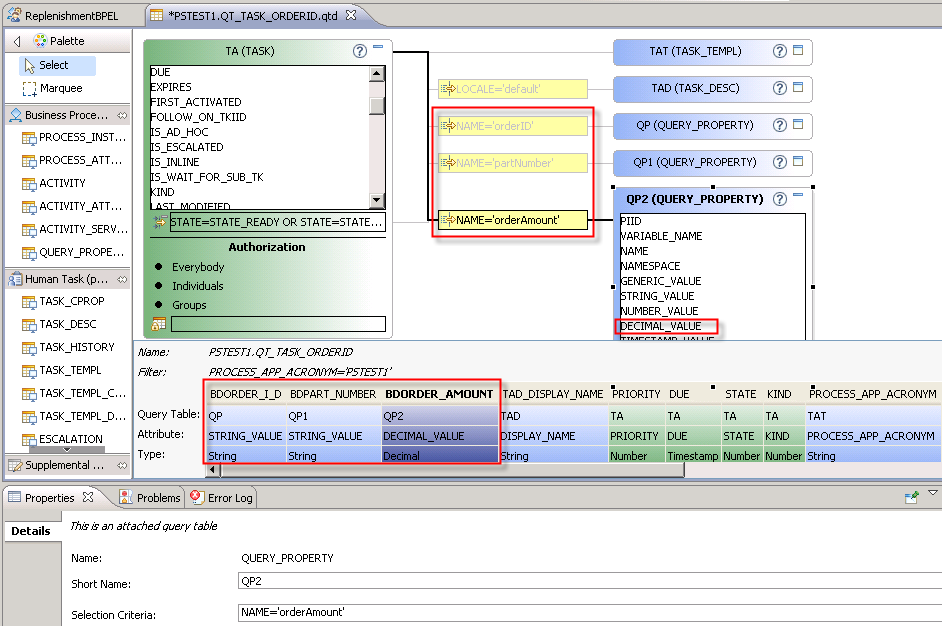
Press Ctrl + S to save the
query table specified.
d. Deploy and
test the Query Table
- In the Navigator locate MyQueryTables
project.
Right-click the PSTEST1.QT_TASK and select Test
on local Business Process Manager.
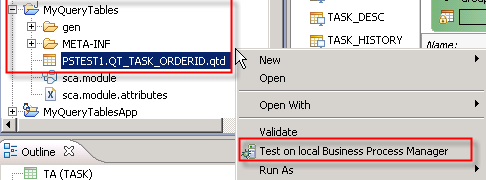
The Test on local Business Process Manager window opens.
-
Verify the settings for the test.
Under BPM profile directory
open the selection window and navigate to your profile directory. Press
OK.
Enter for the BPM user ID: tw_admin
and Password: tw_admin.
Press Deploy.
Wait for the deployment of the query table to complete. The Console
indicates successful deployment
of the query table.
- Press Query.
The Query Result shows the columns specified for the new Task query
table.
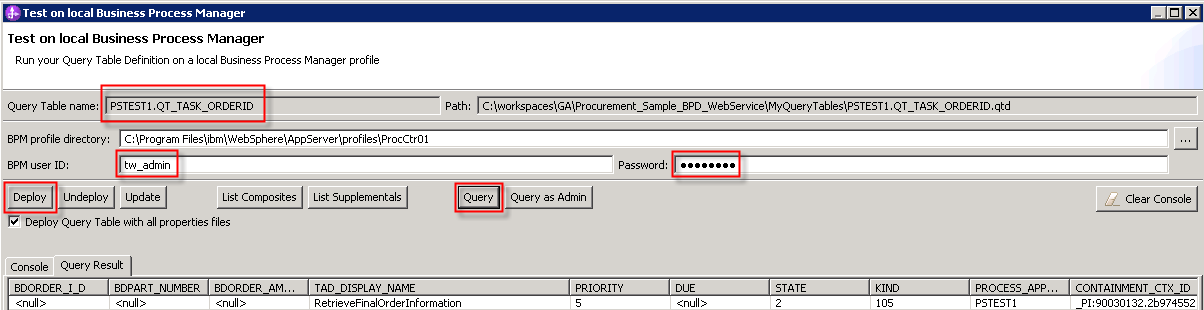
Note:
Depending whether you already instantiated processes you might see
some records.
- Here the BDORDER_I_D display name shows the name while the
Display Name orderID is only used in Business Space.
- The BDORDER_I_D value is <null> because we haven't
redeployed the BPEL process since the query property variables were
added.
- The DUE date value is <null> as for this human task no
due date was specified.
- You might even see two records for the same task, one record
e.g. for the assignment reason Potential Owner, as second record for
the assignment reason Task Administrator.
- Press Close to close
the
Test window.
Note:
You can export the query table definition, save it or deploy it on a
production server via
PSTEST1.QT_TASK_ORDERID > Export > Business Process Choreographer
> Query Tables
- Ensure that the modified Module with the ReplenishmentBPEL
process and the query table is published to the Process Center
Repository.
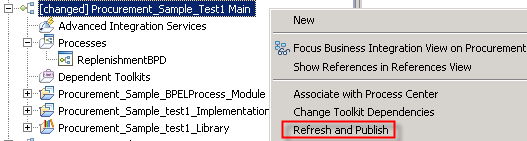
Switch back to the Business
Integration perspective.
Right-click on [changed]
Procurement_Sample_Test1 Main. Press Refresh and
Publish. Wait for Progess Information to complete.
Before continuing create and activate a new snapshot with
the
updates to the process artefacts in IID and IPD.
- Switch to the Process Center Admin view
(http://localhost:9080/ProcessCenter/.
Navigate to the Procurement_Sample_Test1 process application.
Double-click this entry. Press "+
Create New Snapshot".
Enter Procurement_Sample_Test1_SS5a.
- The new snapshot SS5a is created and listed. Click in Activate to deploy this process app
/ snapshot to the Process Center Server.
- When finished you see following status.

4. Configure
Business Space using the Federated Queries
In this section we configure a Space in Business Space to
enable
the federated queries. The configuration uses edit settings to enable
the federated query table and to select and align the task properties
to match the task attributes of the human task managed by both, the BPEL and
BPMN engine.
a. Create a Space from scratch for the Procurement Sample
- Open the Business Space application and create a new space for
the
procurement sample application.
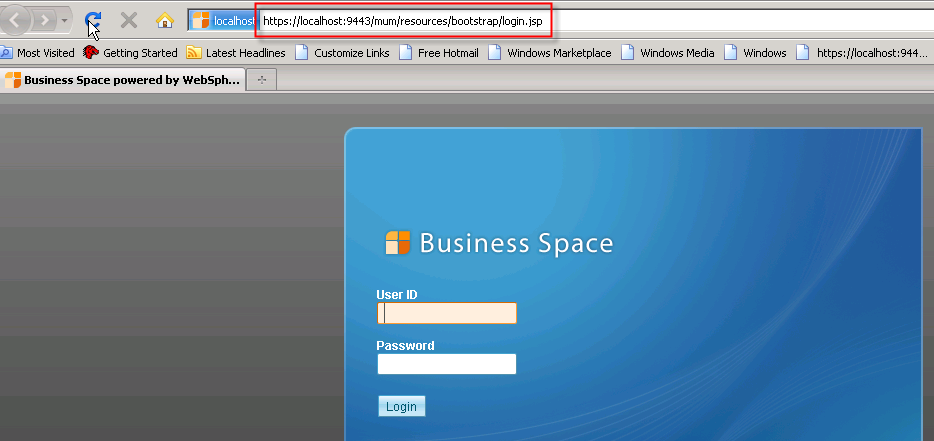
Open your internet browser and enter the url for the Business Space http://localhost:9080/BusinessSpace
or https://localhost:9443/mum/enabler.
Logon using the
userid tw_admin and password tw_admin.
Press Login.
You might be prompted to accept a Security Certificate. If so, confirm
this.
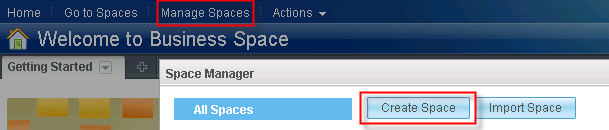
- Create the Procurement Sample Space
Select Manage Spaces. 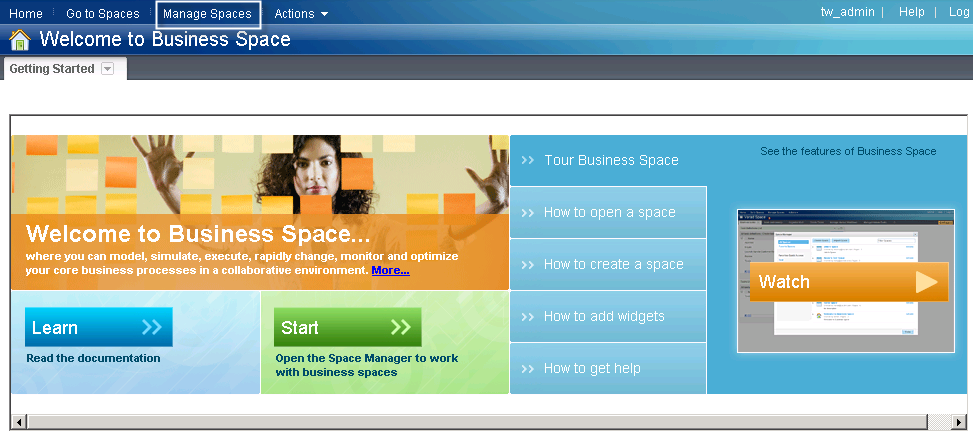
- Create a Space from a Template
Press Create Space.
-
Enter the Space name:
Procurement Sample
BSpace.
Enter the Space description: Space to demonstrate
federation.
Create the new space based on a template.
Select as
template: Interact with Processes and Tasks. Press Save.
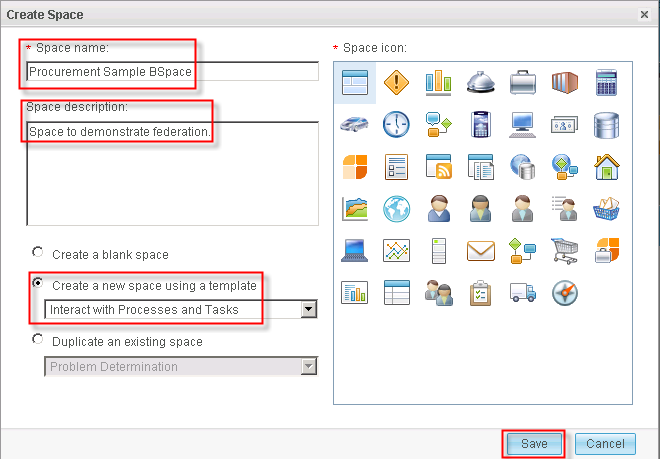
The Procurement Sample BSpace is created.
Press Done.
b. Configure the Tasks List
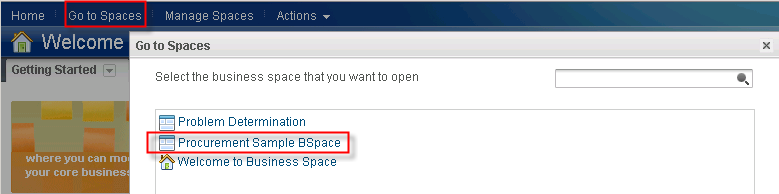
- Press Go to Spaces.
Double-click Procurement Sample BSpace.
- Switch to the Initiate and Work with Tasks
page. Click Edit Page on the far right.

- From the widget menu of the Tasks
widget, click Edit
Settings.

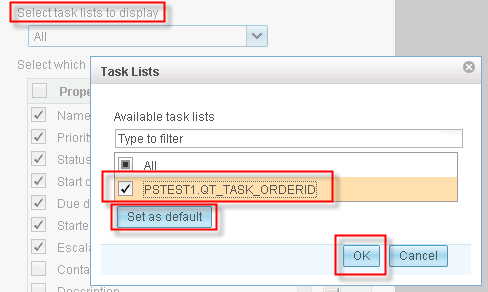
- In the Tasks settings dialog: Under the Content tab
open drop-down to Select task lists to display. The
list contains
the saved search that you created and shared in Process Portal.
Chose Select task lists ...
- Set the flag for the PSTEST1.QT_TASK_ORDERID entry. Press Set
as default. Click OK.
- Select and arrange the properties of the task list to be
displayed.
(De-) Select Properties you want the enduser to see. Move the ones
enabled up or down to determine the sequence of the columns displayed
based on these settings rather the definition of the query table or
saved search themselves.
Have the PSTEST.QT_TASK_ORDERID selected
as task list.
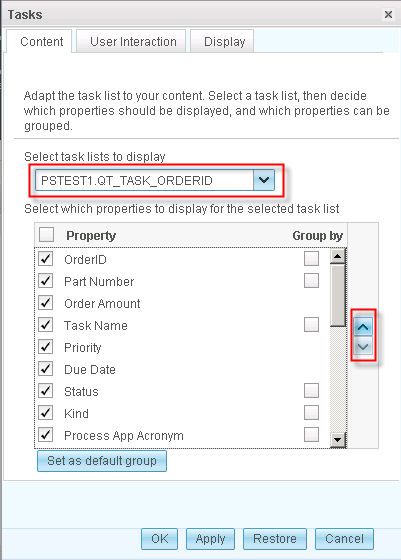
Flag and move up or down properties as you prefer.
Press Apply or OK when satisfied with the
specification.
Under Display > Refresh you can set the refresh method
to Automatically if you like. You also might familiarize with the other
settings for User Interaction and Display.
Press OK.
c. Configure
the Task Definitions list
- Open the Initiate and Work with Tasks page.
See the widget with the list of Task Definitions.
When using Business Space
processes are
started by invocation tasks and not triggering by initiating the
process template as it is done in Process Portal. One or more versions
of the process application are
currently
deployed. First,
the PSTEST1-Tip deployment, and, second, the PSTEST1-PSTEST1_SSxx
snapshot. Dependent on the number of snapshots multiple
Replenish_InvocationTasks are
included in this task definition list.
To identify which invocation task to start it is recommended to display
the snapshot it relates to.
Note (optional step)
Select Undeploy TIP in the Process Center Admin
Console if one of the Replenish_InvocationTasks with the TIP is
annoying to you.
- Press Edit Space.
For the Task Definitions list press the twisty and
select Edit Settings… .
Select the task definition list to display All.
Flag the Property Snapshot to
be displayed.
Press OK.
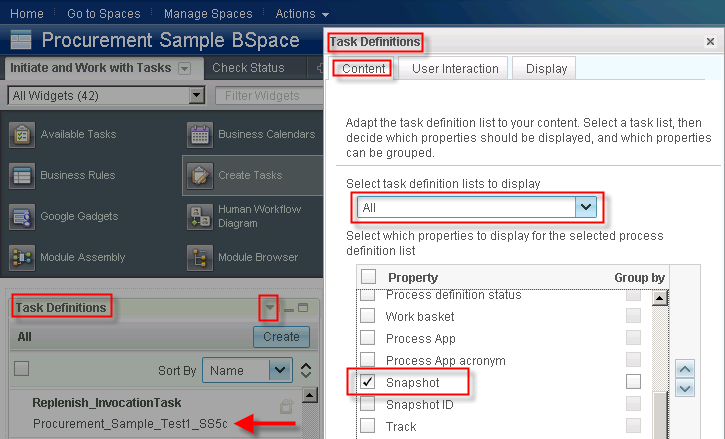
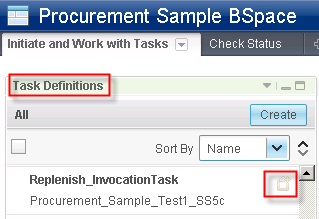
The screenshot above already shows the Replenish_InvocationTask in
Icons Show mode with the snapshot name listed.
- Press Finish Editing on the far right.

d. Test the
federated Query Table
- Open Initiate Tasks and Processes > Task Definitions page
again.
This time in table
layout and with the Snapshot column displayed. Navigate to the Replenish_InvocationTask, and to
your most current snapshot, here Replenish_Sample_Test1_SS5c.
Select that instance and press the icon to Create an instance from this task definition.
Note:
The
Procurement_Sample_BPELProcess_FormsEAR.ear was installed in
chapter 1 provides the html
form for the invocation task and further Task Information.
The Task Information window is refreshed and starts
any empty Input form for the Replenish_InvocationTask. The Input form
opens.
Select a Due date. For the
business variables enter:
orderID = OID_333
partNumber = PN_333
Quantity, orderAmount, etc. don’t have to be provided.
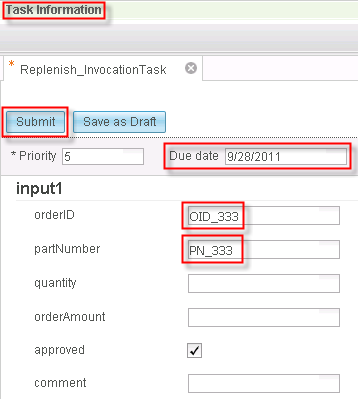
Press Submit.
- Work on Tasks
Select the Work on tasks page
tab and access the Tasks widget.
Ensure that the PSTEST1.QT_TASK_ORDERID task list is
selected. You specified this before as default.
Ensure as well the user
interaction filter is Assess and work
on my tasks. See that the column names have the names specified
during query table definition as display names.
See the task instance of the BPD Task: ApproveReplenishment with
OrderID = Order_333.

Note:
In case a task instance, here the one managed by the BPMN engine with
OrderID = Order_333, isn't shown you might analyze following areas.
- Did you manually Refresh the list?
- Does this task show up in the Process Portal or in the
Inspector?
- Is a task that is managed by the BPEL engine shown in the BPEL
Business Process Choreographer? Access Processes "Administered by me"
and "View Process State".
- Was the process instance successfully started?
- In case the query table or saved search was modified and
redeployed the Business Space still might use the former federated
query table. Verify this be stopping and re-starting the business level
application BSpaceEAR.
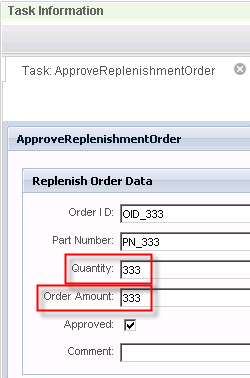
-
Perform the Task
Flag this task. Under Actions press
Accept and edit this task.
The Task Information
Change the value for the Quantity to 333 and for the Order Amount to
333 as well. Press Ok.
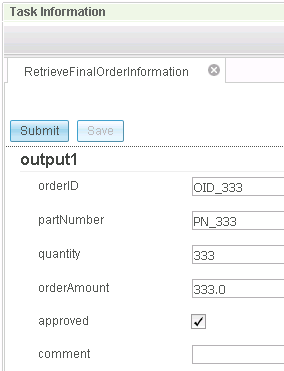
Wait for the Task List to refresh.
The BPEL Task RetrieveFinalOrderInformation
for OrderID=Order_333 shows up. The modified Order Amount is displayed.

-
Start the RetrieveFinalOrderInformation task
and see that the values changed in the BPD task implementation were
updated for the final human task in the BPEL process.
This completes the development tasks. To continue with the section
Run the Sample is not
required as this was already done be testing the query table.
Congratulations. You have successfully completed this sample on
the federated Business Space query and user frontend !!!