Build it yourself
This chapter describes how to
develop the BPM process as well as the Case (Type), to test them in
isolation and how to specify the integration between both of them. This
is done in following sequence:
- Verify
that all pre-requisites of the cross-cell environment are established
- Configuration
steps for ACM task implemented by BPM process
- Develop / import,
test and activate the BPM process application
- Import / develop and
test ACM_Solution
- Extend
case to create and test a case task that runs a BPM process
1
Verify that all pre-requisites of the cross-cell environment are
established
Note
Throughout this document you'll be asked to enter the url for the ACM -
or the BPM Server. Often you see existing links, where fmtc5031 relates
to the ACM Server, while fmtc5168 is the hostname of the BPM server.
Configure LDAP settings, single sign-on (SSO) and
secure socket (SSL) support by completing the steps in Configuring
cross-cell security for IBM
Business Process Manager and IBM
Case Manager in the IBM
Business Process Manager information center. The LDAP repository must
be federated.
- Installation
and configuration of the BPM System with Process Center (Playback) Server and Process Designer.
Process Server might be installed optionally.
- Installation
of Case Manager, FileNet P8 server, and FileNet Enterprise Manager (FEM)
- Cross-cell
setup with
- shared
LDAP directory added to ACM and BPM
- configuration
of single-sign-on for sharing of LTPA keys, identical domain names, and
SSO verification
- configuration
of secure socket layer (SSL) between ACM and BPM servers with
extraction of extract of the certificate from the BPM Server and import
into the ICM Server and vice versa, verification of this step
Complete and
verify
the steps according to Configuring cross-cell security for IBM Business Process Manager and IBM Case Manager in the IBM
Business Process Manager information
center.
2
Configuration steps for ACM Task implemented by BPM process
Besides the general cross-cell setup following configuration steps -
specific to the scenario
where the ACM task is implemented by a BPM process - need to be carried
out.
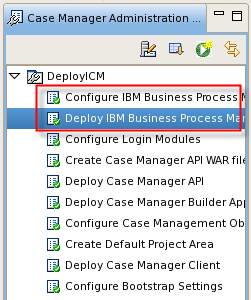
- Configure IBM Business Process Manager to ACM
- Deploy IBM Business Process Manager Integration Service
- Enable callback handler on BPM side
- Install ifix IFPM51383
2.1 Configure Business Process Management to ACM
This task
configures
the connection to the
IBM
Business Process Manager host
server. This task is required if you use the IBM Business Process Manager as the workflow server for the IBM
Case Manager.
In the ACM
System run Configmgr to execute the tasks
- Start the configmgr (under Linux): opt/IBM/CaseManager/configure/ ./configmgr
- Navigate to File > Open Profiles
> opt > IBM > cmpit >
install-scripts > profiles > Deploy ICM
> open DeployICM.cfgp
- Right-click
in Navigator.
Add New
Task > Configure IBM
Business Process Manager
Double-click on IBM Business Process Manager. The configuration window opens.
- Enter your
username, password, server information.
Make sure you use Process
Server
port and information only. Press Save.
- Press Test Connection to verify its
success.
Build an IBM Case Manager – IBM WebSphere ILOG JRules Solution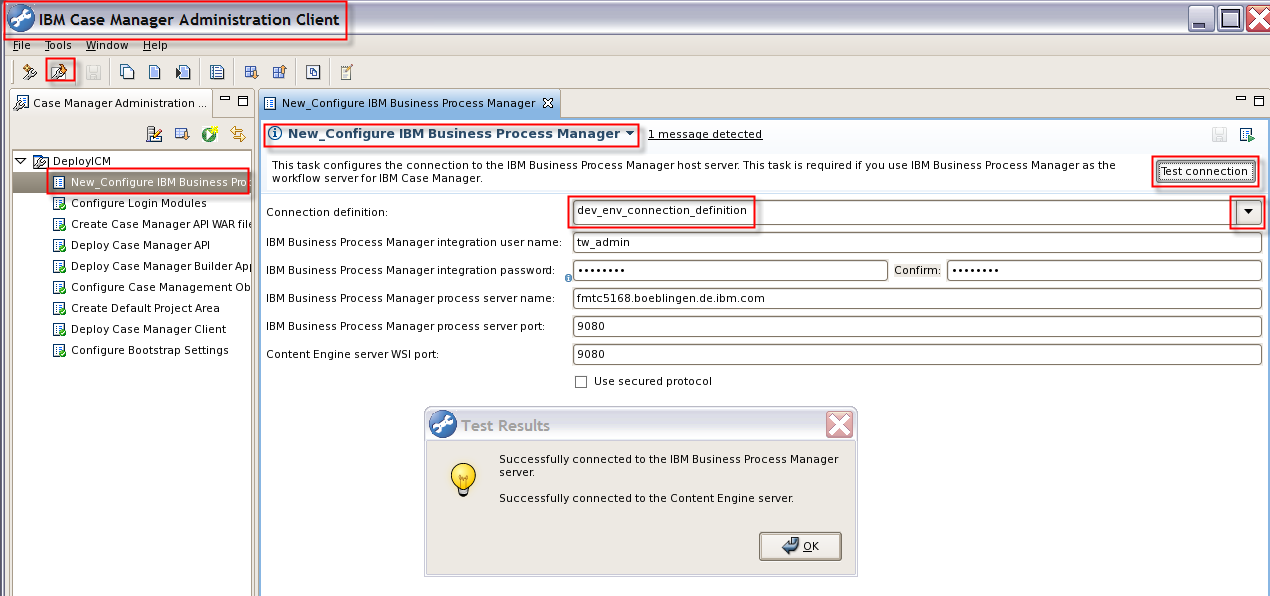
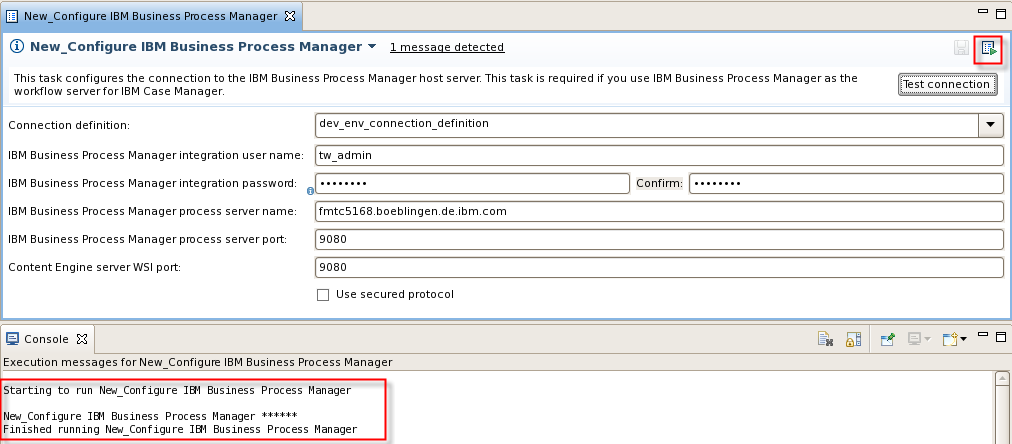
- Press the icon Run
a
single Task in the upper right corner for the New Configure
IBPM to finish.
- Rename New Configure IBPM to just Configure IBM Business Process Manager.
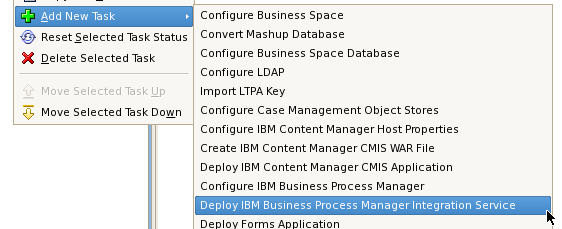
2.2 Deploy IBM Business Process Manager Integration Service
Execute this task while still in the Configuration Manager of the ACM
System.
In the ACM System run Configmgr to execute these steps:
- Navigate to Fille > Open Profiles > opt > IBM > cmpit
> install-scripts > profiles > Deploy ICM > open
DeployICM.cfgp
- Add New Task > Deploy IBM
Business Process Manager
Integration Service.
- Double-click on New Deploy IBM
BPM.
Enter your username, password, server information of the BPM and
Content Engine.
Use Content Engine Application Server SOAP port: 8880

Press Save.
- Press Test Connection.
Wait and ensure for successful connection.
- Press the icon Run a Single Task
in the upper right corner for the New Deploy IBPM Integration Service
to finish.
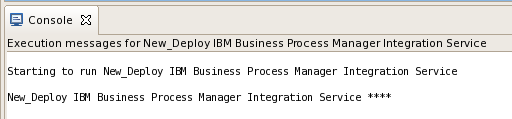
- Rename New Deploy IBM Business Process Manager Integration
Service you just deployed.
- Exit the Case Manager
Admin Client (CMAC).
2.3 Configuration of Callback
The preceding steps were done to make the BPM Server with an authorized
user known to ACM. This configuration is used for the callback from BPM
to ACM and requires to specify the ACM authorized user to be used in
the response to the ACM Server.
- Launch the administrative console of your BPM Server
http://localhost:9080/ibm/console
- Navigate to General client policy set bindings > BPM Web
Service API Client_fmtc5168Node01_server1 > WS-Security >
Authentication and protection > UNT > Callback handler
- Enter user name and password of the authorized ACM case manager
user, in our setup P8Admin/P8admin.
http://publib.boulder.ibm.com/infocenter/dmndhelp/v7r5m1/topic/com.ibm.wbpm.main.doc/ic-homepage-bpm.html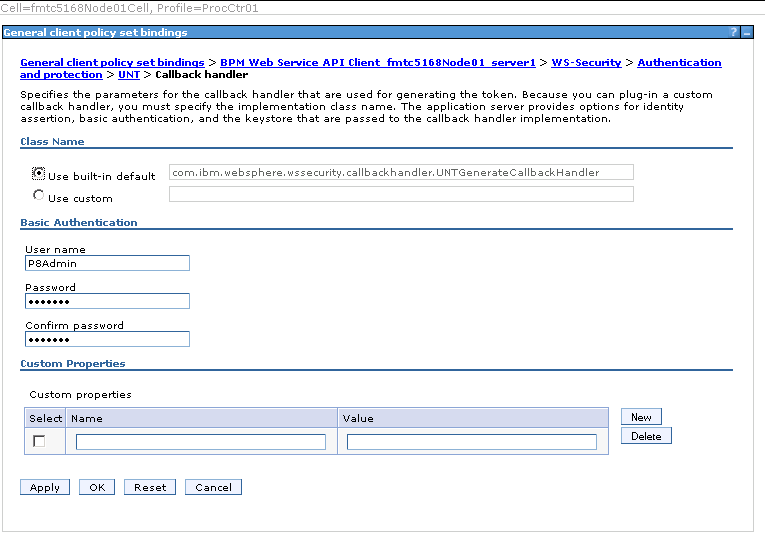
- Press OK and Save to save your settings.
2.4 IFix Installation
Note
At the time when this sample document was
created for ACM
v5.1 the
request from the ACM server to BPM or the response from BPM to ACM
servers worked initially but after
being
left idle for a couple of hours the requests no longer worked. This was
due to a WS-RM (reliable messaging) issue and was addressed via an iFix
that can be
installed on WAS 7.0.0.5-7.0.0.19.
This
iFix needs be
installed via Installation Manager for the WebSphere Application Server
of the ACM - as well as BPM Systems is available internally under this
ftp
site: Reliable
Messaging iFix.
3 Develop / import, test and activate the BPM process
application
In this section you develop, test and activate the BPM process
application. If you want to learn and practice this continue on with
the next chapter Build
Process
Application and BPD with Coach. Otherwise
continue with the first step to import the provided final process app
and skip the instruction on how to develop the process app.
More information about the IBM Business Process Manager can be found in the information center.
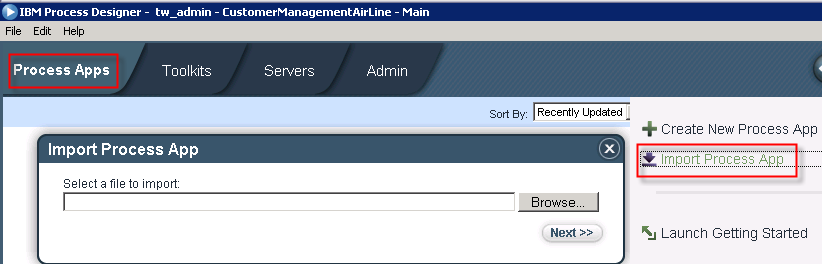
3.1 Import the BPM Process if familiar
already
Import the final process application and familiarize with the
Business Process Definition (BPD)
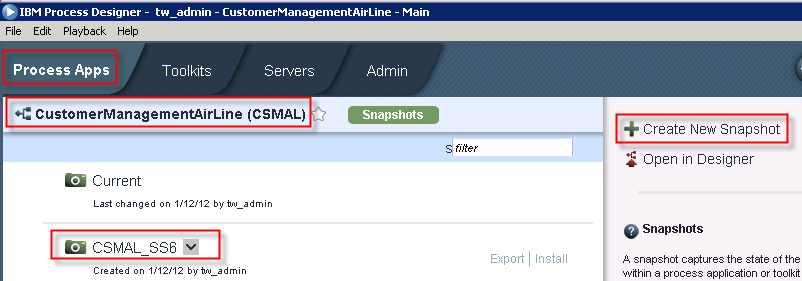
- Download the CustomerManagementAirLine_CSMAL_SS6.twx
to a temporary directory.
- Start the Process Designer. Under the tab Process Apps press Import Process App. Navigate to the
file downloaded and import the file.
- Open the imported process app in the designer and see the
BPD,
the human task, and variables.
- Continue on with Create
and activate a snapshot and make it the default
3.2 Build Process Application and BPD with Coach using the Process
Designer
In this section you create the business process definition, i.e.
the
process with a human task in it, from scratch. You also enable
some
process parameters to be used in a search. In the sample about the
unified inbasket we will build a saved search to make use of these
custom properties.
Create the Process Application
- Start the IBM Process Designer (PD)
- Logon with userid = admin and password
= admin.
The Process Designer opens in the Process
Apps view.
- Press + Create New Process App.
Enter exactly the name CustomerManagementAirLine
and acronym CSMAL. Because of naming conventions
applicable to the ACM-BPM integration this name and acronym must be
identical
with the solution name and prefix defined in the ACM Case Builder.

- Press Open in Designer.
Create a new Business Process Definition
- Click the Process catalog. Select the + sign
for the
highlighted catalog. Chose Processes > Business Process
Definition.
Enter as new BPD name ComplaintAnalysis_BPD.
- Press Finish. The BPD is created and the
diagrammer opened.
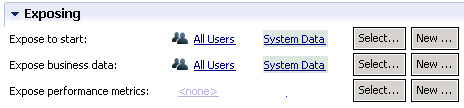
- Specify Overview
Select the Overview tab. Under exposing select Expose
to start: All Users as well as
for Expose business data: All Users.
- Specify Variables (tab)
As Local Input and Output variables we define the business data that
will be passed to and returned from the BPD by the ACM task later on.
As a restriction for the
ACM-BPM
integration only simple data types are allowed.
Select the Variables tab and press Add Input.
In the Details section enter the Name: Age
and select as Variable Type: Integer.
Continue on to add all Input parameters as listed in the screenshot
below.
Stay with the Variables tab and press Add
Output.
In the Details section enter the Name: Complaint
Status and select as Variable Type: String.
At the end your Variable specification should look like this. Ensure
that you have the correct types with Integer, String, and Boolean.
Complex data structures are not supported.
You also might deactivate previous snapshots.the CustomerManagementAirLine_CSMAL_SS6.twx
to 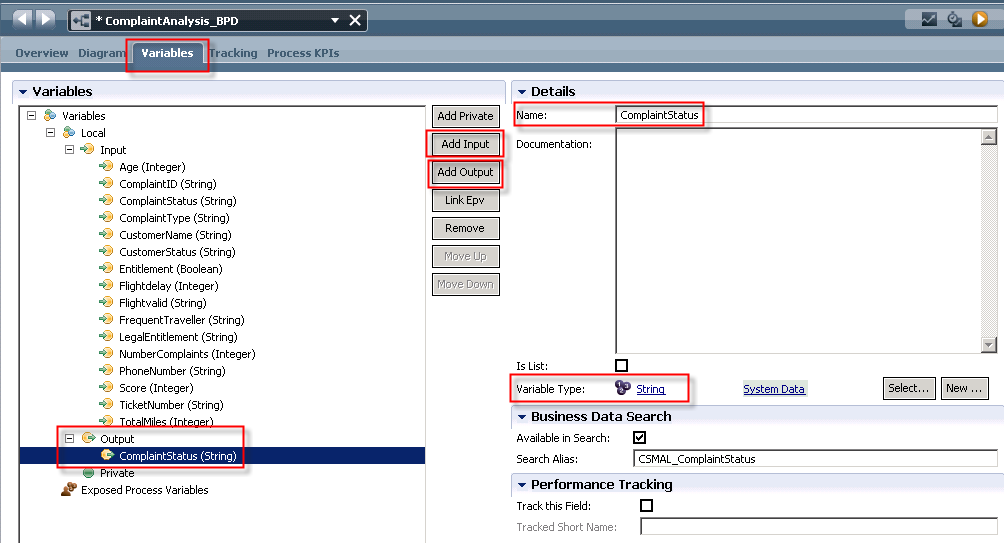
- Define parameters for Business Data Search
In this sample, when specifying the unified inbox, we want to display
business data.
These will be defined in a saved search. In this step we need to expose
these parameters and define an alias. This alias is build based on the
acronym or prefix of our ACM solution, here CSMAL_ followed by the
corresponding name of the property - as it is called in the ACM Case
Builder.
Select Input > ComplaintID (String).
Under Business Data Search
check the box for Available in Search. As Search Alias enter CSMAL_ComplaintID.
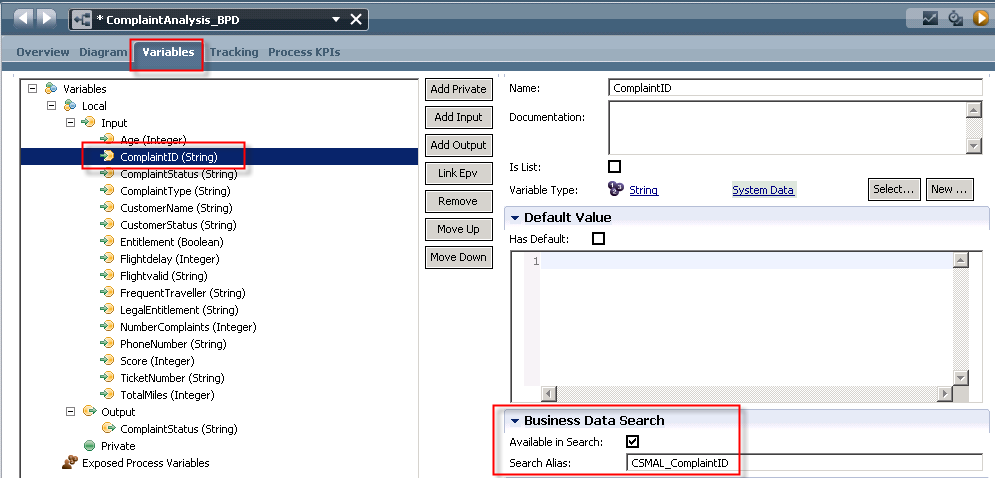
Note
The alias names are the corresponding full property names of the ACM
solution. See, for example, CSMAL_xxxx.
- Repeat this for ComplaintStatus (String) with alias CSMAL_ComplaintStatus, for
ComplaintType (String) with alias CSMAL_ComplaintType,
and for CustomerName (String) with alias CSMAL_CustomerName.
- Press Ctrl + S to save
your specification.
Model an activity as human task
- Specify Activity with Implementation Type Human Task
Select the Diagram tab.
Select the Activity
node from the palette, drag & drop it on the canvas into the Participant
lane. Select the Sequence Flow symbol and connect
the Start with the Activity as well
as the Activity with the End nodes.
Right-click activity and under Properties > General > Common >
Name enter Analyze Complaint Task.
Right-click this activity and select Activity
Wizard ... .
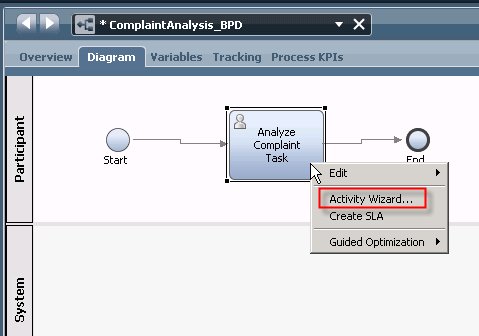
The Activity Wizard - Setup Activity Window opens.
- Stay with the activity as well as service name. Press Next.
Stay with the given definitions (true) on which parameters will be
passed. Press Finish.
- Define the Coach
Right-click the coach and under Properties > General enter the name Analyze Complaint Coach.
Double-click the coach or select the tab named Coach.
The form for the coach opens which shows entry fields of the variables
defined for the activity.
Build an IBM Case Manager – IBM WebSphere ILOG JRules Solution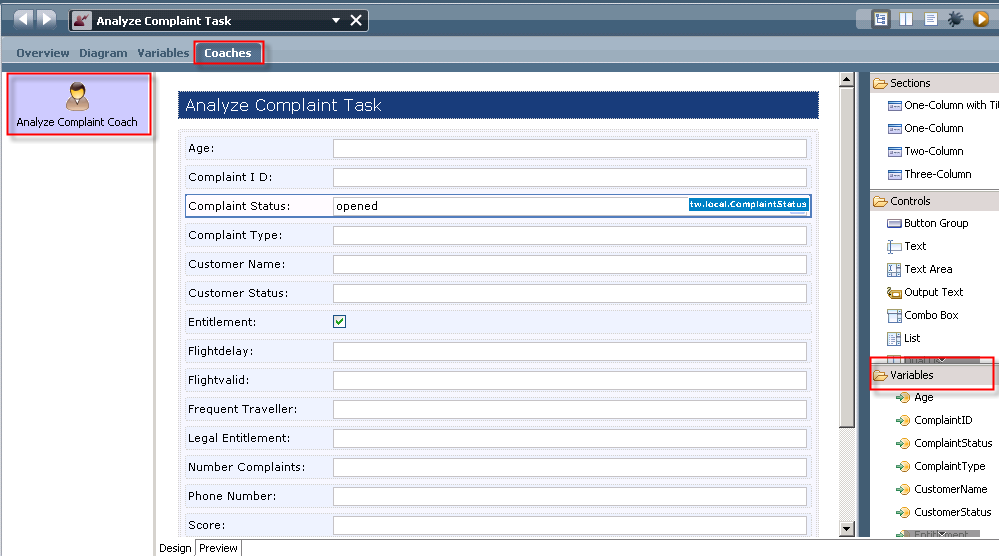
- Select the parameter ComplaintStatus
in the form to change it from in input text field to a drop down list.
Under Properties > Presentation > Widget Style select Drop Down List.
Under Properties > Presentation > Manual Data press Add.
Add the following Values and equal Display Texts: opened - new - accepted - settled -
verified - closed.
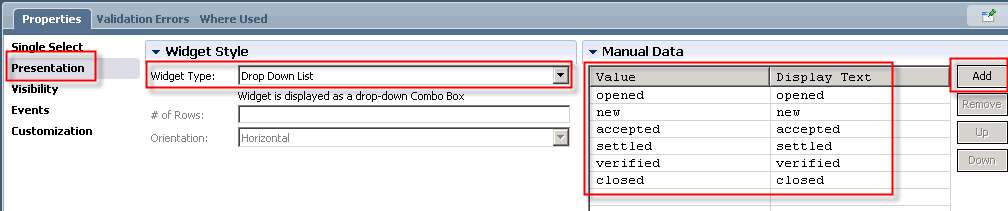
Press Ctrl + S.
3.3 Test the BPD in isolation using the Inspector
The person acting as Business Author or Process Designer has
the
possibility to test the BPD on its own.
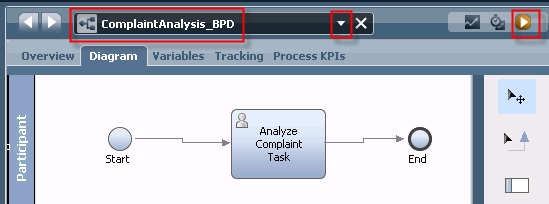
- Navigate back to the ComplaintAnalysis_BPD
process and the Designer > Diagram view.
Press the red arrow on the right to Run
the Process to instantiate he BPD. You are prompted for the
Inspector to open.
Confirm and press Yes to switch to the Inspector
perspective.
The process is started on the
Process Center (Playback) Server. The Inspector view opens with a token
at the (first) task.
- Select the latest process instance. Press the Refresh button.
The
activity/task with the token in status "Received " displayed.
Select the task and press Run.
http://publib.boulder.ibm.com/infocenter/dmndhelp/v7r5m1/topic/com.ibm.wbpm.main.doc/ic-homepage-bpm.html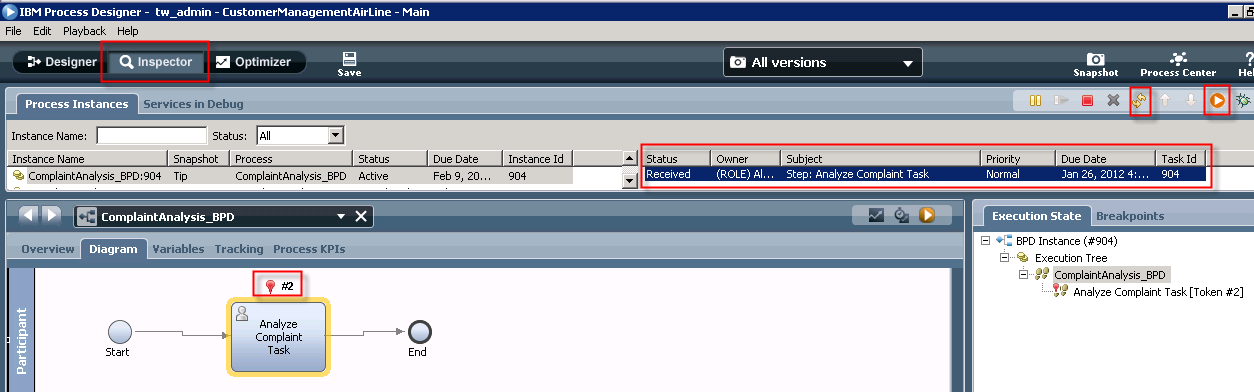
You are prompted for a user and afterwards a form on behalf of this
human task is displayed.
Verify / modify data and press OK.
The test is completed when you are satisfied.
3.4 Create and activate a snapshot and make
it
the default
4 Import, develop and test ACM Solution
In this section you develop, test and activate the ACM process
application. If you want to learn and practice this continue with Build Solution in Case
Builder. Otherwise
continue with the first step to import the provided final ACM solution
and skip the instruction on how to develop the solution.
Note
This ACM solution is based on a scenario by "Walter Mayer, et. al:
Build an IBM Case Manager – IBM WebSphere ILOG JRules Solution".
4.1 Import the ACM Solution if familiar
already
Import the final ACM solution and familiarize with the Case and
Cast Type.
- Download the CustomerManagementAirLine_FinalSolution.z_i_p
to a temporary directory. Change the file extension from *.z_i_p to *.zip.
- Start the Case Manager Administrative Client (CMAC). Under Linux
see /opt/ibm/CaseManagement/configue > ./configmgr.
The CMAC Client opens. Select Tools
> Import a Solution.
- Enter the appropriate data about your ACM system, user/password,
etc.

Press Next.
- On the second page select the project area. Press Finish to
import the final solution.
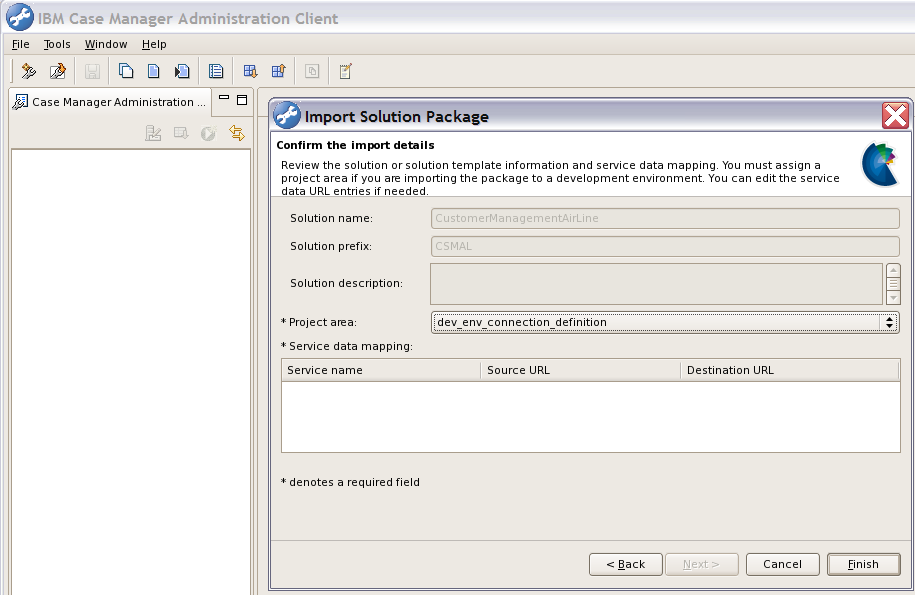
You can exit from the Case Manager Administrative Client.
- Even this is the final ACM solution to invoke the BPM process
you need to adopt your own BPM default snapshot with this solution
(case task). In order to do so continue with chapter
5 - Extend
case to create and test a case task that runs BPM process.
4.2 Build Solution in Case Builder
In this step you create the ACM solution, that is a case, a case
type, properties, inbaskets, tasks, etc. from scratch. You'll use and
learn how to model this using the Case Builder.
Following reference documents provide more details on how to build
and administrate a case solution:
Create the Solution (Case)
This
section
describes the Case Builder tasks to create
the CustomerManagementAirLine Solution in IBM Case Manager Builder.
- Start the IBM
Case Manager Builder via http://localhost:9080/CaseBuilder
using the
userid / password of your case administrator P8Admin
/ P8admin. Press Login.
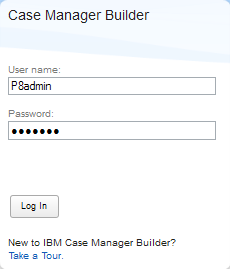
The Case Builder opens.
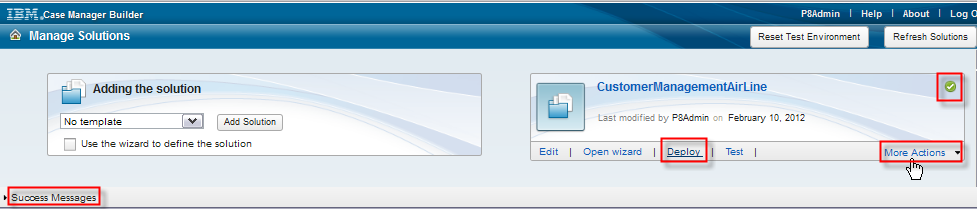
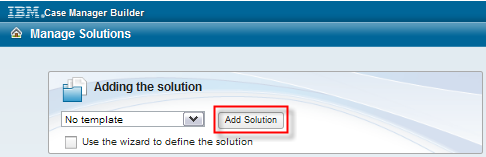
- In Case
Manager Builder start page opens. In the Adding the solution pane press
Add Solution.
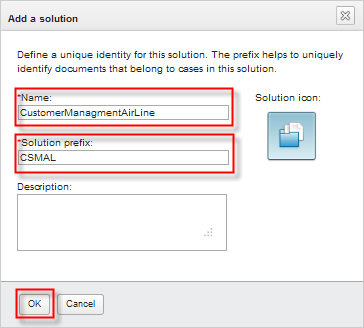
- Enter for
name of the solution CustomerManagementAirLine
and for the prefix CSMAL.
Note
The name of the solution and the prefix must be identical with the name
and acronym of the BPM process application.
Press OK.
Note
Adding
to the solution has no effect to the Content Engine (CE) unless you
have
deployed your solution. So you will not see any added data models to CE
during development phase.
The solution (case) is created.

Specify Case
The implementation
of
the scenario can be done straight forward by completing the
configuration tasks in the tabs one by one from left to right – which
are
- Properties
- Roles
- Document
types
- Personal
In-baskets
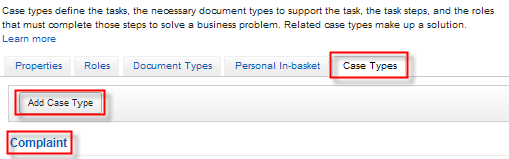
- Case
Types

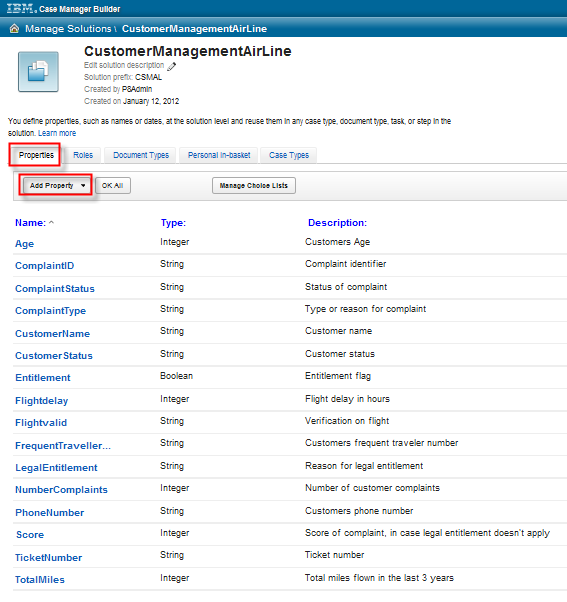
- Properties
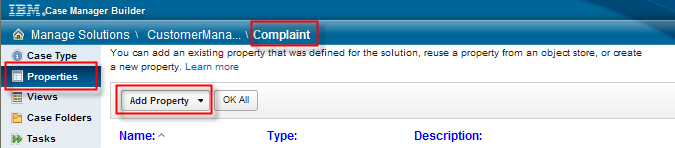
Add properties
for all attributes of
the solution as listed in the screenshot below.
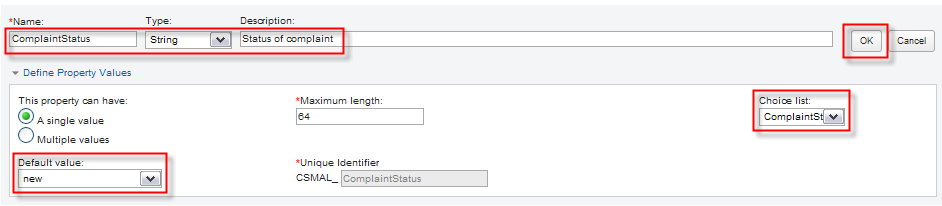
Press Add Property. Enter
Name, Type and Description of each attribute and press OK.
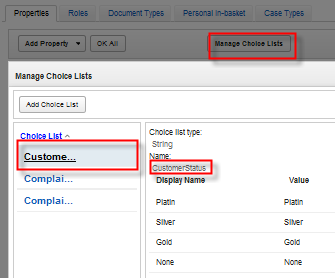
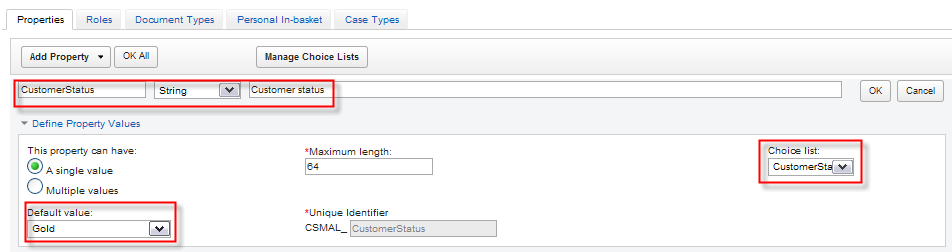
- Define and allocate choice lists
The
properties CustomerStatus, ComplaintStatus,
ComplaintType are defined referencing
choice lists with
the specific values.
Press Manage Choice List. The
corresponding list opens.
Press Add Choice List.
Enter the name CustomerStatus.
Enter the value pairs as list below: Platin
- Silver - Gold - None.
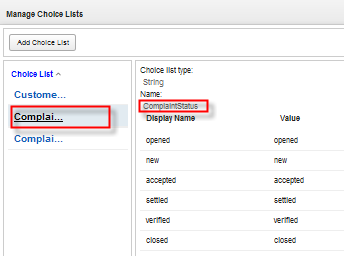
Repeat to press Add Choice List. Enter the name ComplaintStatus.
Enter the value pairs as list below.
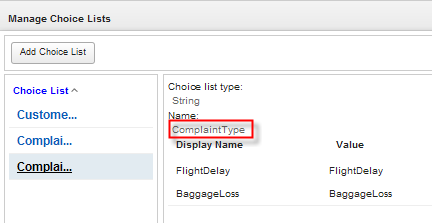
Repeat to press Add
Choice List. Enter the name ComplaintType.
Enter the value pairs as list below.
Associate the choice list CustomerStatus with the parameter
CustomerStatus and select a default value of your choice.
Repeat the same step and associate the
ComplaintType - and ComplaintStatus choice list with its parameter. For
the ComplaintStatus select new
as default value.
Press OK
All.
- Roles
In the
example scenario only one role is needed: “Agent”.
A subtask of the
role
definition is the configuration of the role In-basket.
Select the tab Roles.
Press Add Role and enter the
name Agent.
Under In-basket name enter AgentInbasket.
Press Select Property to
select the attributes / columns for the Agents inbasket.
Select and arrange the attributes Step Name, CustomerName, ComplaintID,
ComplaintStatus, PhoneNumber, i.e. the attributes an enduser
would use to identify and work on a complaint.
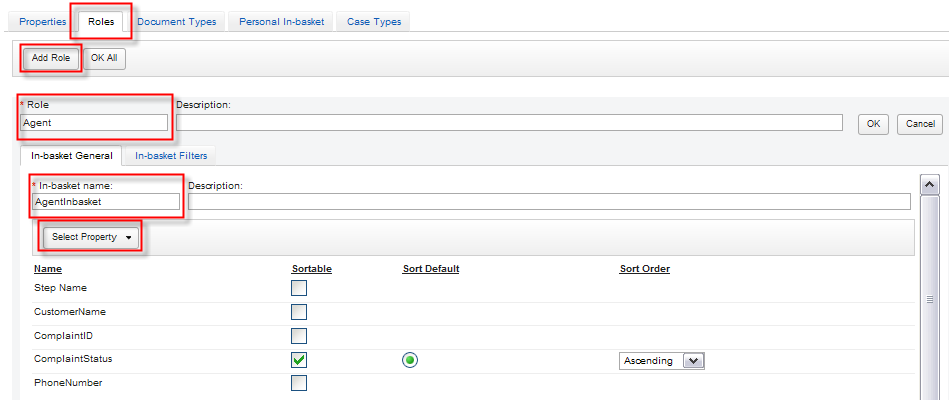
Press OK All.
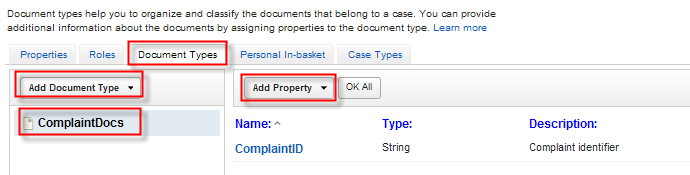
- Document Types
Optionally a
document
type can be defined in this step.
Select the tab Document Types.
Press Add Document Type and
enter the name ComplaintDocs.
Under In-basket
name enter AgentInbasket.
Press Add
Property to select the attribute ComplaintID.
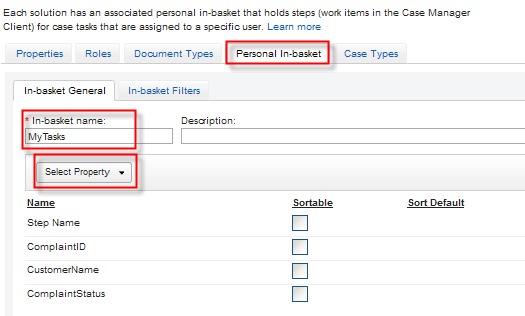
- Personal In-basket
Under Personal
In-basket name enter MyTasks.
Press Select
Property to select the attributes / columns for the Agents
inbasket.
Select and arrange the attributes Step Name, CustomerName, ComplaintID,
ComplaintStatus, PhoneNumber, i.e. the attributes an enduser
would use to identify and work on a complaint.
- Press Save to save your
work.

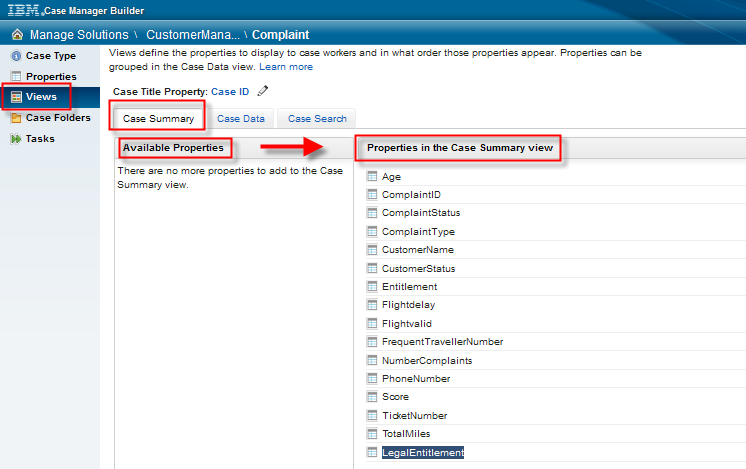
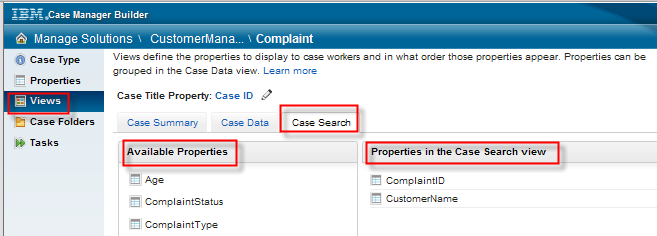
4.3 Specify Case Type
4.4 Add a workflow diagram using the Step
Designer
For each of the tasks added, the task workflows have to be
defined. This is done clicking on the Open Step Editor symbol on the
right side of
For each of the tasks, add a Role Lane by dragging
Make sure the role “Agent” is assigned.
- Edit steps
Double-click the icon for editing steps for the VerifyNewComplaint case
task.
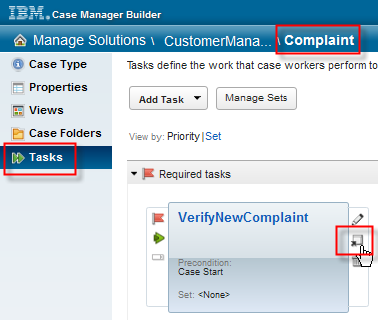
The Step Designer opens.
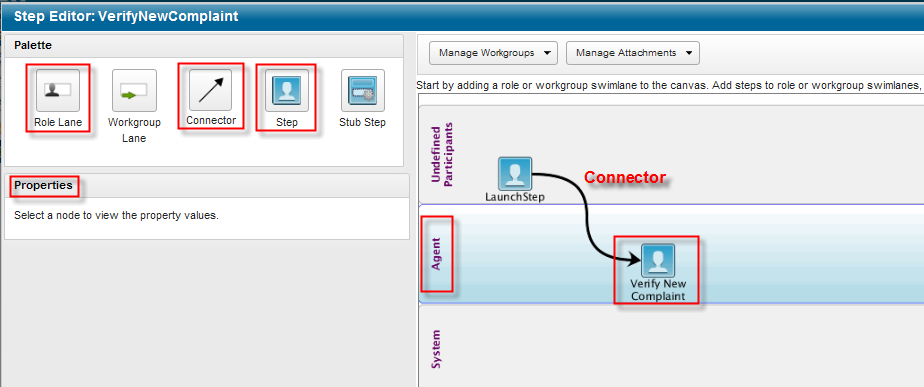
- Define lane
Drag the Role Lane from the
palette to the canvas and arrange it in between Undefined Participants
and System.
The lane automatically takes the name of the single defined role Agent
- Model task and define sequence
Drag a (manual) Step from the palette to the Agent lane.
Select the Connector artifact
from the palette and connect the
LaunchStep (start node) with the VerifyNewComplaint step.
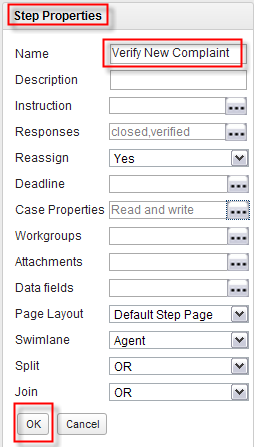
- Specify Properties
Select the new Step and press Properties
in the lower left quadrant.
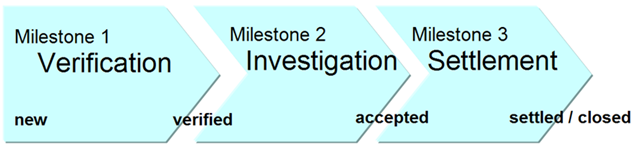
Specify the name of this step to Verify
New Complaint.
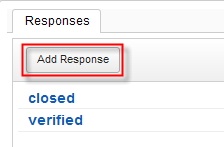
Select the Properties > Responses .
. .
Attribute. Under Responses press Add
Responses and add closed
as well as verified, the
possible state changes from new following this verification. Press Add and OK.
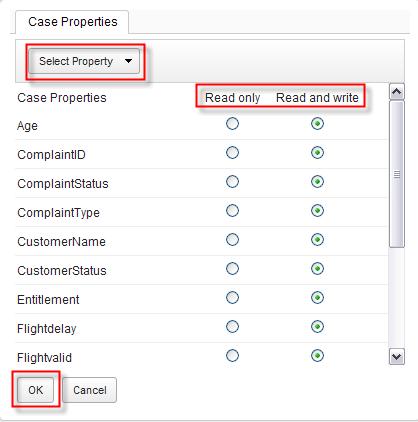
Select Properties > Case
Properties . . .
and Select Property > Select All.
Press OK.
Expand Case Data >
ComplaintDetails > ComplaintStatus and change this from new
to verified.
Finally the properties for the step should look similar to this.
Expand Case Data >
ComplaintDetails > ComplaintStatus and change this from new
to verified.
 complaint's
Press OK to save the property
settings.
- Press Save to save all
changes. Press Validate to
verify your specifications.

If the validation succeeds press Close. Otherwise try to identify and
correct your errors.
Repeat the same for the AnalyseNewComplaint
Repeat the steps for editing and properties setting for the case task
AnalyseNewComplaint.
- Drag a lane (Agent) and a step to the canvas and connect the
Launch Step with the Analyse New
Complaint Step.
- Specify the Responses . .
. to closed and accepted as supsequent state to
verified.
- Specify the Case Properties . .
.
to Selelct All. Press OK to save your Property settings.
- Press Save, Validate and
Close your workflow.
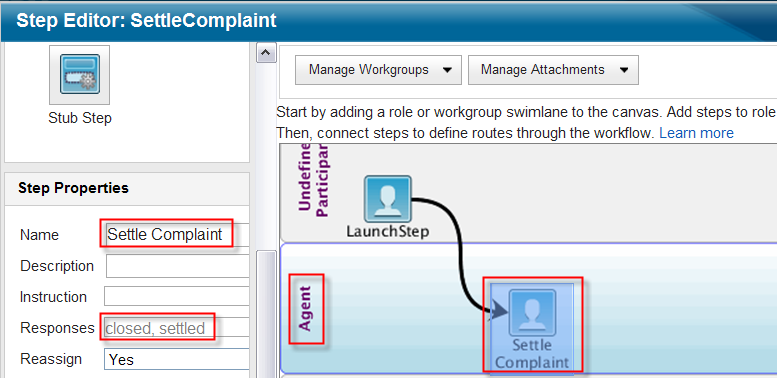
Repeat the same for the Settle Complaint
Repeat the steps for editing and properties setting for the case task
Settle Complaint.
- Drag a lane (Agent) and a step to the canvas and connect the
Launch Step with the Settle Complaint Step.
- Specify the Responses . .
. to closed and settled as supsequent state to
accepted.
- Specify the Case Properties
to Select All. Press OK to save your Property settings.
- Press Save, Validate and
Close your workflow.
You return to the Case Type View where you Save, Validate and
Save and
Close your case.

4.5 Deploy and test the Case Type
5
Extend case to create and test a case task
that runs a BPM process
The modeling of this integration is described in the ACM
v5.1 information center - Creating a task that runs an IBM Business
Process Manager process application.
Ensure that a process application is created in the IBM Business Process
Manager Process Center. If you do not use the Playback Server,
ensure that a snapshot of the
process application is exported (deployed) to the IBM Business Process
Manager
Process Server. The name of the process application must match the name
of the IBM
Case Manager solution.
If you run the process application in Process Server only, then you
must make a snapshot of the process application and designate it as the
default snapshot. If you run the process application in the Process
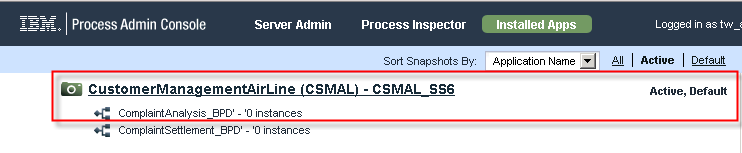
Center, you do not need to designate a default snapshot. Instead, the
snapshot that was most recently activated in the IBM Business Process
Manager Process Admin Console is used by Case Manager Builder.
You did this in section Create
and activate a snapshot and make it the default.
5.1 Specify Case Task implemented by BPM process
- In the Case Manager Builder access the CustomerManagementAirLine
solution. Press Edit.

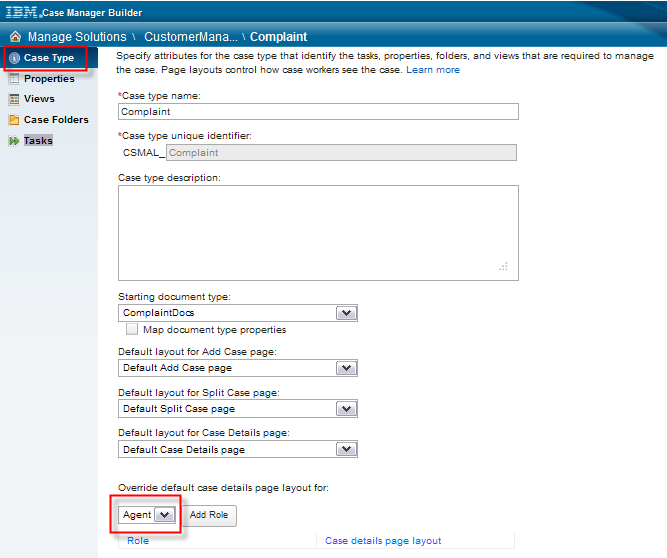
The Case opens. Navigate to Case Types > Compliant
- Open the Complaint case
type.
The former pure case task can't be converted
into a BPM process implementation task. Delete the current
AnalyzeNewComplaint task.

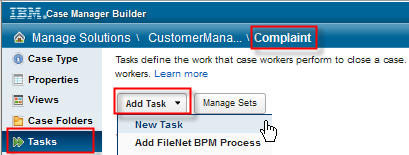
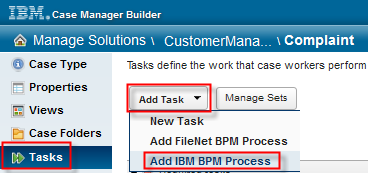
Add a task that runs an IBM Business Process Manager process
application
- On the Case Type
page, click .
If Add
IBM BPM Process is not available, then no process is associated
with the solution.
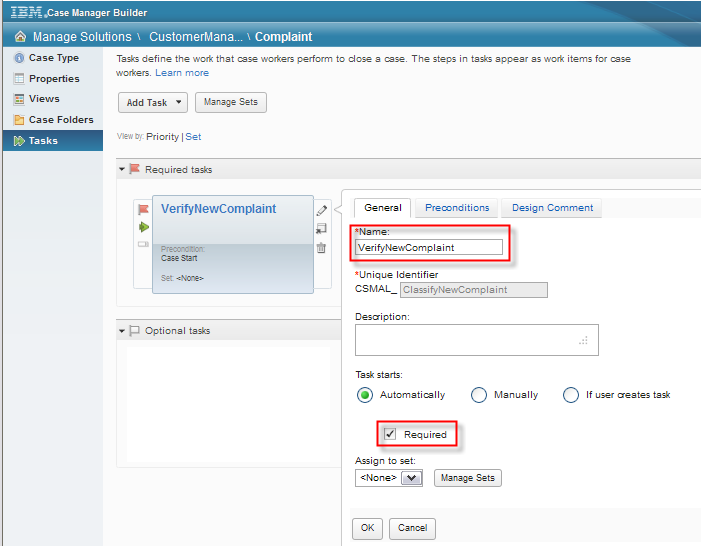
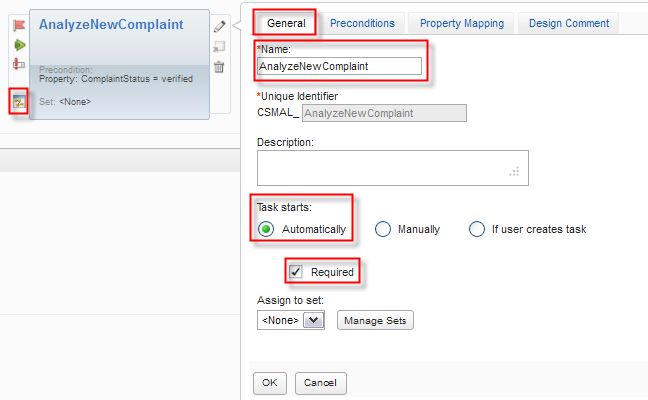
- On the General
page, specify the name AnalyzeNewComplaint,
unique identifier, and a description (optional).
Define that the task starts Automatically,
and as Required.
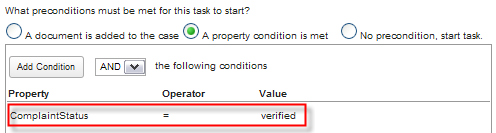
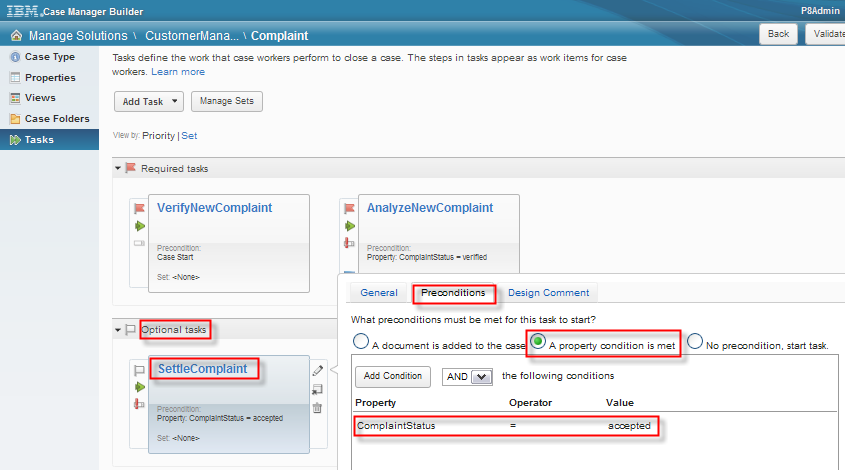
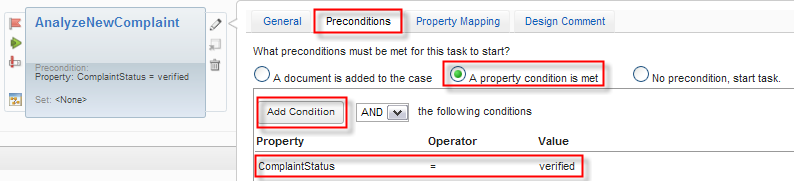
- On the Preconditions
page, define any preconditions that are required before the task can
start.
Here, select A property condition is
met. Press Add Condition.
Specify the condition to ComplaintStatus
= verified.
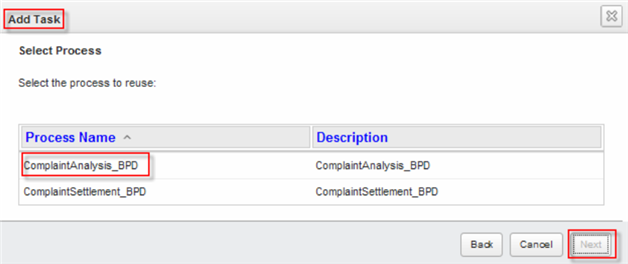
- On the Select
Process page, select the process to reuse. The available
processes depend on the process application that is associated with the
solution.
Select the ComplaintAnalysis_BPD
imported or developed in section 3. Press Next.
http://publib.boulder.ibm.com/infocenter/dmndhelp/v7r5m1/topic/com.ibm.wbpm.main.doc/ic-homepage-bpm.html
- On the Property Mapping page, map process data fields to
solution properties:
- Select a process data
field name from the reused process.
- Select the
corresponding solution / case type
property name to map to the selected process data field name.
Properties must match the data type and number of values (single value
or multivalue) of the selected data fields. For example, string
properties only match string data fields, and single value properties
only match single value data fields. After you select a data field
name, only valid matching properties are displayed in the Property name
menu.
- To add the selected
mapping to the property map, click the plus (+) icon.
- The name, types, and
amount of input and output parameters between the process and the case
are identical, so you have to map them, until the parameter list under
Process data field name is empty (none).

- Optional:
In the Design
Comments page, add a design comment. For example, the comment
might explain the reasons this task was created, what the imported
process does, or how it works with the solution.
- Click Finish to complete the specification. Or press
OK, in case you have re-opened your settings.
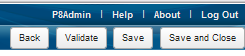
- Press Save and
afterwards Validate.
Correct any errors that might result from the validation of your case
specification.
Press Save and Close.
5.2 Validate and test the integrated solution
We are ready to test the invocation of the BPM process and to check the
result received via a callback to resume case processing.
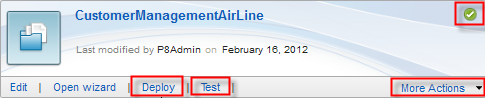
- Deploy Solution
From the Manage Solutions
page, click Deploy in the
solution summary of your CustomerManagementAirLine
to deploy the
solution to your project area. Deployment is a process that runs in the
background.
The status in the solution summary will change to reflect the
deployment status.
Note
If the solution
deployment fails, you will receive an error indicator that you can
click to display all deployment errors that must be resolved.
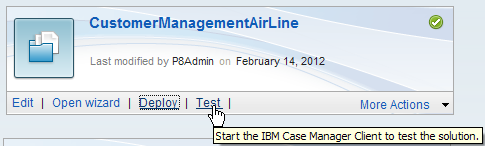
- If the deployment is successful, the Test button
is enabled. Click Test and a
sample Case Manager Client will display
your solution.
When the solution is deployed, the following three
default spaces are created in Case Manager Client: the Solution Space,
the
Case Pages Space, and the Step Pages Space.
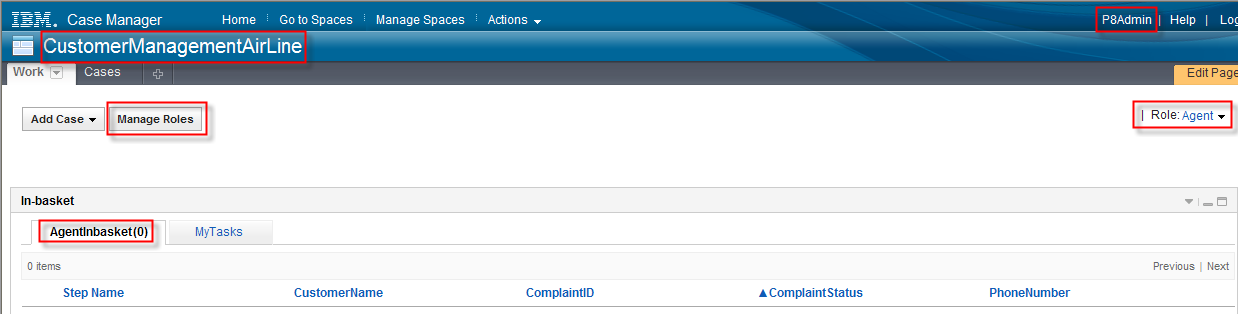
Add Case
- You will be automatically logged into the Case Manager Client. Otherwise use
the url:
http:/localhost:9080/CaseClient and the userid/password to
start a new case as Case Adminstrator.
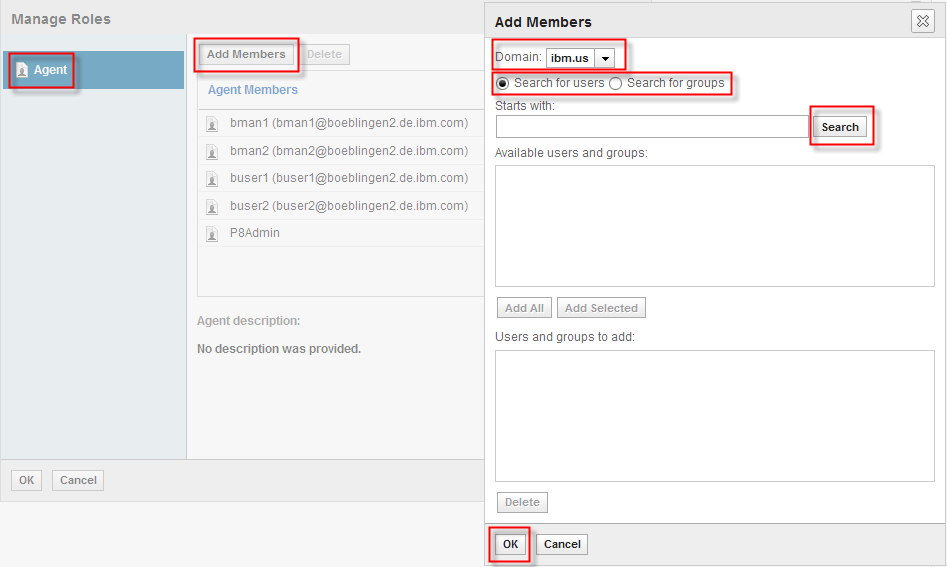
- Click Manage Roles from the toolbar on the Work, Cases, or
Case Details page to assign case workers to roles.
This was done in Manage Roles
already.
- Open and complete
a work item from the in-basket to verify that the page works correctly.
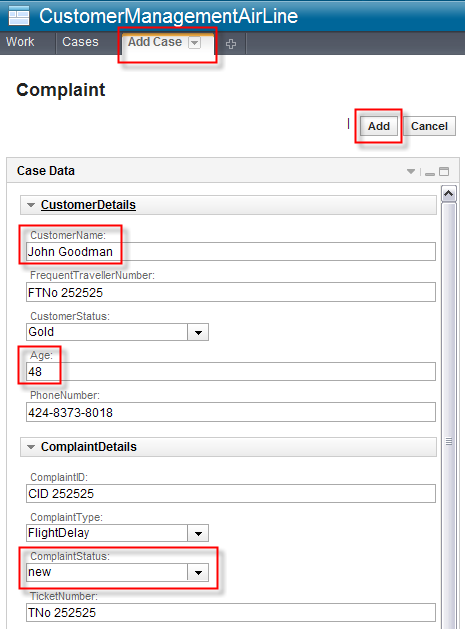
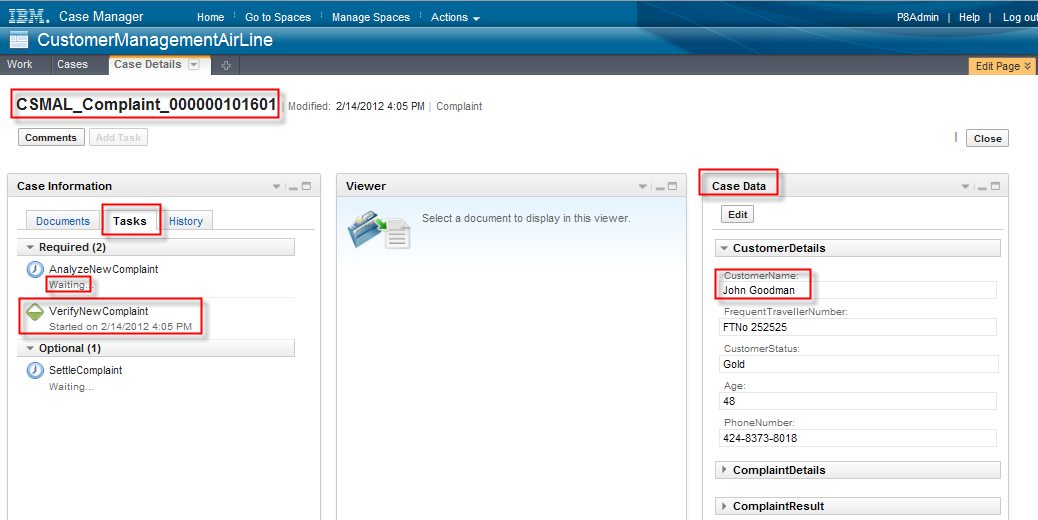
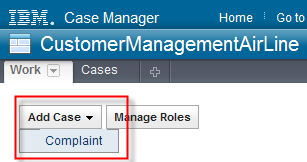
- Add Case
Select the Add Case button and
see the available case types to be startable. Click the single
case type Complaint.
The Add Case Page opens with one pane named Case Data.
Expand the CustomerDetails section
and enter your own name and/or modify some of the other attributes.
Expand the ComplaintDetails
section and verify that the ComplaintStatus
currently is set to new.
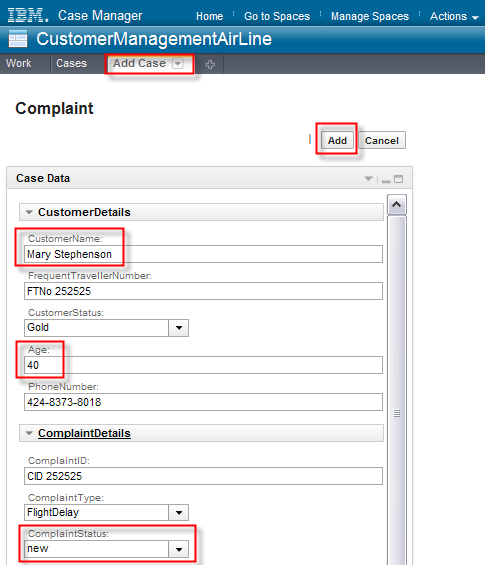
When finished with your update of the default values press Add.
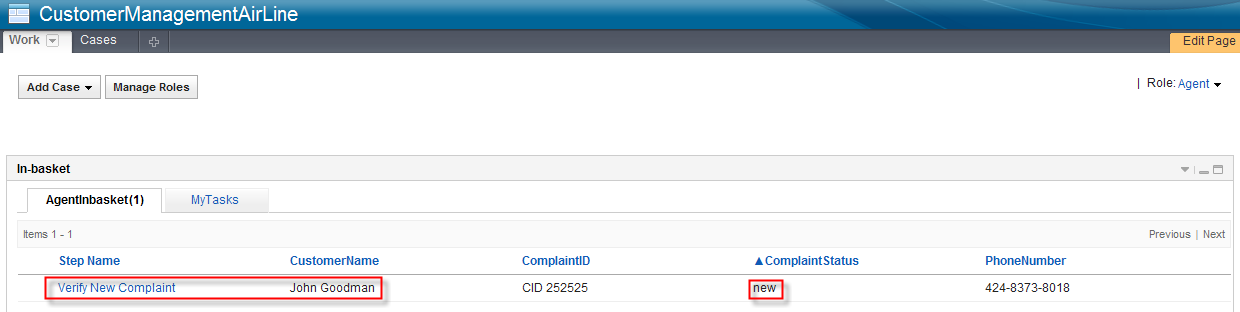
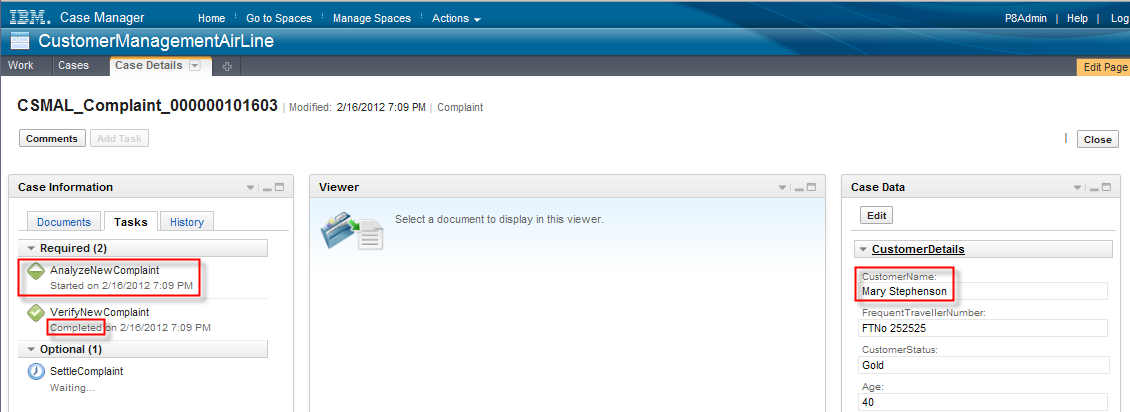
- Work on VerifyNewComplaint Task
The Work page opens and you see a new workitem with the Step Name Verify New Complaint.

Double-click the step VerifyNewComplaint.
The pane for this step is opened. The enduser might verify the Case
Information Summary / Documents / History.
Afterwards s/he has to update the Case Data.
Expand Case Data >
ComplaintDetails > ComplaintStatus and change this from new
to verified.
Press the verified control at
the top right to complete this step.
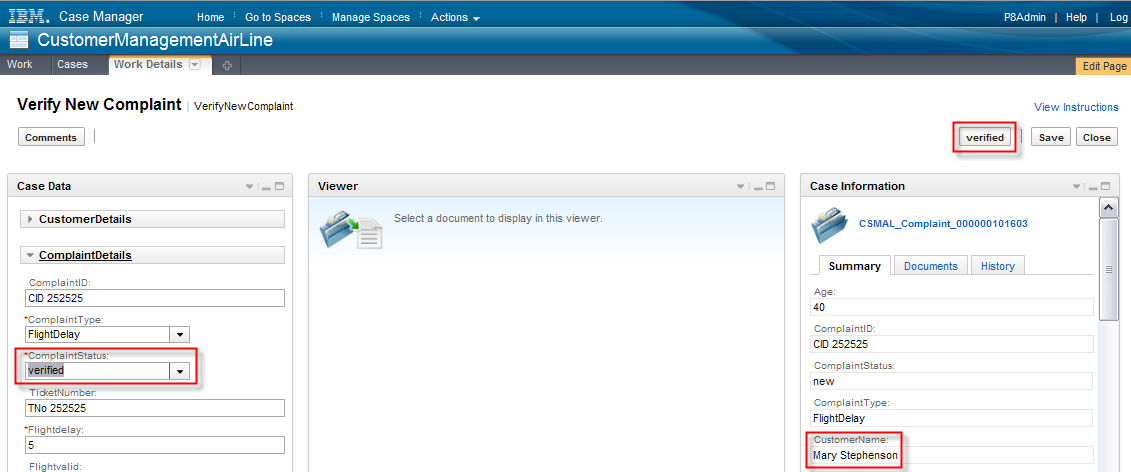
The verification step part of the VerifyNewComplaint task completes.
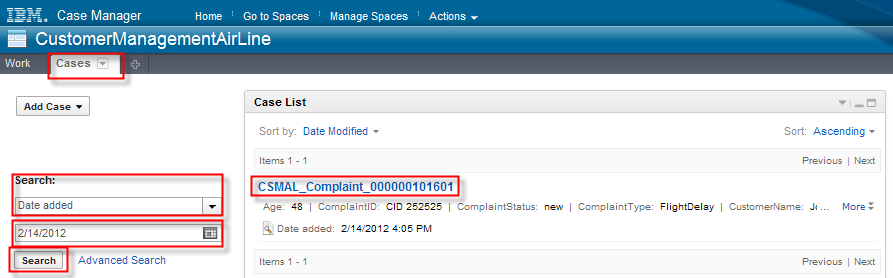
Via Cases > Search for your
current case you can determine the status of each task. The
AnalyseNewComplaint task is automatically started by the Case Manager
and this time a BPM process is invoked.
Work on BPM Task
- Switch to the IBPM Portal to work on the Analyze New Complaint
task.
Logon to the BPM Portal client using the url: http://localhost:9080/portal. Use
the userid of an enduser who is defined in the shared LDAP and whom we
assigned to the Agent role in Manage Roles before.

The Task List opens.
- Start the new task.
Select the task from the task list. Press Run.
 The Coach opens.
- Verify the data passed by the ACM task. Change the
ComplaintStatus of the verified complaint to accepted as a result of this
analysis.

Press OK.
Return to the Case Client to complete the Settle Complaint task
- Return and login to the Case Client
http://localhost:9080/CaseClient.
This time with the same user as for
the Portal. In our case buser1.
The In-basket shows the next case task of our solution. So the
complaint has to be settled after it was analyzed and accepted.
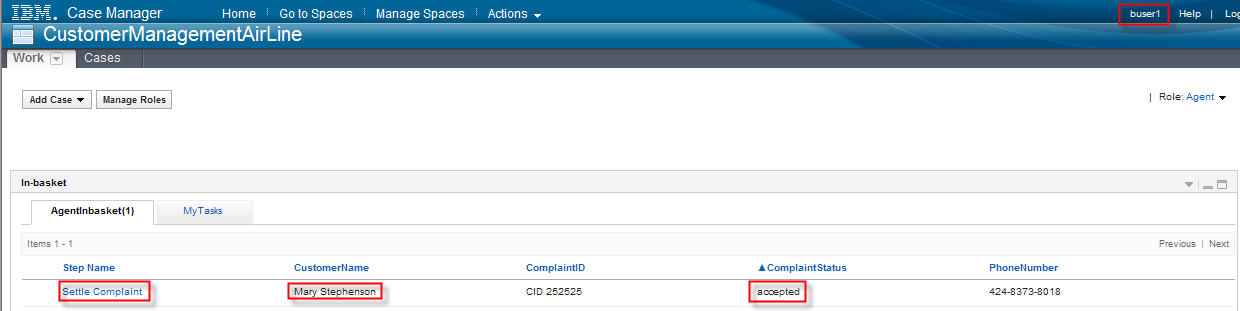
Click this task to start working on it.
- Expand Case Data >
ComplaintDetails > ComplaintStatus and change this from
accepted to settled or closed.
Press the control button settled.
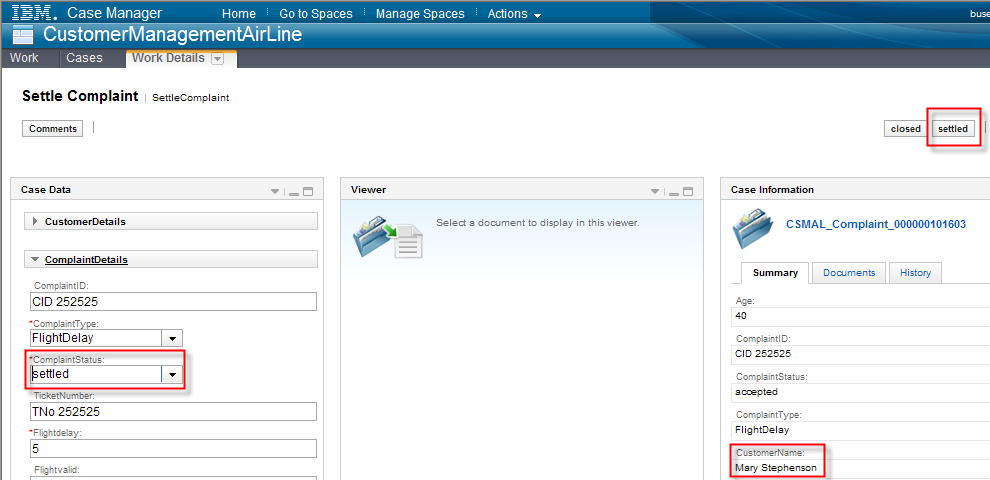
This completes the development, integration and testing of the ACM to
BPM integration. For the handling of human task we used the Case Client
and BPM Portal.
In the chapter Run the
Sample we model how to specified the Unified
Client to access ACM and BPM task in a federated task list.
 to create a new one.