Enterprise Edition Home |
Express Edition Home |
Previous Page | Next Page The onperf Utility on UNIX > The onperf User Interface >
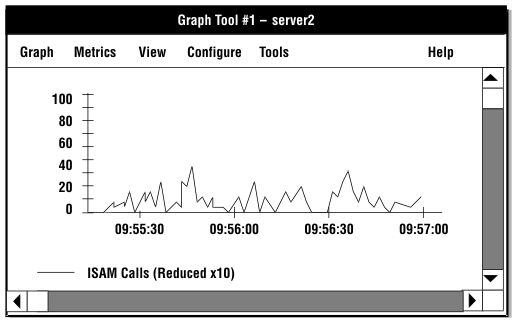
The
graph tool is the principal onperf interface.
This tool allows you to display any set of database server metrics
that the onperf data collector obtains from
shared memory. Figure 93 shows
a diagram of a graph tool.
Figure 93. Graph-Tool Window
You cannot bring up a graph-tool window from a query-tree tool,
a status tool, or one of the activity tools.
Title Bar
When you invoke onperf,
the initial graph-tool window displays serverName, the
database server that the INFORMIXSERVER environment
variable specifies, in the title bar. The data comes from the shared
memory of the indicated database server instance.
If the configuration of an initial graph-tool has not yet been
saved or loaded from disk, onperf does not
display the name of a configuration file in the title bar.
If you open a historical data file, for example named caselog.23April.2PM,
in this graph-tool window, the title bar displays caselog.23.April.23.April.2PM.
Graph-Tool Graph Menu
The Graph menu provides the following
options.
- Option
- Use
- New
- Creates a new graph tool. All graph tools that you create
using this option share the same data-collector and onperf processes. To
create new graph tools, use this option rather than invoke onperf multiple
times.
- Open History File
- Loads a previously saved file of historical data into the
graph tool for viewing. If the file does not exist, onperf prompts
you for one. When you select a file, onperf starts
a playback process to view the file.
- Save History File
- Saves the contents of the data-collector buffer to either
an ASCII or a binary file, as specified in the Configuration dialog
box.
- Save History File As
- Specifies the filename in which to save the contents of the
data-collector buffer.
- Annotate
- Brings up a dialog box in which you can enter a header label
and a footer label. Each label is optional. The labels are displayed
on the graph. When you save the graph configuration, onperf includes
these labels in the saved configuration file.
- Print
- Brings up a dialog box that allows you to select a destination
file. You cannot send the contents of the graph tool directly to
a printer; you must use this option to specify a file and subsequently
send the PostScript file to a printer.
- Close
- Closes the tool. When a tool is the last remaining tool of
the onperf session, this menu item behaves
in the same way as the Exit option.
- Exit
- Exits onperf.
Important:
To save your current configuration before you load a new
configuration from a file, you must choose Configure > Save Configuration or Configure > Save Configuration As.
Graph-Tool Metrics Menu
Use the Metrics menu to choose the
class of metrics to display in the graph tool.
Metrics are organized by class and scope.
When you select a metric for the graph tool to display, you must
specify the metric class, the metric scope, and the name of the metric.
The metric class is the generic database
server component or activity that the metric monitors. The metric scope depends
on the metric class. In some cases, the metric scope indicates a
particular component or activity. In other cases, the scope indicates
all activities of a given type across an instance of the database server.
The Metrics menu has a separate option
for each class of metrics. For more information on metrics, see Ways to Use onperf.
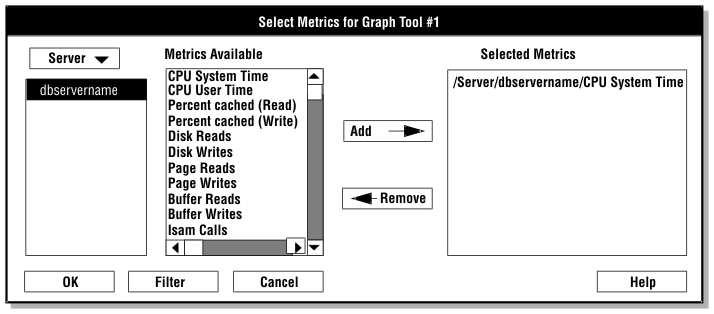
When you choose a class, such as Server,
you see a dialog box like the one in Figure 94.
Figure 94. The Select Metrics Dialog Box
The Select Metrics dialog box contains three list boxes. The
list box on the left displays the valid scope levels for the selected
metrics class. For example, when the scope is set to Server,
the list box displays the dbservername of the database server instance
that is being monitored. When you select a scope from this list, onperf displays
the individual metrics that are available within that scope in the middle
list box. You can select one or more individual metrics from this
list and add them to the display by clicking Add.
To remove them from the display, click Remove.
Tip:
You can display metrics from more than one class in a
single graph-tool window. For example, you might first select ISAM Calls, Opens,
and Starts from the Server class.
When you choose the Option menu in the same
dialog box, you can select another metric class without exiting
the dialog box. For example, you might select the Chunks metric
class and add the Operations, Reads,
and Writes metrics to the display.
The Filter button in the dialog box brings
up an additional dialog box in which you can filter long text strings
shown in the Metrics dialog box. The Filter dialog box also lets
you select tables or fragments for which metrics are not currently displayed.
Graph-Tool View Menu
The View menu provides the following
options.
- Option
- Use
- Line
- Changes the graph tool to the line format. Line format includes horizontal
and vertical scroll bars. The vertical scroll bar adjusts the scale
of the horizontal time axis. When you raise this bar, onperf reduces
the scale and vice versa. The horizontal scroll bar allows you to
adjust your view along the horizontal time axis.
To change
the color and width of the lines in the line format, click the legend
in the graph tool. When you do, onperf generates
a Customize Metric dialog box that provides a choice of line color and
width.
- Horizontal Bar
Graph
- Changes the graph tool to the horizontal bar format.
- Vertical Bar Graph
- Changes the graph tool to the vertical bar format.
- Pie
- Changes the graph tool to the pie-chart
format. To display a pie chart, you must select at least two metrics.
- Quick Rescale Axis
- Rescales the axis to the largest point that is currently visible
on the graph. This button turns off automatic rescaling.
- Configure Axis
- Displays the Axis Configuration dialog box. Use this dialog
box to select a fixed value for the y-axis on the graph or select automatic
axis scaling.
The Graph-Tool Configure Menu and the Configuration Dialog
Box
The Configure menu provides the
following options.
- Option
- Use
- Edit Configuration
- Brings up the Configuration dialog box, which allows you to change
the settings for the current data-collector buffer, graph-tool display
options, and data-collector options. The Configuration dialog box
appears in Figure 95.
- Open Configuration
- Reinitializes onperf with the settings
that are stored in the configuration file. Unsaved data in the data-collector
buffer is lost. If no configuration file is specified and the default
does not exist, the following error message appears:
Open file filename failed.
If the specified configuration file does not exist, onperf prompts for
one.
- Save Configuration
- Saves the current configuration to a file. If no configuration
file is currently specified, onperf prompts
for one.
- Save Configuration As
- Saves a configuration file. This option always prompts for
a filename.
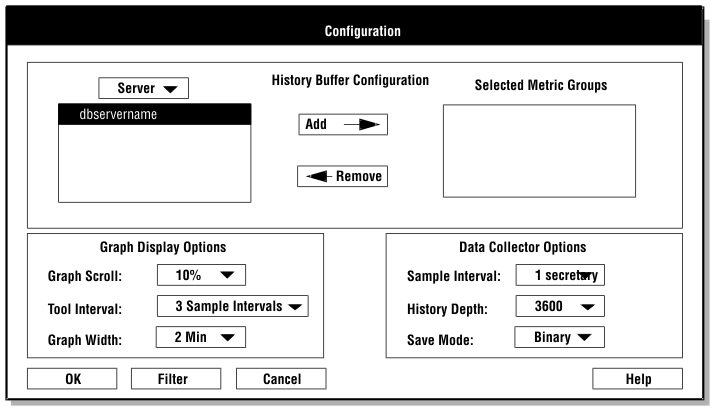
To configure data-collector options, graph-display options, and
metrics about which to collect data, choose the Edit Configuration option
to bring up the Configuration dialog box.
Figure 95. The Configuration Dialog Box
The Configuration dialog box provides the following options for
configuring display.
- Option
- Use
- History Buffer Configuration
- Allows you to select a metric class and metric scope to include
in the data-collector buffer. The data collector gathers information about
all metrics that belong to the indicated class and scope.
- Graph Display Options
- Allows you to adjust the size of the graph portion that scrolls
off to the left when the display reaches the right edge, the initial time
interval that the graph is to span, and the frequency with which
the display is updated.
- Data Collector Options
- Controls the collection of data. The sample interval indicates
the amount of time to wait between recorded samples. The history depth
indicates the number of samples to retain in the data-collector
buffer. The save mode indicates the data-collector data should be
saved in binary or ASCII format.
Graph-Tool Tools Menu
Use the Tools menu to bring up other
tools. This menu provides the following options.
- Option
- Use
- Query Tree
- Starts a query-tree tool. For more information, see Query-Tree Tool.
- Status
- Starts a status tool. For more information, see Status Tool.
- Disk Activity
- Starts a disk-activity tool. For more information, see Activity Tools.
- Session Activity
- Starts a session-activity tool. For more information, see Activity Tools.
- Disk Capacity
- Starts a disk-capacity tool. For more information, see Activity Tools.
- Physical Processor Activity
- Starts a physical-processor tool. For more information, see Activity Tools.
- Virtual Processor Activity
- Starts a virtual-processor tool. For more information, see Activity Tools.
Changing the Scale of Metrics
When onperf displays
metrics, it automatically adjusts the scale of the y-axis to accommodate
the largest value. You can use the Customize Metric dialog box to establish
one for the current display. For more information, see Graph-Tool View Menu.
Displaying Recent-History Values
The onperf utility
allows you to scroll back over previous metric values that are displayed
in a line graph. This feature allows you to analyze a recent trend.
The time interval to which you can scroll back is the lesser of
the following intervals:
- The time interval over which the metric has been displayed
- The history interval that the graph-tool Configuration dialog
box specifies
The length of time you can scroll back through cannot exceed
the depth of the data-collector buffer.
For more information, see The Graph-Tool Configure Menu and the Configuration Dialog
Box.
Figure 96 illustrates the
maximum scrollable intervals for metrics that span different time
periods.
Figure 96. Maximum Scrollable Intervals for Metrics That Span Different Time Periods
Enterprise Edition Home |
Express Edition Home |
[ Top of Page | Previous Page | Next Page | Contents |
Index ]