Apache JMeter
Apache JMeter (http://jmeter.apache.org/) has a bit of a learning curve but generally has all the features needed to do performance testing. Writing and maintaining realistic test suites can be time consuming, particularly because even minor changes to an application can break the test flow and assumptions. Nevertheless, it is critical to have realistic testing. You can have different tiers of tests, from simple smoke tests to incredibly realistic user flows, with the latter being more brittle.
For a lab demonstrating JMeter, see https://hub.docker.com/r/kgibm/fedorawasdebug
Download the JMeter binary (http://jmeter.apache.org/download_jmeter.cgi), unzip, change directory to bin, and run jmeter. You will start with a blank test plan and workbench. In general, you should do most of your work in the test plan and the workbench is only used for some copy/paste operations. Right click on the test plan and use the context menus to build it. Here are some general tips:
- As you change fields and navigate, the changes you make are persistent within the GUI; however, you should save your plan and periodically re-save as you make changes.
- Try to use variables as much as possible so that your test is more flexible.
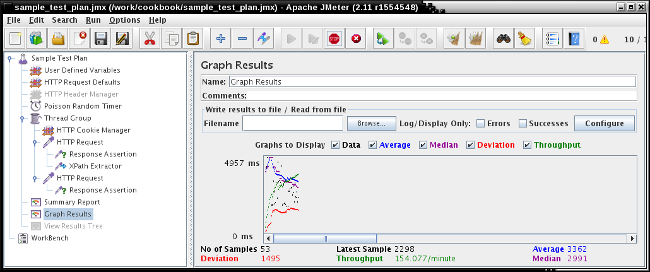
See a sample JMeter script at https://raw.githubusercontent.com/kgibm/problemdetermination/master/scripts/jmeter/sample_test_plan.jmx, a screenshot of which is below. Here are the highlights:
- A "User Defined Variables" configuration element defines some global variables such as the scheme, host, port, number of threads, etc.
- An "HTTP Request Defaults" configuration element defines the default parameters of the HTTP client. In particular, note that "Retrieve All Embedded Resources" and "Use concurrent pool" are checked to instruct the client to retrieve things such as images, CSS, and JS resources from resulting HTML files to more closely mimic real world behavior.
- An "HTTP Header Manager" configuration element with a header name of "Authorization" and a value of "Basic ..." shows how to add an HTTP header to perform basic authorization on every request. Notice that the element is grayed out, signifying that the element is disabled. To enable it, right click and click Enable or Toggle. This technique is often useful to quickly change tests.
- A "Poisson Random Timer" timer element pauses each thread for a random period of time between requests with most times occurring near the specified value in the configuration.
- A "Thread Group" threads element that will perform the actual HTTP
requests with a certain concurrency and for a certain number of
iterations.
- An "HTTP Cookie manager" configuration element that will stores cookies for each thread.
- An "HTTP Request" sampler element that will do the actual HTTP
request. Since we've set up HTTP Request Defaults above, we only need to
change what's unique to this request, in the first example just the path
/.
- A "Response Assertion" assertion element that will fail the request if it doesn't see the specified value in the response. It is useful to add these to all responses to ensure that there are no functional errors in the application.
- An "XPath Extractor" post processor element which will extract content from the response into variables for use in subsequent requests. We check "Use tidy (tolerant parser)" because most HTML is not well formed XML. We set the reference name to the variable that we want to hold the extraction, and the XPath query to perform the extraction. Other useful post processors are the regular expression extractor.
- An "HTTP Request" sampler element that will do an HTTP request to the contents of the variable that we extracted from the previous response.
- A "Summary Report" listener element that will provide basic statistics on the test results.
- A "Graph Results" listener element that will provide the same statistics as the summary report in graph form over time.
- A "View Results Tree" listener element that will provide the full request and response of every sample. This is useful during test design and should be toggled off otherwise.
- Make a habit to change the "Name" of each element to describe what it's doing. The name will be reflected in the tree on the left.
- To start the test, click the simple green arrow.
- As the test is running, the number of threads executing is in the top right corner. You can also click any of the listener elements to see a live view of the statistics, graph, or results tree.
- To stop the test, click the shutdown red X button (the stop button terminates threads and should be avoided).
- After stopping a test, you may want to clear the previous results before starting a new iteration. Click the clear all brooms icon to reset the listeners.