Windows hangs and High CPU
Note: This document has undergone significant updates aroun Sep 19 2024. Please re-review the system preparation steps and carefully read the post-mortem steps.
Known issues to check first
None currently.
System preparation
Perform the following in preparation to capture a future Hang or High CPU condition.
If you have not previously setup the Windows error reporting tools to save error information then refer to 'MustGather setup of error reporting dump tools for Microsoft Windows' for information on performing this setup. This setup step must be performed prior to recreating the hang. Make sure you are aware of the directory into which the tool will save the log and dump data.
Remove any existing Windows log and crash files from its output directory (after backing up as appropriate).
Ensure that
'ExtendedStatus On'is enabled in the web server configuration file.Install ProcDump from Microsoft Windows Sysinternals to request dumps from hung processes.
Add the Procdump install location to your Path or make a note of the install location so that you can invoke the utility from that location later. Note that the Procdump install zip contains both a
procdump.exeand aprocdump64.exe(for 64-bit OS systems)Gather general system and web server information.
This information is gathered by running the ihsdiag
ServerDoc DescribeConfigtool as described by the instructions in the System and web server information tool documentation.
This will result in a directory of information named 'ServerConfig.timestamp'.
That directory should be zipped and sent to IBM using the provided instructions after completing the following steps for obtaining additional information.Reduce the value of
ReportIntervalto get finer granularity of mod_mpmstats data in the error_logMake sure that requests to /server-status are enabled from localhost or a trusted IP, so the data can be collected during a problem.
Task Manager configuration (one time setup)
Perform the following steps to configure task manager to display detailed information.
Start 'Task Manager' (You can run '
taskmgr.exe' from a Command Prompt)Select the '
Details' tabMake sure the needed columns are displayed
At a minimum, the following columns of information should be displayed:
PID
User name
CPU
CPU Time
Working set (memory)
Memory (private working set)
Handles
Threads
User objects
I/O read bytes
To select columns to be displayed:
Right-click one of the column headers (such as '
Name')Click '
Select columns' on the menu that is displayed. (A 'Select columns' window is displayed)Select the checkbox of each column to be displayed (Refer to the list above)
Click the 'OK' button to save the settings
Click the '
Name' column header to sort the list of processes by name.
Install and run a test data collection of perfview to make sure your data collection will succeed at the time of the incident.
Obtaining information at the time of the hang or high CPU issue
These steps must be performed at the time of the problem
Save a server-status report
From a web browser, request
http://www.example.com/server-status/?showmodule(Replace www.example.com with your web server address). If the web server is completely hung, it may not respond. Otherwise, save the server status report as a file in the '
ServerConfig.timestamp' directory prepared in advanceCollect Task Manager information
Find the two
Apache.exeorhttpd.exeprocesses.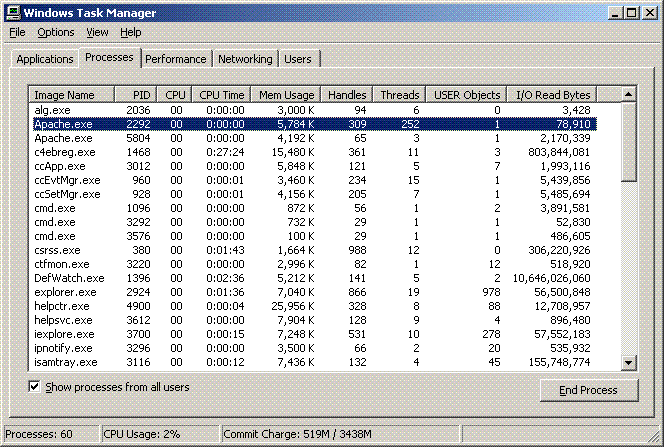
The process with the larger number of threads (
252threads in the example above) is the IHS child process. (Note: This should be almost the value set for ThreadsPerChild in the config). Make a note of the associated PID (2292in the example above) for the IHS child process. It will be used later.Note: The child PID can also usually be determined by looking for the IHS process with +/- ThreadsPerChild number of threads displayed in the output of a '
pslist' invocation.With the Task Manager window selected, press
<Alt><PrtSc>to save an image of the window to the clipboard.Run the Windows
Wordpadprogram and paste the image of the Task Manager window into the new file. Save it astaskmgr.docortaskmgr.rtf.Copy the saved file into the '
ServerConfig.timestamp' directory.
Web server state - capture a dump using
ProcdumpRun '
procdump64 -ma CHILDPID' [Use 'procdump' for 32-bit OS systems.]
(where CHILDPID is the PID of the IHS child process as determined in the prior steps above.)Note the location of the dump as printed in your command prompt window. Copy the file(s) into the '
ServerConfig.timestamp' directory.Note: Multiple invocations will create uniquely named dumps and does not overwrite previously generated dumps until the DumpCount value is reached (default is 10) at which point the older dump files will be overwritten as new dumps are created. {DumpCount an be adjusted under the LocalDumps registry entry. If needed, refer back to 'MustGather setup of error reporting dump tools for Microsoft Windows' }
Any additional error or access log files that might be available.
The
access.loganderror.logfiles will be automatically gathered by theServerDoc DescribeConfigtool used above, but if the configuration file has been changed to specify differently named log files then you should copy these log files from theIHS_install_root\logs\directory to the 'ServerConfig.timestamp\files\logs' directory.WebSphere plug-in trace file
The actual location is specified in
plugin-cfg.xmland is generated by configuringLogLevel="Trace".
Example:c:\WebSphere\AppServer\logs\http_plugin.log
Copy the file into the 'ServerConfig.timestamp' directory.Event Viewer information
Open the 'Event Viewer' (All Programs / Administrative Tools / Event Viewer)
For both the
'Application'and'System'logs:Select the log in the tree
Rt-click and select
'Save Log File As...'Name each file the same as the log (i.e.
'Application'or'System'), and select a type of'Event Log (*.evt)''Save' into the '
ServerConfig.timestamp' directory
(the directory created in the first step by running 'ServerDoc DescribeConfig')
Perform the perfview data collection and add the PerfViewData.etl.zip and PerfViewCollect.log to the
ServerConfig.timestamp' directoryData collection is complete. It is now safe to recover the service without losing diagnostic data.
Recap of information to send to IBM support:
Create a zip file of the 'ServerConfig.timestamp' directory as
described in the System and web server information
tool documentation. Send this
ServerConfig.timestamp.zip containing the following to IBM support for
analysis:
IHS information gathered by the
'ServerDoc DescribeConfig'Server status report, if it could be loaded
Task manager information, as saved to
taskmgr.docortaskmgr.rtfWeb server state, as represented by the dump and log file(s)
All error and access logs
WebSphere plug-in trace file
Event Viewer export files
PerfViewData.etl.zip and PerfViewCollect.log