To replace a faulty host interface adapter in a Lenovo Storage V7000 2076-524 with a new one received from customer replaceable unit
(CRU) or field replaceable unit (FRU) stock, use this procedure.
For lists of supported
host interface adapters, refer to
Lenovo Storage V7000 2076-524 Gen2 replaceable units.
Important: For correct operation, use the correct SFP transceivers
with each adapter card. The topic
"Storwize V7000 2076-524 Gen2
replaceable units" identifies the suitable IBM parts.
- Use only 8G bps SFP transceivers in the 8 Gbps Fibre Channel adapter
cards.
- Use only 16 Gbps SFP transceivers in the 16 Gbps Fibre Channel
adapter cards.
- Use only 10 Gbps SFP transceivers in the 10 Gbps Ethernet (FCoE/iSCSI)
adapter card.
Complete the following steps to replace a host interface adapter.
- Complete Procedure: Removing a Lenovo Storage V7000 Gen2 node canister to remove the Lenovo Storage V7000 2076-524 node canister with the faulty host interface adapter.
- Identify which host interface adapter is to be removed. The interface adapters are in slots numbered
2 and 3
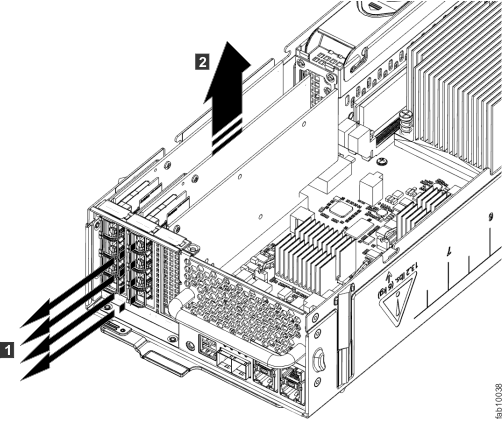
- Remove any small form-factor pluggable SFP transceiver from
each rear-facing port of the host interface adapter and put safely to one side.
- Complete Procedure: Removing and replacing the lid of a Lenovo Storage V7000 Gen2 node canister to remove and replace the lid of a Lenovo Storage V7000 2076-524 node canister.
- Gently pull the host interface adapter upward to disconnect it 2, and then carefully remove
it from the canister 1.
Figure 1 displays removing the
host interface adapter.
Figure 1. Removing the host interface adapter
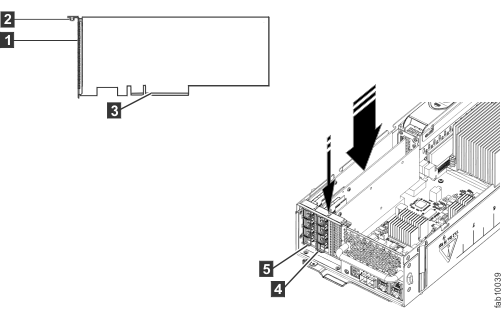
- Remove the replacement host interface adapter1 from its package.
Figure 2 displays installing the
host interface adapter.
- Set the connecting edge of the replacement host interface adapter3 on the host interface adapter connector so that the connectors are aligned.
- Ensure that the adapter is perpendicular to
the canister main board so that the small tab on the top of the bracket 2 is aligned with the alignment hole in the top edge of the
slot.
- Maintain alignment while applying pressure
to the top edge of the host interface adapter opposite the connecting edge to push the host interface adapter into the connector 4 and 5.
Figure 2. Installing the host interface adapter
- Check that the host interface adapter is installed squarely in its slot. If the small tab of the
mounting bracket is not positioned correctly, repeat steps 5 onward
to install the adapter correctly.
- Replace the canister lid, as described in Procedure: Removing and replacing the lid of a Lenovo Storage V7000 Gen2 node canister.
- If any SFP transceivers were removed from the rear-facing
ports of the host interface adapter at step 2,
ensure each one is reinstalled by following the installation steps
of Replacing an SFP transceiver in a Lenovo Storage V7000 2076-524 control enclosure.
- Reinstall the canister into the enclosure from which it
was removed in step 1 following Replacing a Lenovo Storage V7000 Gen2 node canister. The
node canister starts.
- Reconnect the cables to the canister, ensuring cables go
into the same ports from which they were removed in step 1.
- When the canister is back online, check the event log for
any new events relating to hardware changes.