This section describes how to develop, deploy, and configure
the sample to demonstrate the concepts of work baskets. It uses a
predefined project and shows how to build this scenario rather using
the known human task staff resolution concepts with staff verbs and
individual worklists. The major
steps in configuration, design and development are shown below.
The start of process instances, the execution of human
tasks and administration of work baskets is done in Run the sample.
Installation of pre-requisites
Install the feature packs
The WebSphere
Process Server Feature Pack for v7.0 provides flexibility for
assigning tasks in form of work baskets. These are logical entities,
which are used to group available tasks into meaningful subsets, based
on responsibilities, organizational units, topics, and so on.
Perform following steps to enhance your WID and Process Server
installation through the feature pack.
Verify the pre-req's for the WebSphere Integration Developer
Feature Pack 1
Download the feature pack
Install the WebSphere Integration Developer Feature Pack 1
Verify the pre-req's for the WebSphere Process Server V7.0
Feature Pack 1
Download the feature pack
Install the WebSphere Process Server V7.0 Feature Pack 1
Configure feature pack / augment server profile
You must deploy and configure widgets for
the IBM® WebSphere® Process Server V7 Feature Pack before you and
others on your team can begin using them in Business Space powered by
WebSphere.
The Business Space itself might already configured. In order to use the
new Human Task Administration widgets that are part of the feature
pack, configure Business Process Choreographer. See Configuring
Business Process Choreographer using the Profile
Management Tool.
Otherwise update (augment) the Business Process Choreographer and all
the necessary resources on a given server (profile) via the bpeconfig.jacl script configuration
tool so that the full functionality of the WebSphere Process Server V7
Feature Pack widgets can be used. In this case follow the instructions
in the Information Center Deploying and configuring WebSphere Process Server
widgets for the feature pack.
Install Query Table Builder in WID
Query tables support task and process list queries on data that is
contained in the
Business Process Choreographer database. This includes human task data
and business process data that is managed by Business Process
Choreographer, and external business data.
Query tables provide an abstraction on the data of Business Process
Choreographer
that can be used by client applications. In this way, client
applications become independent of the actual implementation of the
query table.
Install it according to the PA71_GettingStarted.pdf -
Installation Instructions
Wait for installation to complete, including automatic restart of
WID.
Enable work baskets and business categories
Specify Java EE authorizations for work baskets and business
categories
Verify system-level Java EE roles for the administration of business
categories and work baskets. Access the settings for the Business
Category System Administrator as well as the Work Basket System
Administrator.
Log in to the Admin
Console of WebSphere Application server. Either right-click on the
server in WID and select Administration
> Run administrative console or
open a web browser, enter URL http://yourhost:yourport/admin. Note: Replace yourhost
with your server's internet address and replace yourport
with the port of your server's HTTP transport, for example
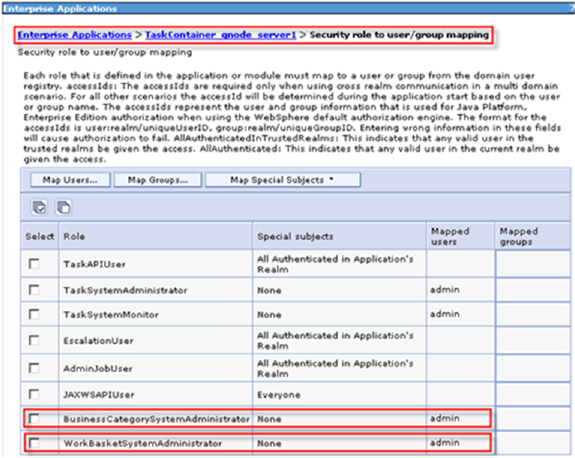
Select the submenu Applications > Application Types =
Enterprise
Applications.
Double-click your TaskContainer, here
TaskContainer_qnode_server1.
The configuration window opens.
Select Detail Properties > Security role to
user/group mapping.
The corresponding window opens. Verify the settings for the Business
Category System Administrator as well as the Work Basket System
Administrator. Both roles are assigned to with the userid admin.
Note:
Use the Map Users ... button to specify further
users as domain administrators. However, in this scenario we stay the
userid admin.
Work basket enabling
To enable the Human Task Manager in support of work baskets perform
the following steps:
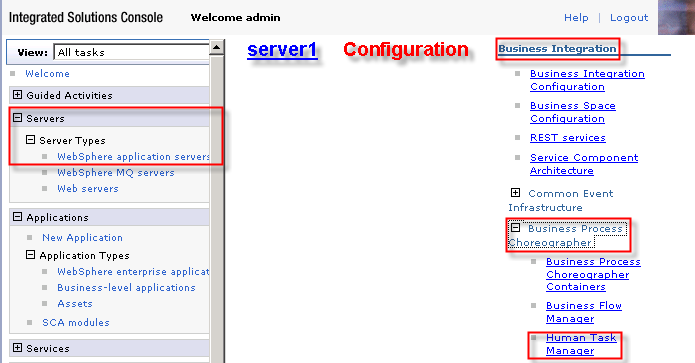
Log in to the Admin Console of WebSphere Application server.
Select submenu Server Types > WebSphere
application server. Double-click server1.
Under the Configuration
tab select Business
Integration
> Business Process Choreographer > Human Task Manager.
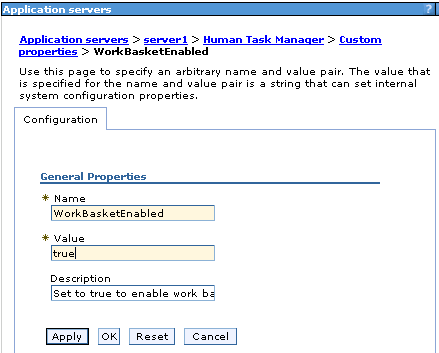
Double-click WorkBasketEnabled. The settings
page opens.
Set the value for WorkBasketEnabled to true
Click OK. Click Save.
In the next paragraph, similar to work baskets, you enable business
categories.
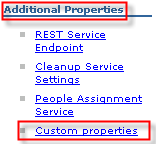
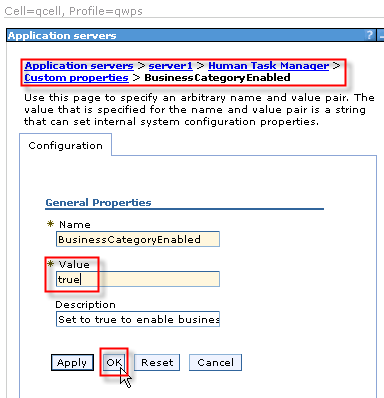
Business category enabling
You are still under Business
Integration
> Business Process Choreographer > Human Task Manager and
herein Additional Properties >Custom
Properties.
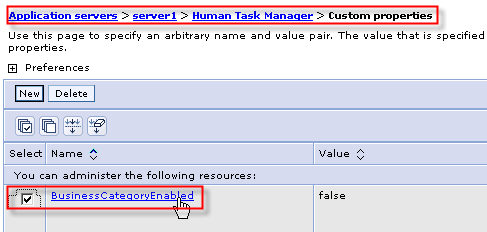
Double-click BusinessCategoryEnabled. The
settings
page opens.
BusinessCategoryEnabled set to true.
Click OK. Click Save.
Import the prepared project and familiarize with the Process
A project has been prepared, which serves as the basis to build this
sample. The project contains the BPEL process and human task
implementations when executing the process using Business Space. To
import the prepared project interchange file, perform the following
steps:
Click on the link InquiryRequest_Start
process model to save the zip file to a directory of your
choice,
for example C:\tempWBSample\.
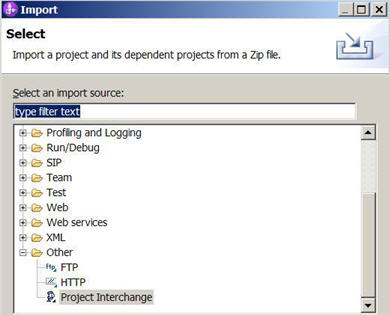
In WebSphere Integration Developer, click File >
Import. The Import window opens.
Select Other > Project Interchange.
Click Next. The Import Project Interchange
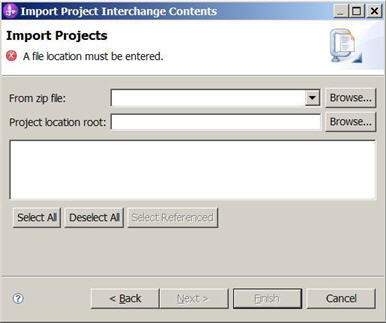
Contents window opens.
Click Browse next to the From zip file
field.
Browse and navigate to the directory that you have used before to
save the zip file.
Click Open.
Select your workspace directory as your Project location
root.
Click Select All.
Click Finish.
Wait until the automatic build process has finished.
You may notice that there are problems indicated. We will
fix those in the following steps.
Familiarize yourself with the process and work basket structure
In this sample we use a business process in
the finance industry which applies to other industries in the same way.
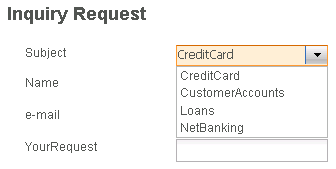
I deals with an inquiry request. The request is entered by the customer
using a request form. He selects a subject, enters his personal data
and provides additional comments on the request.
Familiarize yourself with the process:
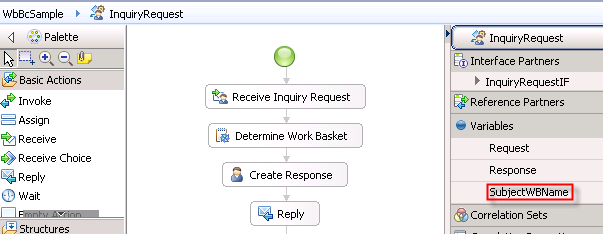
Expand the project tree WbBcSample project >
Integration Logic > Processes and open the InquiryRequest
process.
The Java Snippet activity Determine Work Basket takes the
Subject selected as part of the input request and determines the work
basket to put this request into. In more complex scenarios we could
imaging to use a business rule to determine the proper work basket. See
Properties > Details for the Java code.
The local variable SubjectWBName holds the work
basket identifier that is used in the Create Response
activity to dynamically set the work basket identifier. Users granted
access
as Task Potential Owner for this work basket can work on and
create the response to this inquiry.
This
variable is also specified for demo purposes in the Description field
for this activity
and will be used when the widget My Work page with the "Available Tasks
in Work Baskets" widget is
customized.
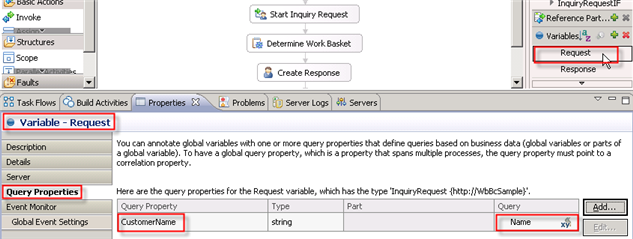
The query property for this process called CustomerName which uses the
attribute Name part of the
Request input message is already specified.
Determine work basket names and structure
When developing human-oriented workflows you
need to understand and improve the organization structure and adopt it
in your LDAP directory. Similar, when you apply the paradigm of work
baskets you have
to outline their setup in terms of their names, types, structure in
form
of distribution targets, access rights, etc.
In the former section we introduced four different
subjects. In this scenario we want to associate and allocate each
subject with a work basket type-topic. This would be sufficient
to run the sample later on.
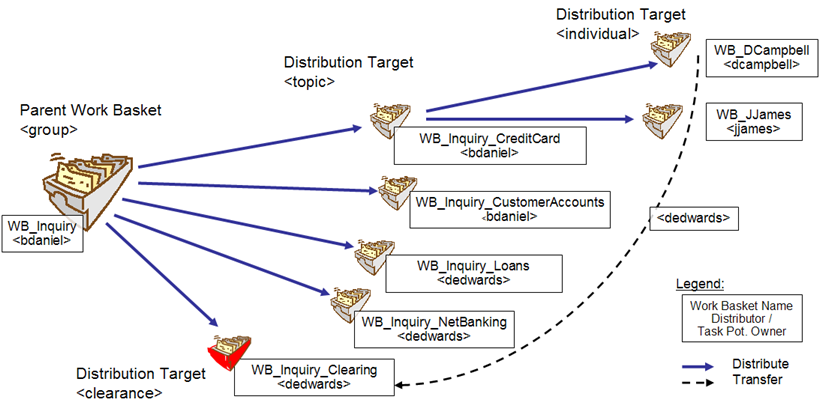
For completeness reasons does the section create and configure work baskets
also list to specify the parent work basket WB_Inquiry, a work basket
of type clearance and two individual work baskets as distribution
target to the work basket WB_Inquiry_CreditCard shown in the figure
below.
Identify the work basket for a human task
Specify a work basket identifier in the
Human
Task Editor. Perform the following steps to assign the human task Create
Response dynamically to a topic-related work basket
using a replacement variable:
Open InquiryRequest process. Double-click the
human task activity CreateResponse.
The To-do Task specification window for the InquiryRequestTask2
task opens.
Note: The default entry Potential Owners = Everybody
is specified.
Press Delete
to get rid of this staff assignment
option.
Select Details and press Work basket identifier:
Insert Variable ... .
The Select Replacement Variable window opens.
Select Variables: Business process variable and for Specify
XPath expression: SubjecWBName which is the variable that stores
the work basket name derived from the Subject of the inquiry
request in the preceding Java activity.
Press OK.
The replacement variable shows up for the work basket
identifier.
Press Ctrl+S to save your specifications.
Specify business categories in conjunction with work baskets
Business categories are used to categorize human tasks in task lists
and work baskets. The following steps need to be applied:
Still under the specification of the human task Create
Response. Press Properties > Details.
Enter CustomerService as
the name of the Business category.
Press Ctrl+S to save your specifications.
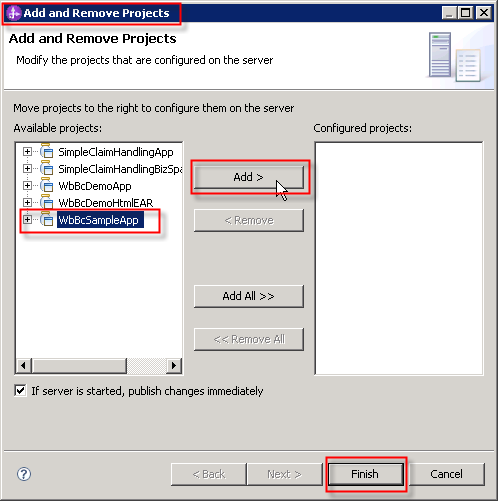
Deploy your project in WID to the integrated test environment
In WebSphere Integration Developer, switch to the Servers view.
In the table, right-click WebSphere Process Server V7.0.
From the pop-up menu, select Add and Remove Projects.
Select the project you want to deploy: WbBcSampleApp.
Press Add > and click Finish.
Wait until the project has been successfully deployed.
Create, export and deploy a query table
Create a query table (QT)
Query tables support task and process list queries on data that is
contained in the Business Process Choreographer database. This includes
human task data and business process data that is managed by Business
Process Choreographer, and external business data. Query tables provide
an abstraction on the data that can be used by client applications. For
further information refer to the document PA71 Getting Started with the Query
Table Builder, to the section in the Information Center Query tables in Business Process Choreographer, as
well as to a Query Table Sample for reference.
In this sample we use query tables to include the business category,
the work basket identifier, and the customer name as task
properties. Refer to section
familiarize with the process were the custom property CustomerName
was enabled in the process model.
The query table properties will be used further on to configure the
task list / work basket widget in
Business Space to support filtering, sorting, and grouping.
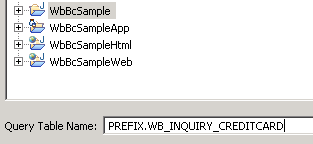
In WID Business Integration Perspective select Window
> Open Perspective > Other ... > Query Tables
In the navigation tree right-click in the WbBCSample
project. Select File > New > Composite Query Table for
Business
Space.
The Composite Query Table Definition for Business Space opens.
Select module WbBcSample and enter for the Query
Table Name: - everything in capital letters - the name PREFIX.WB_INQUIRY_CREDITCARD
Click Next.
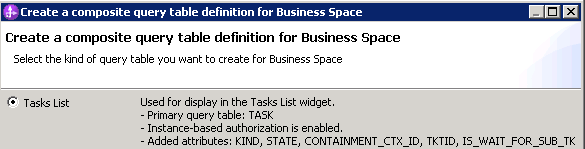
The Create a composite query table
definition for Business Space window opens.
Select the radio button for Task
List as you specify the the Task List
columns for the inquiry work baskets.
Press Finish.
The Query Table specification page with the primary query table opens.
Note:
Query tables that will be used in Business Space have to fulfill
certain criteria. Query tables for the widget Tasks List require:
The primary query table has to be TASK.
The attributes KIND and STATE of the primary query table TASK
have to be added to the query table.
To enable drill down scenarios
that include the tasks associated with a process instance, add the
attributes CONTAINMENT_CTX_ID and TKTID. Additionally, for displaying
details in the Tasks List it is recommended to add IS_WAIT_FOR_SUB_TK.
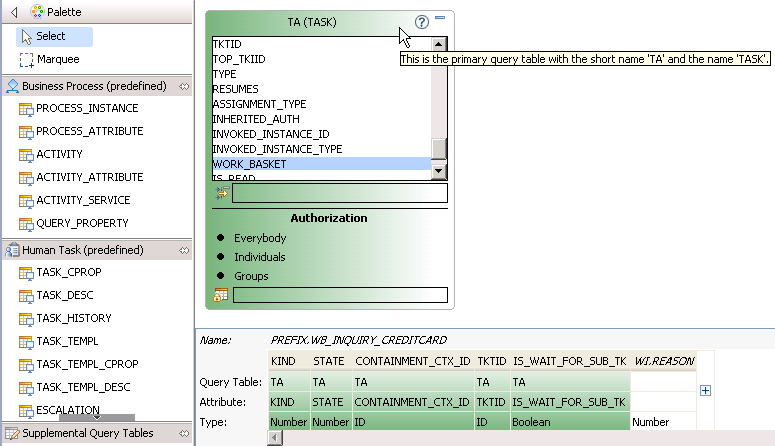
Drag the task attributes
you want to use or display in a task list / work basket from the Task
table and drop it right at the beginning of the table at the
bottom of
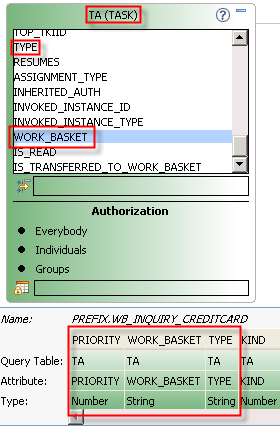
the editor. Perform this step for the PRIORITY,
WORK_BASKET and TYPE
attribute, where the later one stores the Business
Category name.
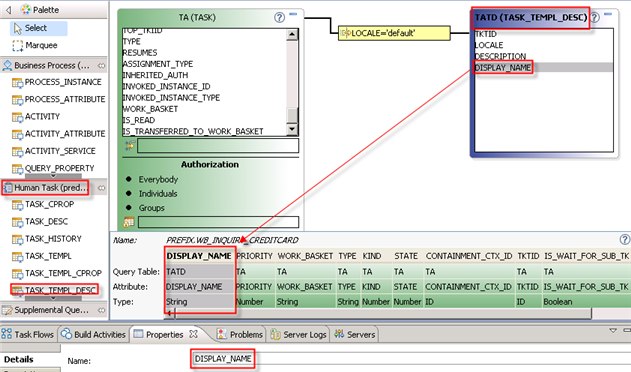
Add the Task display name as additional parameter to the primary
query table.
Select the TAID
(TASK_TEMPL_DESC) tablefrom
the navigation bar (Palette) under Human Task
(predefined). Drag and drop it on the canvas. This
supplemental query property in
blue gets
joined / linked with the primary query table.
Drag and drop the DISPLAY_NAME
attribute from the TAID
supplemental table and move it right in front of the Priority column in
the lower part of this editor.
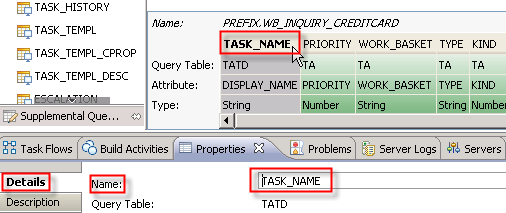
Change new query table attribute via Properties > Details > Name
from DISPLAY_NAME to TASK_NAME.
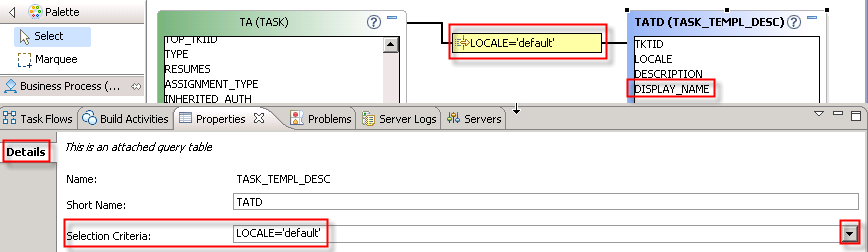
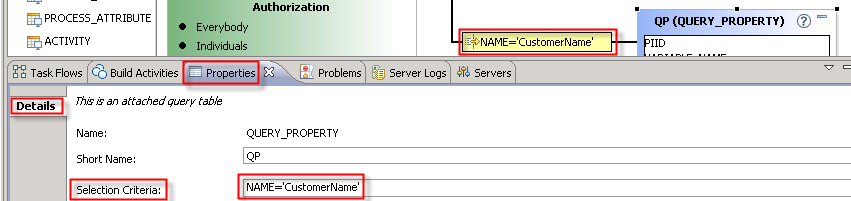
Modify the Selection Criteria for
the join. Select the connection LOCALE='default'.
Under Properties > Details >
Selection Criteria use the drop down menu on the far right and
select LOCALE=$LOCALE_BEST_MATCH.
The chosen selection criteria is displayed.
Add the customer name as an additional parameter to the primary
query table.
Select the QUERY_PROPERTY tablefrom the navigation bar under Business Processes (predefined).
Drag and drop in on the canvas. This supplemental query property gets
joined / linked with the primary query table.
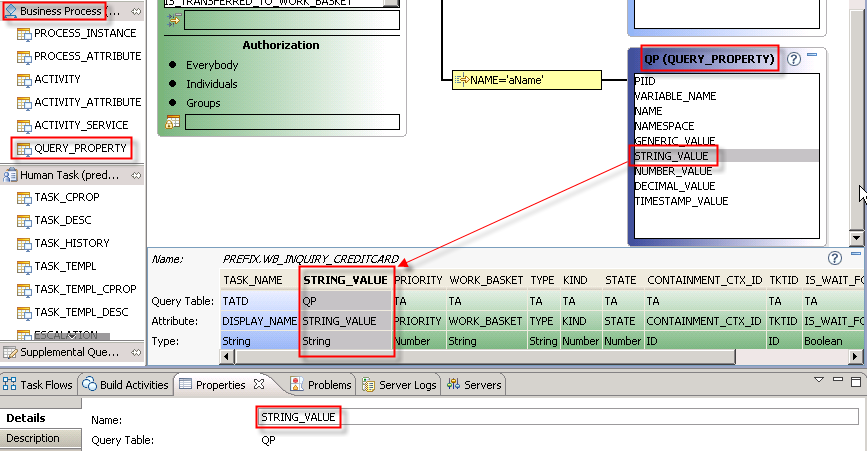
Select the STRING_VALUE
in the QP (QUERY_PROPERTY) table.
Drag and drop it to the lower part in front of the PRIORITY column.
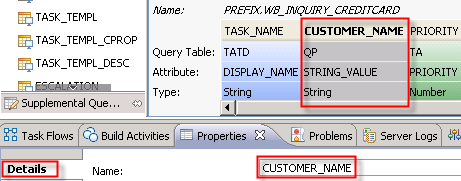
In the defined query table double-click on STRING_VALUE
Under Properties > Details > Name change
STRING_VALUE to CUSTOMER_NAME.
Modify the Selection Criteria for
the join. Select the connection NAME='aName'.
Under Properties > Details >
Selection Criteria
replace aName by CustomerName.
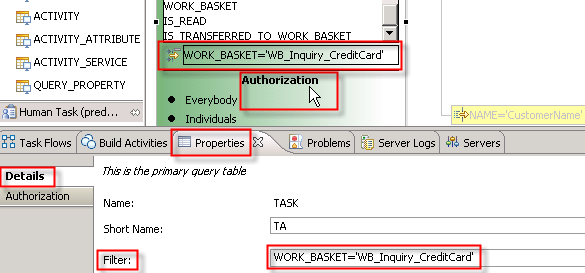
Specify a primary query table filter.
In the editor, select the primary query table TA (Task). The property window opens.
Under Details
specify the Filter: entering WORK_BASKET='WB_Inquiry_CreditCard'.
Define the QT Display Name.
Click on the canvas. The property window opens. Select the Description tab. For the Display
Name enter QT_Inquiry_CreditCard.
Press Ctrl+S to save your work.
Deploy and test the query table
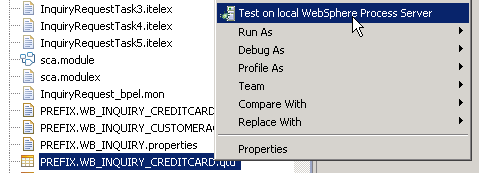
Right click the PREFIX.WB_INQUIRY_CREDITCARD
and select Test on local WebSphere Process Server.
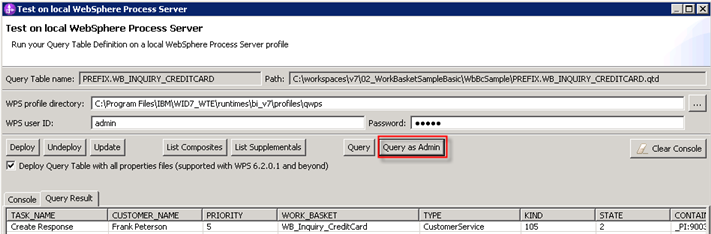
The Test on local WebSphere Process Server Window opens.
Specify the settings for the test.
Under WPS profile directory
open the selection window and navigate to your profile directory. Press
OK.
For the WPS user ID: enter admin
and Password:admin.
Press Deploy.
The Console indicates successful deployment of the query table.
Wait until successful deployment is returned.
Press Query as Admin.
The Query Result shows the columns specified for the new Task query
table,
in this case with one task instance already available.
Create business categories and work baskets in Business Space
The Feature Pack provides a new template and a set of new widgets.
Administering Work Baskets and Business Categories template
The Administering Work Baskets and Business Categories template
creates a space for administering work baskets and business categories.
Work Baskets and Business Categories widgets
Work baskets provide an alternate way of assigning work to
people. Work is assigned to a work basket from where it can be
distributed to individuals, groups, or other work baskets. Business
categories provide a mechanism for classifying work. New widgets are
available to create and specify both of them.
Configure Business Categories in Business Space
Define and update the settings of the business category using the
Business Category Information Widget.
To start the Business Space in the integrated test environment of your
WebSphere Integration Developer, perform the following steps:
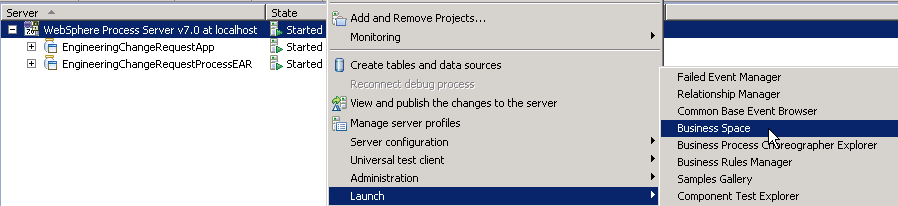
In WebSphere Integration Developer, switch to the Server view.
In the table, right-click WebSphere Process Server V7.0.
From the pop-up menu, select Launch > Business Space.
Optionally start the Business Space on WebSphere Process Server,
perform the following steps:
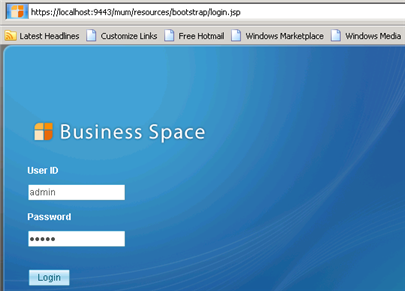
In a web browser supported by Business Space, open URL http://yourhost:yourport/mum/resources/bootstrap/login.jsp.
Note: Replace yourhost with your server's
internet address and replace yourport with the
port of your server's HTTP transport, for example
The login screen is displayed.
Enter the BusinessCategory- / WorkBasketSystemAdminstrator User
ID admin and Password admin.
Click Login.
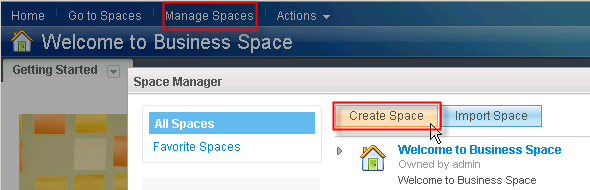
Create a new space
Click Manage Spaces. Click Create Space.
The Create Space window opens.
Create Space
For Space name: enter Administer
Work Baskets and Business Categories.
For Create a new space using a template select the Administering
Work Baskets and Business Categories template from the drop
down list.
Click Save. The new Administer Work Baskets and
Business Categories space is created.
Click Done.
Select Go to Spaces. Double-click on Administer Work Baskets and Business
Categories.
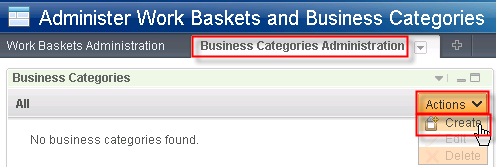
Select the Business Category Administration
tab. Select the Business
Categories widget. Press Actions > Create.
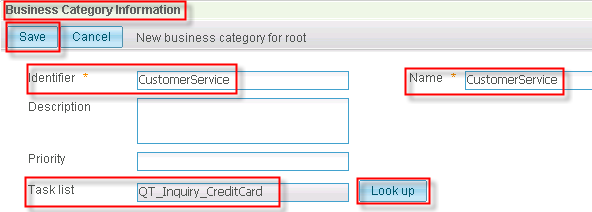
The Business Category Information Widget opens.
Specify the business category.
For the Identifier as well as
the Name enter CustomerService.
Press the Look up Button for
the Task list field and select
the query table QT_Inquiry_CreditCard.
Press OK.
Press Save.
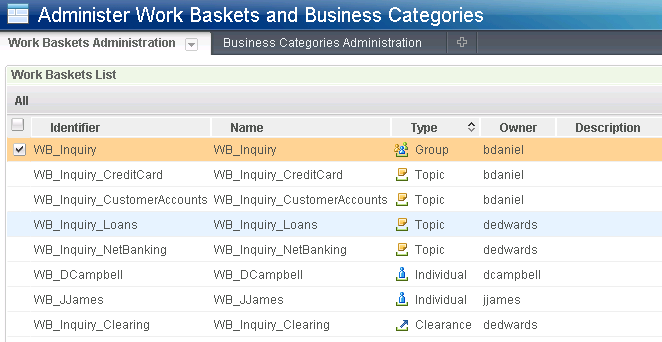
Create and configure work baskets
The Work Baskets Administration page is where you administer work
baskets. It includes Work Baskets List widget that displays the work
baskets that you can administer. The second Work Basket Information
widget
displays information about a work basket that you selected in the Work
Baskets List widget. This widget is the place where you define and
update the settings for a work basket, e.g. to specify the content,
roles, and distribution targets that are available to users. The
work basket system administrator is responsible for defining work
baskets and their distribution targets based on the needs of the line
of business, and the available human resources that are defined in the
corporate people directory.
The diagram below shows the work basket structure, names, and owners
that need to be created in this section.
The following steps need to be applied:
You are still logged in as admin/admin to the Administer Work Baskets and Business
Categories Space.
Select the Work Baskets Administration tab.
Press Actions > Create.
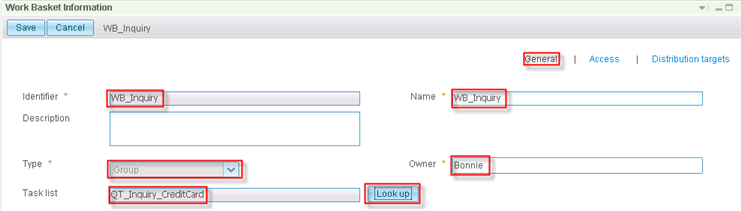
The Work Baskets Information Widget opens.
Specify the wok basket details.
As the Identifier as well as
Name enter WB_Inquiry.
As Type select Group.
As Owner enter bdaniel
which resolves to Bonnie.
Press the Look up Button for
the Task list field and select
the query table QT_Inquiry_CreditCard.
Press OK.
Press Save.
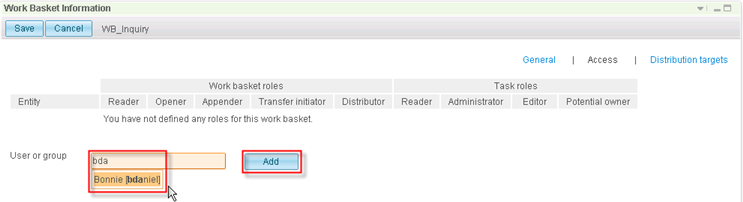
Switch to the Access
page.
Under User or group
enter bdaniel. Press Add when the name is shown.
A row to specify the technical roles for the user bdaniel is added.
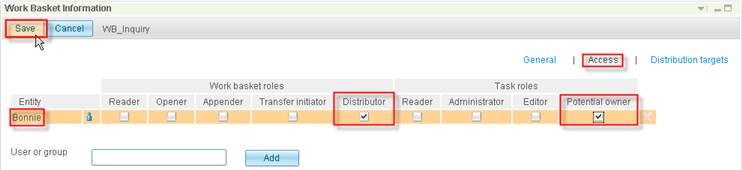
Set the flag for the Work basket role Distributor and Task rolePotential owner.
Press Save. Press Cancel.
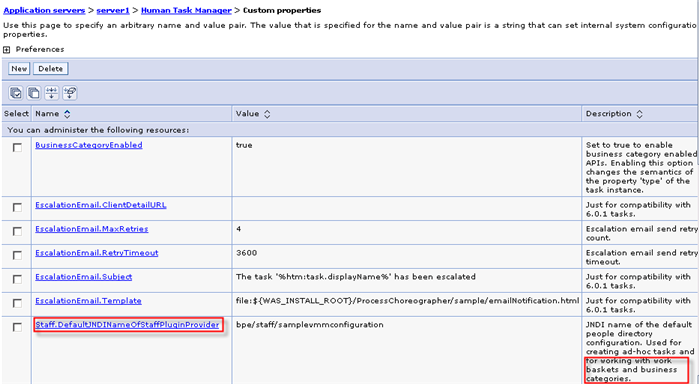
Note:
Similar
to staff assignments via staff verbs is it possible to use different
People Directory Providers. These can be defined using the work basket
APIs where for Business Space the default people directory provider is
used. See Admin Console Application
servers > server1 > Human Task Manager > Custom Properties
> Staff.DefaultJNDINameOfStaffPluginProvider .
No changes are required for this sample.
Repeat these steps using the WB_Inquiry work basket as the parent
and
create and configure following other work baskets.
Attribute
Work basket
identifier and name
General
Type
Owner
Task List
Query Table
Access
User
Access
WB_Inquiry_CreditCard
Topic
bdaniel (Bonnie)
WB_Inquiry
_CreditCard
bdaniel
Distributor
Pot. Owner
WB_Inquiry_CustomerAccounts
Topic
bdaniel (Bonnie)
none
bdaniel
Distributor
Pot. Owner
WB_Inquiry_Loans
Topic
dedwards (Doug)
none
dedwards
Distributor
Pot. Owner
WB_Inquiry_NetBanking
Topic
dedwards (Doug)
none
dedwards
Distributor
Pot. Owner
WB_Inquiry_Clearing
Clearance
dedwards (Doug)
none
dedwards
Appender
Distributor
Pot. Owner
WB_DCampbell
Individual
dcampbell (David)
none
dcampbell
Transfer-Initiator
Pot. Owner
WB_DCampbell
-
-
-
dedwards
Transfer-Initiator
WB_JJames
Individual
jjames (Jeffrey)
none
Opener
Pot. Owner
At the end of your definition eight work baskets are listed.
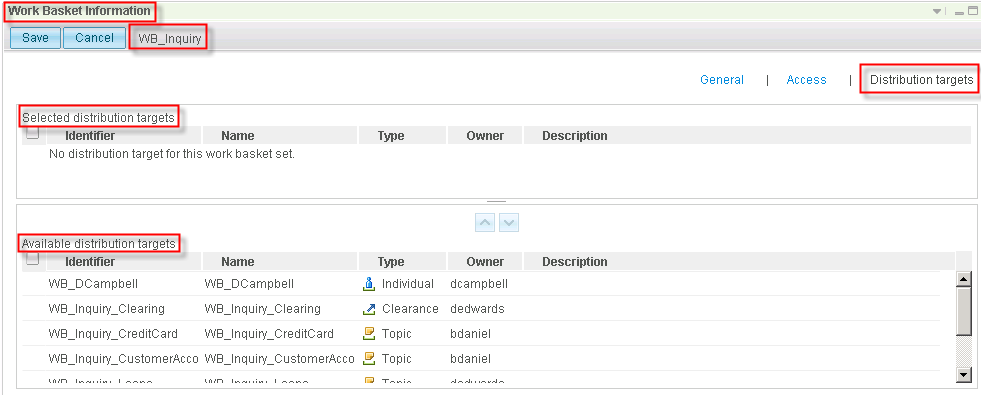
Specify distribution targets.
Select the WB_Inquiry work basket. Press Edit
work basket.
The Work Basket Information widget opens. Switch to the Distribution targets window.
In the lower frame under Available
distribution targets select the following five work baskets: WB_Inquiry_CreditCard,
WB_Inquiry_CustomerAccounts, WB_Inquiry_Loans,
WB_Inquiry_NetBanking, and WB_Inquiry_Clearing.
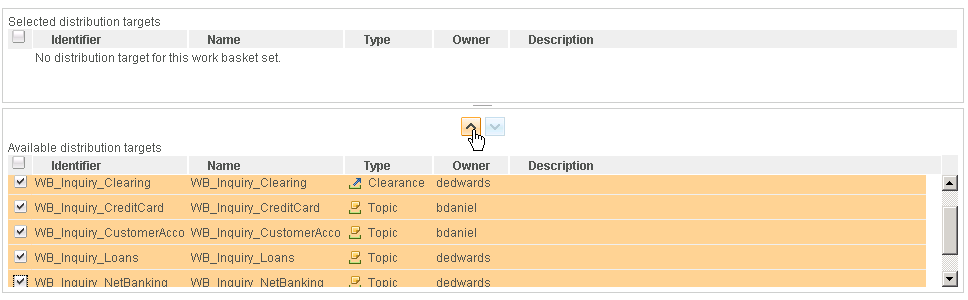
Select the arrow which points upwards.
The
selected work baskets show up under the Selected
distribution targets.
Press Save. Press Cancel.
Repeat this step. Select and edit the WB_Inquiry_CreditCard
work basket and specify the baskets WB_DCampbell and WB_JJames
as distribution targets.
Press Save. Press Cancel.
Logout as user admin.
Configure work baskets space and task list widget
The work baskets were created and configured
by the administrator. For the enduser to work with these work basket
they have to be made available and even customized. For more
information see the information center for Human Task Management widgets.
The following steps need to be applied:
Login with userid/password: bdaniel/wid.
Create a new space.
Click Manage Spaces. Click Create Space.
The Create Space window opens.
For the Space name:
enter Working with Inquiry Work Baskets.
For Create a new space using a template select the Managing
My Tasks.
The new space is created.
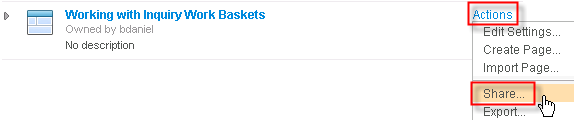
Share Space.
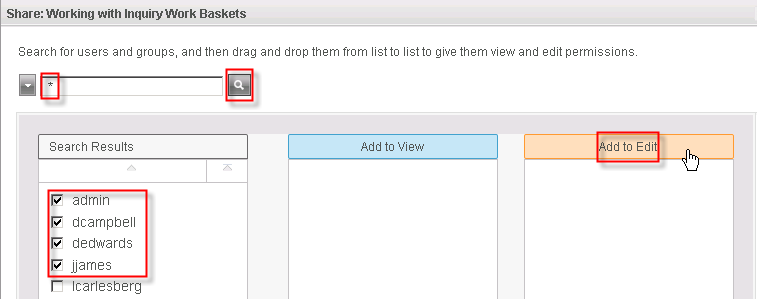
Click Actions. Click Share ...
Enter a wildcard * as search criteria and
click the Search button.
Within the Search Result list select the userids of admin,
dcampbell, dedwards, jjames and transfer them to the Edit
Space list pressing the Add to Edit. This
enables these users not only to view put also to edit this new space.
Click Save. Click Done. The
Welcome window opens.
Click Go to Spaces.
Double-click the Working with Inquiry Work Baskets.
The space opens. Select the MyMork page.
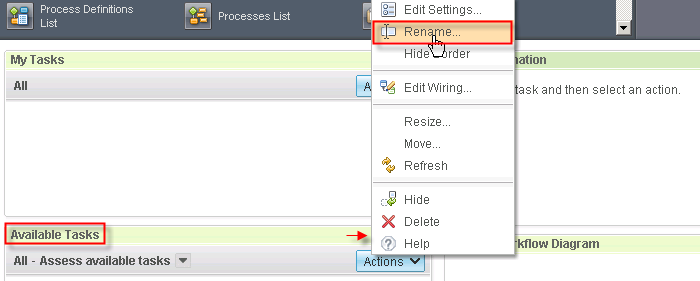
Select Edit Page on the far top right.
Open the menu of options for the
Available Tasks
widget (state=ready) and double-click on Rename.
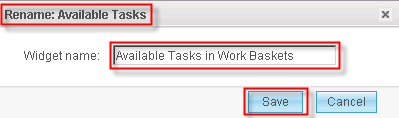
The Rename edit window opens.
Enter Available Tasks in Work Baskets as new widget
name.
Press Save.
Open the menu of options for theAvailable
Tasks in Work Baskets widget. Double-click Edit
Settings ....
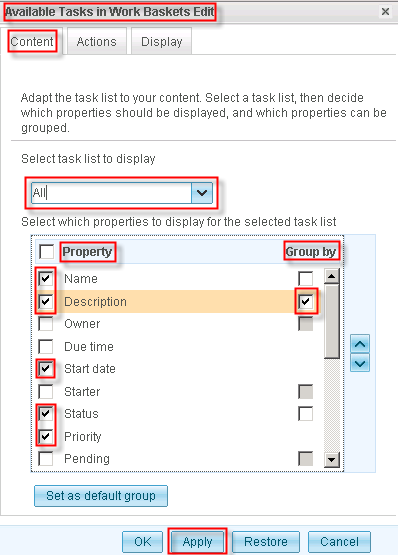
The Task List Edit Window with the Content tab opens.
Stay with All for the Select task list
to display.
As task list Property select following attributes: Name,
Description, Start date,
Status, Priority.
Set the Grouped by flag for Description.
Press Apply.
Note:
The properties list shows all task attributes but not yet a work basket
identifier. In order to display or filter based on a work basket
identifier is it required to have the work basket property be part of a
query table. The Description field was defined using the local variable
SubjectWBIdentifier which stores the work basket identifier. We use
this circumvention when we run the sample to group available workitems.
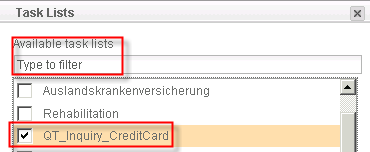
Return to the Select task list to display.
From the drop down list select Select task lists ....
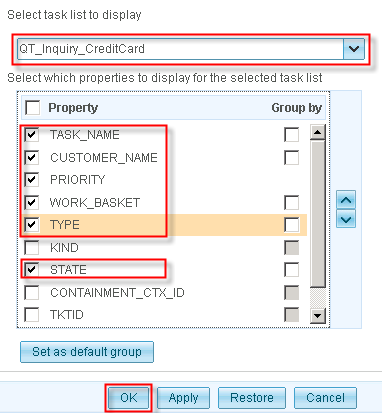
Select the query table QT_Inquiry_CreditCard created
in section create query table with a specific filter.
As Property select following attributes: TASK_NAME,
CUSTOMER_NAME, PRIORITY, WORK_BASKET, TYPE, STATE.
Press OK to save the selected task list.
Complete editing your settings. Press Save.
Press Finish Editing.
Starting process instances, allocation of workitems to work baskets,
transfer as well as execution of workitems is part of chapter Run the sample.


 The
selected work baskets show up under the Selected
distribution targets.
The
selected work baskets show up under the Selected
distribution targets.