This section describes the steps how
to generate a simple Java API for XML Web Services (JAX-WS) client that
makes use of the Web service API
delivered with the WebSphere® Process Server. All this client does is
to display the list of Business Processes installed on your WebSphere
Process Server.
The following steps are described in this section:
In this section, you import and familiarize
yourself with the process model used with the JAX-WS APIs.
1.1 Import and deploy the prepared project
A project has been prepared, which includes the process
started by the JAX-WS client. The project contains the BPEL process
WSApiModule and human task
implementations when executing the process using Business Space. To
import the prepared project interchange file, perform the following
steps:
Click on the link WSApiModule project to save the
zip file to a directory of your
choice,
for example C:\temp.
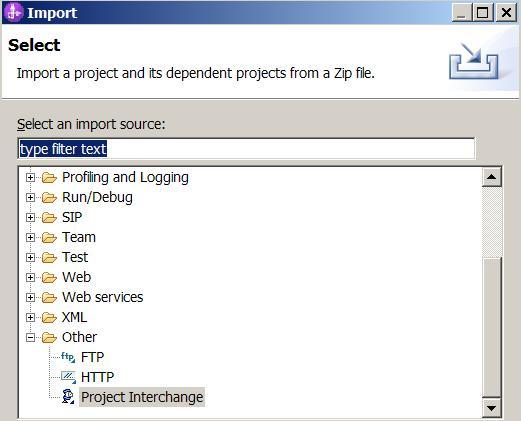
In WebSphere Integration Developer, click File >
Import. The Import window opens.
Select Other > Project Interchange.
Click Next. The Import Project Interchange
Contents window opens.
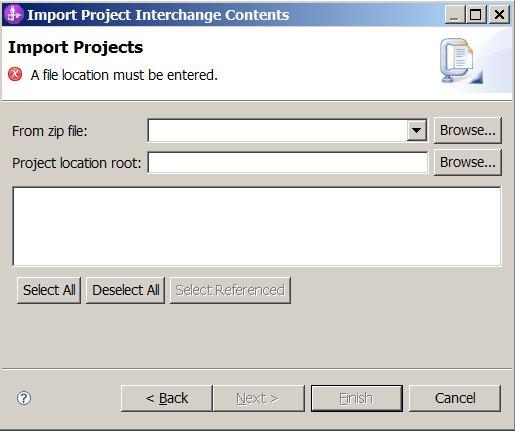
Click Browse next to the From zip file
field.
Browse and navigate to the directory that you have used before to
save the zip file.
Click Open.
Select your workspace directory as your Project location
root.
Click Select All.
Click Finish.
Wait until the automatic build process has finished.
1.2 Deploy your project in WID to the integrated test environment
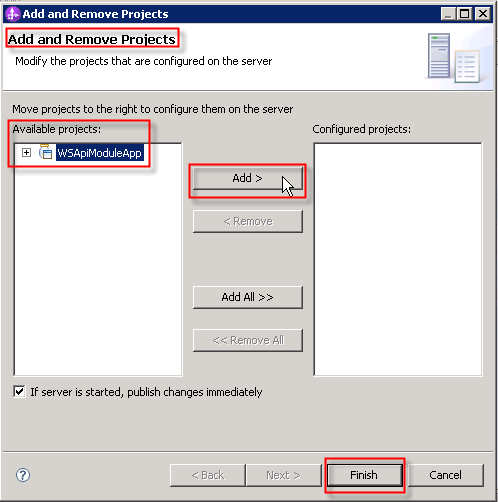
In WebSphere Integration Developer, switch to the Servers view.
Ensure that your WebSphere Process Server V7.0
is started.
Right click the server. From the pop-up menu, select Add
and Remove Projects.
Select the project you want to deploy: WSApiModuleApp.
Press Add > and click Finish.
Wait until the project has been successfully deployed.
1.3 Familiarize yourself with the process
In this sample we use the advertiseProcess
that just includes a Java snippet. Relevant to our JAX-WS sample is the
business object and the interface to start the process.
Familiarize yourself with the process:
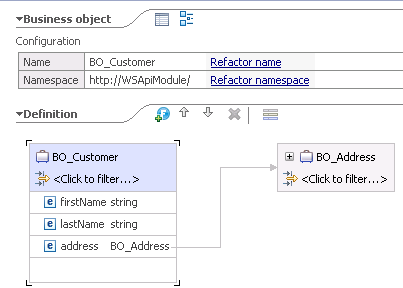
Expand the project tree WSApiModule >
Data Types and open the BO_Customer
business object. For demo purposes this includes the nested business
object BO_Address.
Expand the project tree WSApiModule
> Interfaces and open the advertiseProcessInterface.
Expand the project tree WSApiModule >
Integration Logic > Processes and open the advertiseProcess.
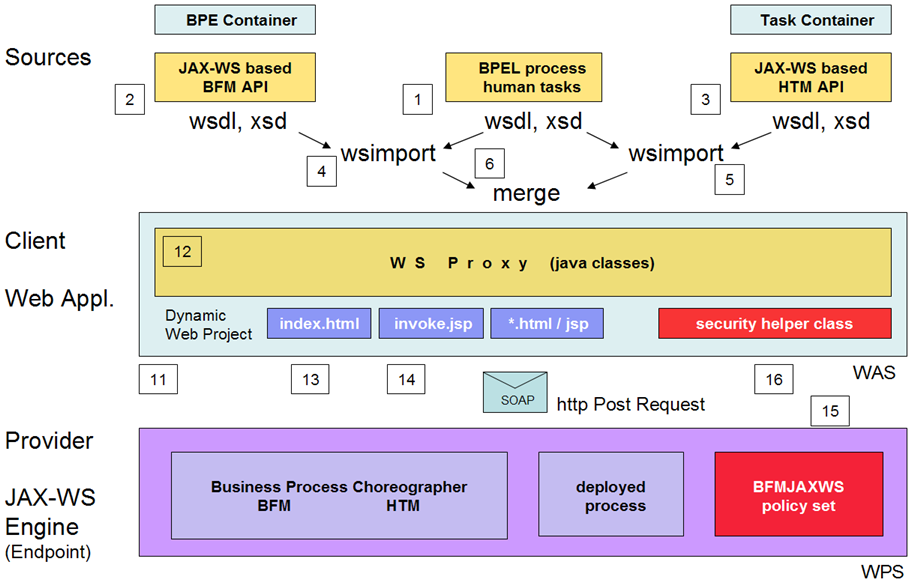
2 Create the Web Service Proxy
In this section, you generate the proxy to
be used by a new web service application to interact with the process
server. You export the WSDL files
of your business process in (1). Same for
the published Business Flow Manager (BFM) in (2) and Human Task Manager
(HTM)
WSDL and XSD files in (3). Based on this you generate the BFM proxy
(4). Even not required for the Basic sample, it is explained how to
generate the HTM proxy in (5) and merge both
of them in (6). The required steps are
shown in the upper part of following diagram under Sources.
2.1 Export your process interfaces
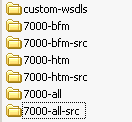
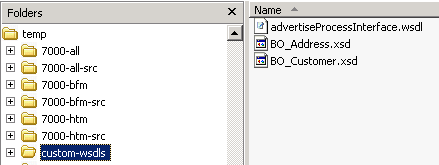
Within your temporary directory create following seven
subfolders:
custom-wsdls, 7000-bfm, 7000-bfm-src, 7000-htm,
7000-htm-src, 7000-all, 7000-all-src.
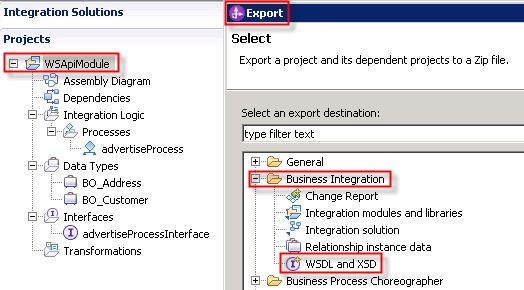
In the Integration Developer, Business Integration perspective,
project tree right click WSApiModule
project.
From the pop up menu select Export.
The Export window opens.
Select Business Integration
> WSDL and XSD. Press Next.
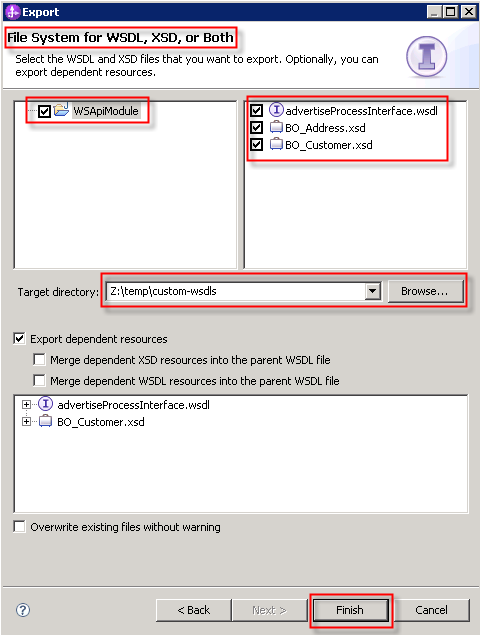
Select and flag the WSApiModule.
As target directory browse to your temporary directory, subfolder customer-wsdls. Press Finish.
This saves the process wsdl as well as the xsd's of your (nested)
business obejcts.
2.2 Download the published BFM WSDLs from WebSphere Process Server
In this section, we export the Web Services Description Language
files
(WSDL files) from the WebSpheer Process Server on which we want to call
the Web service
interface later.
To export the WSDL files for the BFM API, follow theses steps:
Make sure your WebSphere Process Server is started.
In a browser, open the administrative console.
The default URL is
When prompted enter useridadmin and passwordadmin.
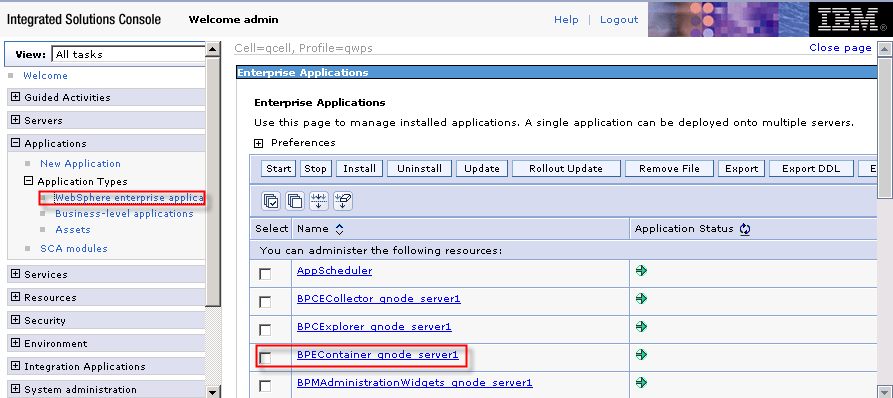
In the navigation pane, select Applications >
Application Types > WebSphere enterprise Applications.
Locate the application named BPEContainer_{your_nodename}_server1
and click on this application name.
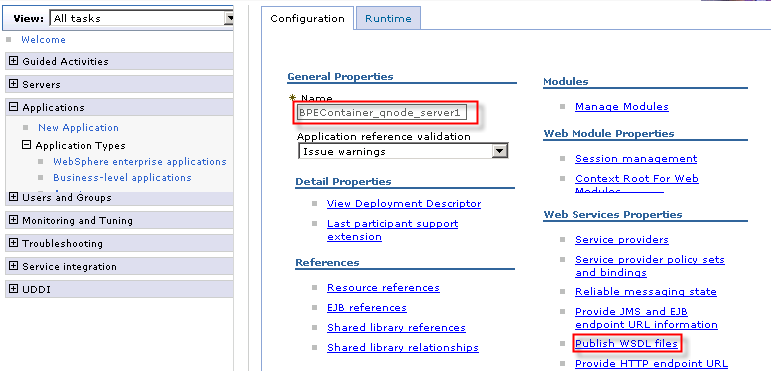
Within the Configuration page click Web
Service Properties > Publish WSDL files.
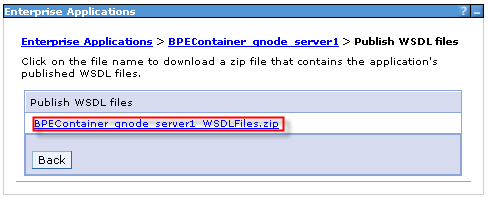
The Publish WSDL files page shows up. Double click the BPEContainer_{your_nodename}_server1.
Press Save to save the
BPEContainer_{your_nodename}_server1_WSDLFiles.zip to your
temporary
directory, for example temp.
Extract this *.zip file
to this temp directory. Delete the b.jar file
that is not needed.
2.3 Download the published Task Mananger (HTM) WSDL files from the
Process Server
In this section, you export the Web Services Description Language
files
(WSDL files) from the WebSphere Process Server on which you want to
call
the Web service
interface later.
Note:
In this sample,
we restrict ourselves to the Business Flow Manager API (BFM API), which
can be used to interact with the BPEContainer. If you rather want to
use the Human Task Manager API (HTM API), which can be used to interact
with the TaskContainer, all steps are similar conceptually, but you
will export the WSDL files from the TaskContainer application instead.
So you might skip this paragraph.
To export the WSDL files for the HTM API, follow theses steps:
Make sure your WebSphere Process Server is started.
In a browser, open the administrative console.
The default URL is
When prompted enter useridadmin and passwordadmin.
In the navigation pane, select Applications >
Application Types > WebSphere enterprise Applications.
Locate the application named TaskContainer_{your_nodename}_server1
and click on this application name.
Within the Configuration page click Web
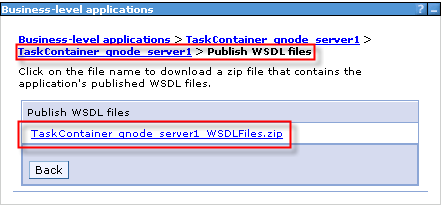
Service Properties > Publish WSDL files.
The Publish WSDL files page shows up. Double click the TaskContainer_{your_nodename}_server1.
Press Save to save the
TaskContainer_{your_nodename}_server1_WSDLFiles.zip to your
temporary
directory.
Extract this *.zip file
to this temp directory. Delete the h.jar file
that is not needed.
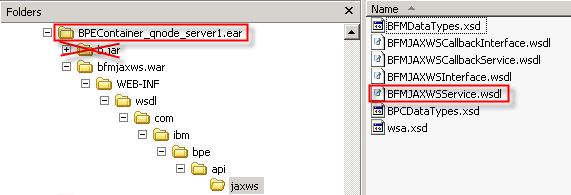
2.4 Generate the BFM proxy
Using the Explorer navigate down to the BFMJAXWSService.wsdl file
as shown in the diagram below.
Open this wsdl file with a text editor.
You might want to explore this ear file and browse through the
BFMJAXWSService.wsdl file.
Near to the end of this file locate the soap:address location and copy this url including your server to the
clipboard.
Open a browser and paste the content of your clipboard. Extend the link by adding ?wsdl. Press Goto ... .
Copy the link which is now shown in the entry field to your
clipboard.
-wsdllocation file:/WEB-INF/wsdl/com/ibm/bpe/api/jaxws/BFMJAXWSService.wsdl relative Pfadangabe, ebenso für HTM Servcie. wsdl
copy manual from temp\...\WEB-INF/wsdl to WebServiceClient_WEB\WebContent\WEB-INF\ for BFM and HTM
the wsdl location is the link you copied from the browser in
the step 4.
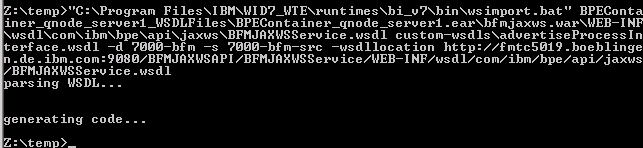
Open a command prompt and navigate to your temporary directory.
Enter the command to generate the BFM proxy according to your
specifications, for example:
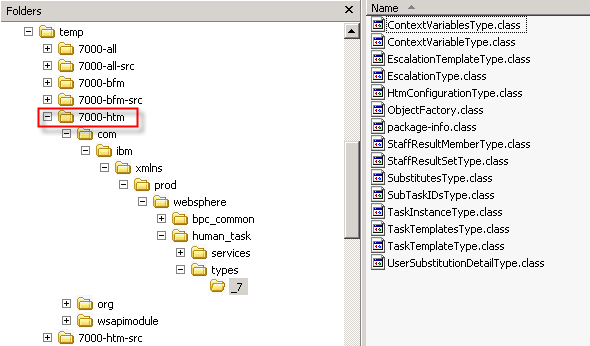
The following screenshots shows the folders and an extract of the
generated BFM proxy.
2.5 Generate the HTM proxy
Note:
This and the following section about the merge of the BFM and HTM
proxies have been added for the sake of completeness. The aren't
required to execute this sample.
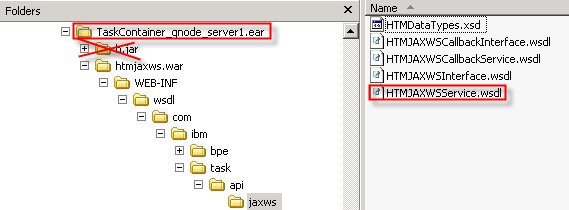
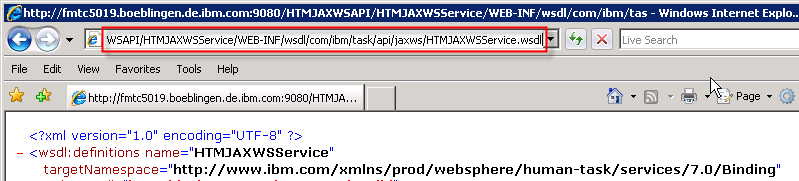
Using the Explorer navigate down to the HTMJAXWSService.wsdl file
as shown in the diagram below.
Open this wsdl file with an editor.
You might want to explore this ear file and browse through the
HTMJAXWSService.wsdl file.
Near to the end of this file locate the soap:address location and copy this url including your server to the
clipboard.
Open a browser and paste the content of your clipboard. Extend the link by adding ?wsdl. Press Goto ... .
Copy the link which is now shown in the entry field to your
clipboard.
-wsdllocation file:/WEB-INF/wsdl/com/ibm/bpe/api/jaxws/BFMJAXWSService.wsdl relative Pfadangabe, ebenso für HTM Servcie. wsdl
copy manual from temp\...\WEB-INF/wsdl to WebServiceClient_WEB\WebContent\WEB-INF\ for BFM and HTM
Generate
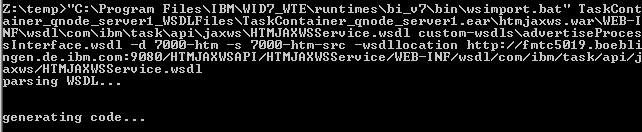
the HTM proxy using following command: <WPS_INSTALL_ROOT>\bin\wsimport.bat" TaskContainer_qnode_server1.ear\htmjaxws.war\WEB-INF\wsdl\com\ibm\task\api\jaxws\HTMJAXWSService.wsdl
custom-wsdls\advertiseProcessInterface.wsdl -d 7000-htm -s 7000-htm-src
-wsdllocation
http://fmtc5019.boeblingen.de.ibm.com:9080/HTMJAXWSAPI/HTMJAXWSService/WEB-INF/wsdl/com/ibm/task/api/jaxws/HTMJAXWSService.wsdl
where
<WPS_INSTALL_ROOT> might look like c:\Program Files\IBM\WID7_WTE\runtimes\bi_v7\.
the location of the HTMJAXWSService.wsdl file can be copied
from the exploded folder as shown in step 1.
the wsdl location is the link you copied from the browser in
the step 4.
Open a command prompt and navigate to your temporary directory.
Enter the command to generate the HTM proxy according to your
specifications, for example:
This chapter describes how to build a client
that uses above proxy and
that will interact with the Process Server (Business Flow Manager) in a
secured way.
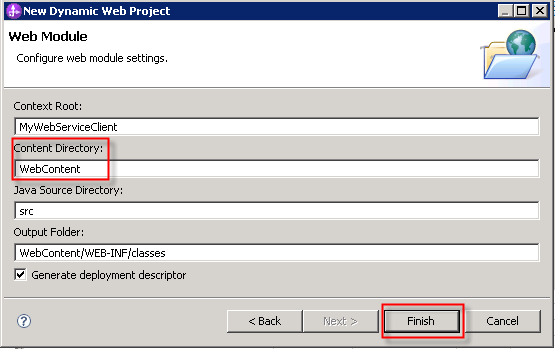
3.1 Create a new Web Project
You will create a simple Web client that uses the BFM Web service
interface. To do this, you first create the Web project named MyWebServiceClient.
Follow these steps:
Switch to the Java EE perspective.
To switch to the Java EE perspective, select Window > Open
Perspective > Other from the Menu. In the Open Perspective
dialog, select Java EE and click OK.
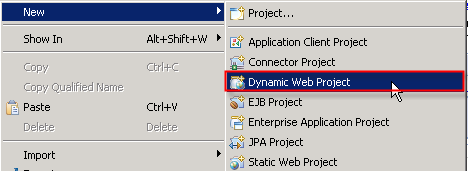
In the Project Explorer, right-click the canvas.
From the pop-up menu, select New > Dynamic Web Project.
In the New Dynamic Web Project window, enter MyWebServiceClient
as value for Project name.
The EAR Project Name is automatically defined as MyWebServiceClientEAR.
The Web Module configuration window opens. Stay with the default
specifications.
Press Finish.
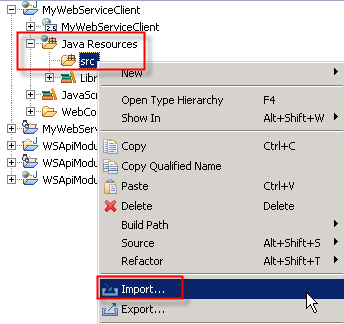
3.2 Import BFM Web Service Proxy
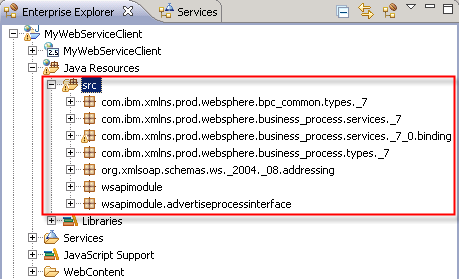
In the Project Explorer
expand the MyWebServiceClient
> Java Resources > src project.
Right click the package src.
From the pop up menu select Import.
The Import selection window pops up.
Select General > File System.
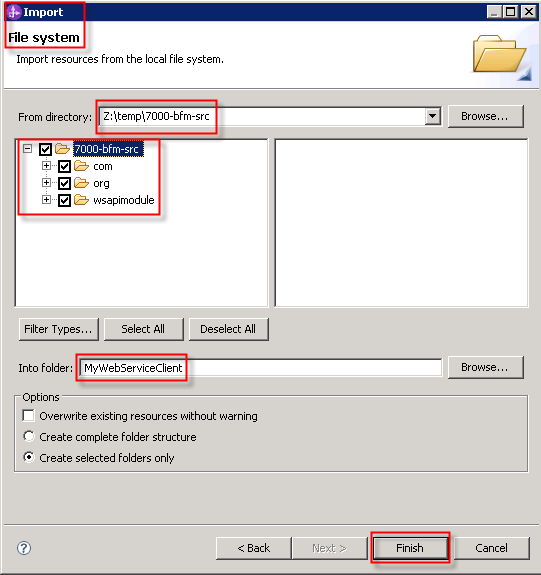
Use the Browse button
and navigate to your temporary directory and the subfolder 7000-bfm-src.
Press Finish.
The proxy is imported to your web project (client).
3.3 Create a simple Web Application
In this section, we create a very simple Web application, consisting
of one HTML page and one Java Server Page (JSP).
3.3.1 Create a HTML page
Complete the following steps:
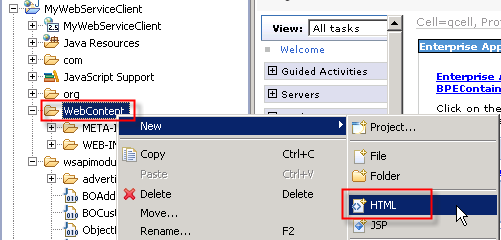
In the Java EE perspective select the Project
Explorer view.
Expand the MyWebServiceClient, right-click in
the WebContent folder.
From the pop up menu select New > HTML.
The New HTML Page window opens.
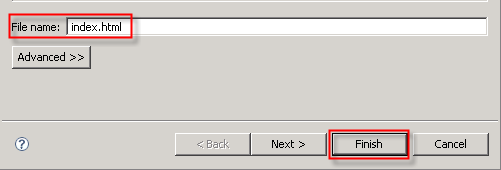
For the file name enter
index.html and click Finish.
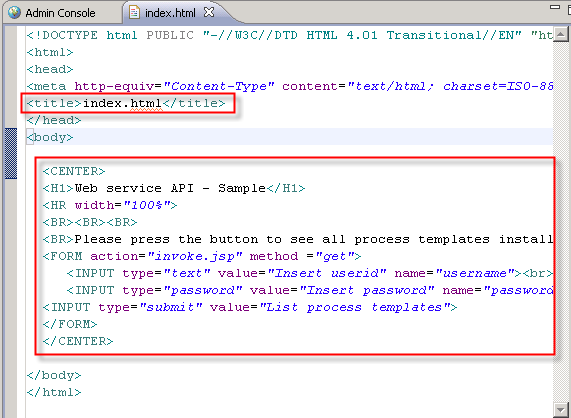
The Page Designer window opens.
Change the <title...
to index.html
Replace the default code by the following code:
<!DOCTYPE html PUBLIC "-//W3C//DTD HTML 4.01
Transitional//EN" "http://www.w3.org/TR/html4/loose.dtd">
<html>
<head>
<meta http-equiv="Content-Type" content="text/html;
charset=ISO-8859-1">
<title>Web service API - Sample</title>
</head>
<body>
<CENTER>
<H1>Web service API - Sample</H1>
<HR width="100%">
<BR><BR><BR>
<BR>Please press the button to see all process templates
installed on the server:
<FORM action="invoke.jsp" method ="get">
<INPUT type="text" value="Insert userid"
name="username"><br>
<INPUT type="password" value="Insert
password" name="password"><br><br>
<INPUT type="submit" value="List process templates">
</FORM>
</CENTER>
</body>
</html>
The important code snippet here is the <FORM> element,
which triggers a call to the JSP that we will define in the next
section.
Click Ctrl+S to save the index.html file.
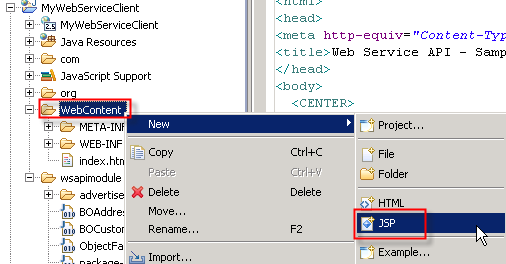
3.3.2 Create a JSP page
In the Java EE perspective select the Project
Explorer view.
Expand the MyWebServiceClient, right-click in
the WebContent folder.
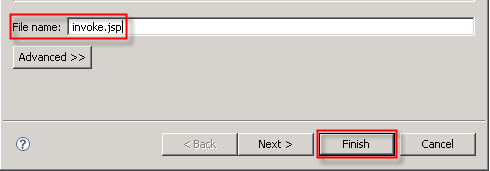
From the pop up menu select New > JSP.
The New Java Server Page window opens.
In the File name field, enter invoke.jsp
and click Finish.
The Page Designer window opens.
Right after the first line <%@ page language=...> insert
the following
lines:
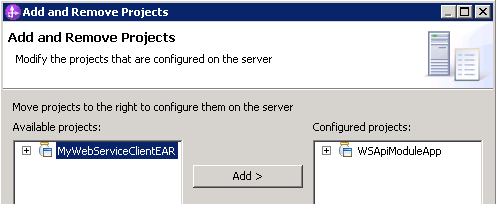
In WebSphere Integration Developer, switch to the Servers view.
Ensure that your WebSphere Process Server V7.0
is started.
Right click the server. From the pop-up menu, select Add
and Remove Projects.
Select the project you want to deploy: WSApiModuleApp.
Press Add > and click Finish.
Wait until the project has been successfully deployed.
Note:
Switch to the Admin Console > Services > Service clients
to see that the deployed asset MyWebServcieClientEAR is using the
BFMJAXWSService proxy. From here you could specify for instance your
client policy sets.
In a Web browser, open the URL http://yourhost:yourport/MyWebServiceClient/index.html.
Note: Replace yourhost with your server's
internet address and replace yourport with the
port of your server's HTTP transport, for example
The index.html page is started.
You successfully tested that the web appplication works. However, we
haven't any code yet to use and verify the userid / password and
subsequently query process templates for this user.
4 Enforce Authentication for and extend the Web Application
The default security definition for the JAX-WS based BPC API is either
a Username or a LTPA token.
For details see the information center on Adding
security. In this section we add configuration information to the
Web application,
so users have to authenticate for using this Web application. The
client will generate a token that is passed to the provider, the BPE
Container.
Policy Sets
You can define a policy set and a binding that fits your security
requirements and generates your
specific security token. This is not part of this sample. For more
information see How
do I secure applications and their environments?.
4.1 Create username token
You will add a security helper class to to your Client web application
which programatically generates a user name token. This token will be
used by the Provider, i.e. the BFM Service to authenticate the user for
the SOAP requests transmitted by the client.
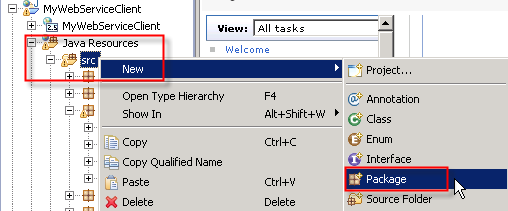
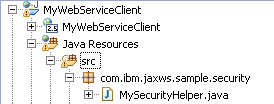
Define new package
In the Project Tree expand MyWebServiceClient > Java
Resources > src.
Right click src. From the pop up menu select New
> Package.
The New Java Package creation window opens.
For the package name enter com.ibm.jaxws.sample.security.
Press Finish.
Download security helper class
Click on the link MySecurityHelper class which
displays the code. Press File > Save Page as this
a MySecurityHelper.java to a directory of your choice, for example
c:\temp\.
Import MySecurityHelper file
In WebSphere Integration Developer, right click on your new package com.ibm.jaxws.sample.security.
From the pop up menu select Import.
The Import Select window opens. Select General > File System. Press
Next. Within import from directory brows and navigate to your temp
directory. Select the MySecurityHelper.java file.
Press Finish.
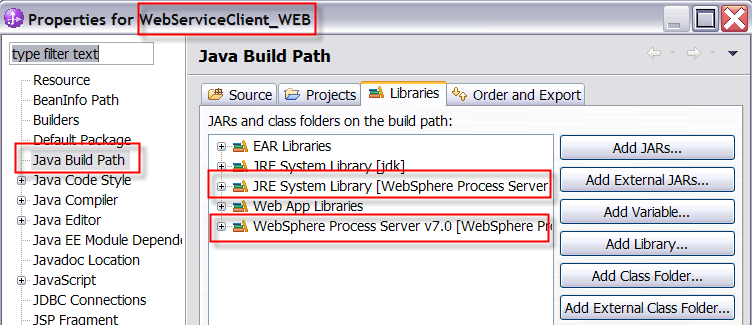
Note:
In case you have any errors ensure that the required libraries are available.
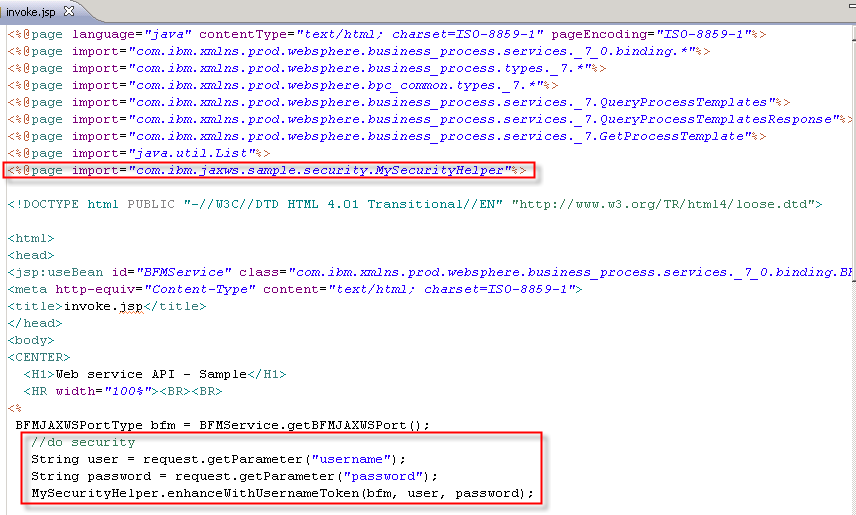
Update the invoke.jsp file to support authentication.
Within the Project Explorer navigate to the WebContent folder and open
the invoke.jsp file.
Just before the first <!DOCTYPE
html ...> element insert the
following
line:
Update the invoke.jsp to issue the query process
template
api.
The following code shows just the usage of one of the Web service
operations, namely the queryProcessTemplates()
operation.
It queries
and retrieves the available templates and certain properties the user
is authorized to access.
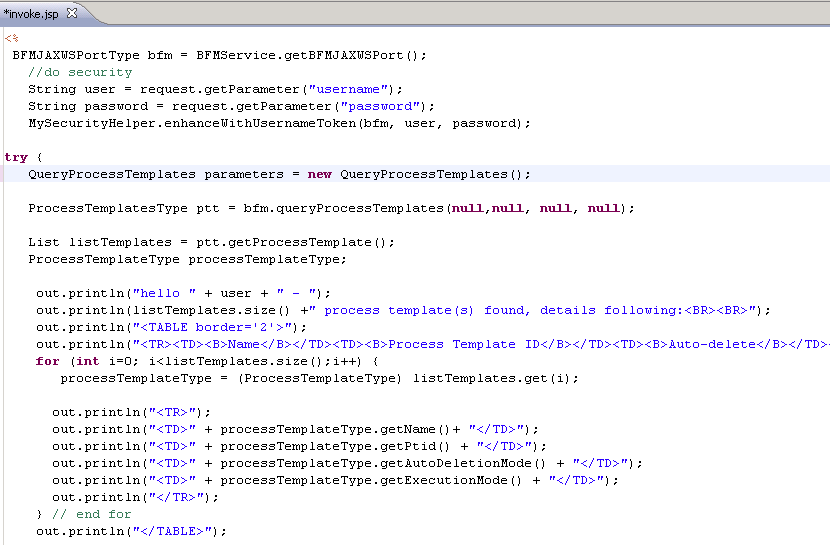
Insert this code snippet immediately following
the security snippet you inserted in preceeding step. It will be
located between the <% ... %> which means that Java code
will be executed within a jsp.
try {
QueryProcessTemplates parameters = new
QueryProcessTemplates();
ProcessTemplatesType ptt =
bfm.queryProcessTemplates(null,null, null, null);
List listTemplates = ptt.getProcessTemplate();
ProcessTemplateType processTemplateType;
out.println("hello " + user + " - ");
out.println(listTemplates.size() +" process
template(s) found, details following:<BR><BR>");
out.println("<TABLE border='2'>");
out.println("<TR><TD><B>Name</B></TD><TD><B>Process
Template
ID</B></TD><TD><B>Auto-delete</B></TD><TD><B>Long
running</B></TD></TR>");
for (int i=0; i<listTemplates.size();i++) {
processTemplateType =
(ProcessTemplateType) listTemplates.get(i);
The screenshot below shows the inserted code to the invoke.jsp file to
query and display the process templates.
Press Ctrl+S to save the file.
4.2 Test your web application
Publish the client application.
Access the server tab. Press the Publish
ccon to re-publish the MyWebServiceClient application with the
modified invoke.jsp file-
In a Web browser, refresh the page with thee URL http://yourhost:yourport/MyWebServiceClient/index.html.
The index page opens.
With in the index page you are asked to Insert userid and password. Authenticate to your
WebSphere Process Server during your
current browser session with your userid and password, e.g. admin
/ admin.
Press List
process
templates.
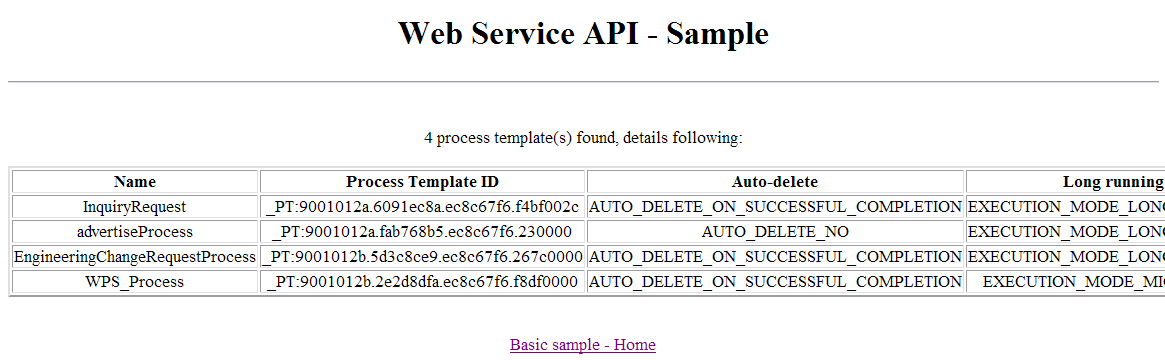
The client application sends the request to the BPE Container
(Provider) to retrieve the process template list and to display the
items in a table. The atttributes include the Process Template ID
(PTID) which
subsequently can be used to start process instances.
The result of this query is displayed. You will have different process
templates currently deployed.
Click Basic
sample -
Home.
4.3 Preparation for advanced sample
The WSApiModuleApp application you deployed to the server contains the
advertiseProcess. This process simulates the scenario that for a given
customer it is computed whether the customer is eligible to receive an
advertisement gift. Doing so you pass initial process start parameters
to create a process instance.
As part of this we use the Java Architecture for XML Binding (JAXB).
JAXB
provides a convenient way to bind an XML schema to a representation in
Java code. This makes it easy for you to incorporate XML data and
processing functions into applications based on Java technology without
having to know much about XML itself.
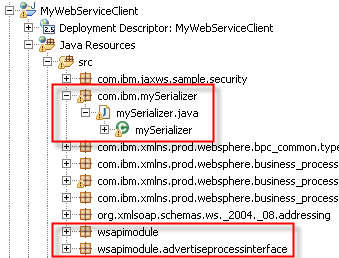
In support of this we need to import and use the BO to XML serializer.
Import this mySerializer class and reference it from the client
application. Perform following steps.
Define new package
In the Project Tree expand MyWebServiceClient > Java
Resources > src.
Right click src. From the pop up menu select New
> Package.
The New Java Package creation window opens.
For the package name enter com.ibm.mySerializer.
Press Finish.
Download security helper class.
Click on the link mySerializer class which
displays the code.
Press File > Save Page as this
a mySerializer.java to a
directory of your choice, for example
c:\temp\.
Import the mySerializer.java file.
Right click on
your new
package com.ibm.mySerializer.
From the pop up menu select Import.
The Import Select window opens. Select General
> File System.
Press Next.
Within import from directory browse and navigate to your temp
directory. Select the mySerializer.java file.
Press Finish.
Update your jsp file to support authentication.
Within the Project Explorer navigate to the WebContent folder and open
your jsp file.
Just after the reference to the MySecurityHelper
class insert the
following
line: