Windows
Windows Recipe
- CPU core(s) should not be consistently saturated.
- Generally, physical memory should never be saturated and the operating system should not page memory out to disk.
- Input/Output interfaces such as network cards and disks should not be saturated, and should not have poor response times.
- TCP/IP and network tuning, whilst sometimes complicated to investigate, may have dramatic effects on performance.
- Consider changing Processor Performance Management (PPM) to the "High Performance" setting or disabling it.
- Operating system level statistics and optionally process level statistics should be periodically monitored and saved for historical analysis.
- Review operating system logs for any errors, warnings, or high volumes of messages.
- Review snapshots of process activity, and for the largest users of resources, review per thread activity.
- If the operating system is running in a virtualized guest, review the configuration and whether or not resource allotments are changing dynamically.
- Use Perfmon to review performance activity.
- Use the Windows Performance Toolkit to review sampled native processor usage.
- If there is sufficient network capacity for the additional packets, consider reducing the default TCP keepalive timer (HKLM\System\CurrentControlSet\Services\Tcpip\Parameters\KeepAliveTime) from 2 hours to a value less than intermediate device idle timeouts (e.g. firewalls).
- Test disabling delayed ACKs
Also review the general topics in the Operating Systems chapter.
General
Check the Windows Event log (eventvwr.exe) for any warnings, error messages, or repeated informational messages.
Microsoft performance tuning guidelines by server version: https://msdn.microsoft.com/en-us/library/windows/hardware/dn529134
Command Prompt
Recursive search for a file pattern:
> @echo off
> for /F "usebackq" %i in (`dir /s /b *.pdb`) do echo %i
> @echo on
Windows Registry
Many operating system settings are changed in the Windows registry. To open the registry, execute regedit.exe.
We recommend periodically backing up the registry, particularly before any significant changes:
- File > Export
- Export Range=All
- Save as some file.reg
Performance Monitor (Perfmon)
Perfmon is the generally recommended tool for Windows performance analysis.
"Windows Performance Monitor is a Microsoft Management Console (MMC) snap-in that provides tools for analyzing system performance. From a single console, you can monitor application and hardware performance in real time, customize what data you want to collect in logs, define thresholds for alerts and automatic actions, generate reports, and view past performance data in a variety of ways." (https://technet.microsoft.com/en-us/library/cc749154.aspx)
By default, counters do not show the process ID, so with multiple java processes, they are java_N, and if one process ends, all counters N+1 actually change. It is recommended to change to the PID format (https://support.microsoft.com/kb/281884):
HKEY_LOCAL_MACHINE\SYSTEM\CurrentControlSet\Services\PerfProc\Performance
DWORD ProcessNameFormat=2
No restarts of the machine or Java are required - just restart Perfmon if it was open.
View Live Data
In the left pane, select Performance > Monitoring Tools > Performance Monitor.
This will show a live graph of % Processor Time:
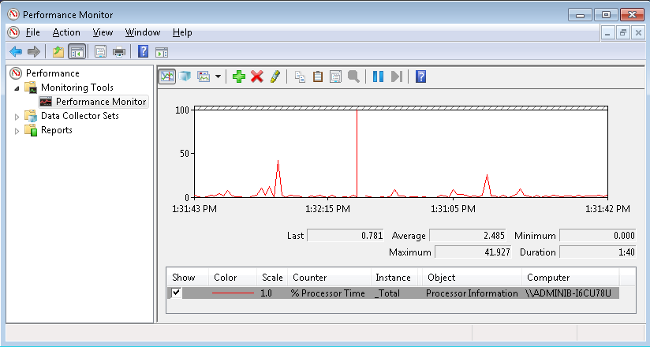
Some useful tips:
- To delete a counter, select the row in the bottom table and click Delete.
- Click the pencil toggle button to highlight the currently selected counter.
- By default, all counter values are scaled between 0 and 100. You can see if values are scaled by looking at the Scale column.
- "Last" is the last sampled value ("Minimum" and "Maximum" are also useful).
- "Average" is the average of all sampled values.
- "Duration" is the amount of time (rolling) that Perfmon will capture and display data. To extend this, right click on the graph > Properties > General > Duration = X seconds
- There are more options in the properties dialog that are worth exploring.
To add a counter, click the green plus icon:
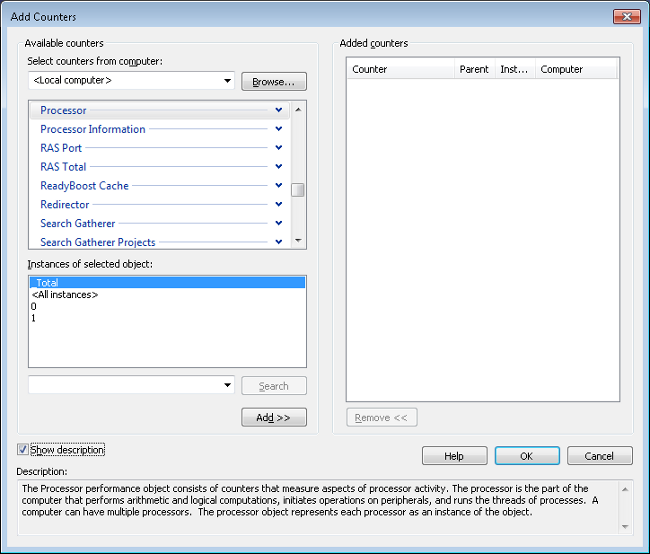
Select a counter and the instances and click Add >>. In general, select <All instances> to ensure you get all the data. For example, if you select Process > % Processor time and you select <All instances>, if a process is spawned after data collection starts, it will be captured.
The instances are a way to look at counters in a more granular way. For example, the 0 and 1 instances above correspond to the two processors on this machine. If we select _Total, we will get the average of both processors. If we select <All instances>, this is a convenience and it is equivalent to multi-selecting _Total, 0, and 1.
Check "Show description" to better understand each counter.
Logging Perfmon Data to Files
For historical analysis of system metrics, configure Microsoft Perfmon to log statistics to files:
- Start perfmon.exe
- Performance } Monitoring Tools } Right Click on Performance Monitor } New } Data Collector Set or Performance } Data Collector Sets } Right Click on User Defined } New } Data Collector Set
- Specify any name, select "Create manually (Advanced)" and click Next
- Under the "Create data logs" section, select the Performance counter box, and click Next.
- In the "Performance counters:" section, click the "Add" button.
Select each of the following counters:
- Expand Processor } % Interrupt Time, % Privileged Time, % Processor Time, % User Time } All instances } Add
- Expand Network Interface } Bytes Received/sec, Bytes Sent/sec, Output Queue Length, Packets Outbound Discarded, Packets Outbound Errors, Packets Received Discarded, Packets Received Errors } All instances
- Expand Process } % Privileged Time, % Processor Time, % User Time, IO Data Bytes/sec, IO Data Operations/sec, IO Other Bytes/sec, IO Other Operations/sec } All instances
- Expand Thread } % Processor Time, ID Process, ID Thread } All instances
- Expand LogicalDisk } % Disk Read Time, % Disk Write Time, % Free Space, % Idle Time, Avg. Disk Bytes/Read, Avg. Disk Bytes/Write, Avg. Disk sec/Read, Avg. Disk Read Queue Length, Avg. Disk sec/Write, Avg. Disk Write Queue Length, Disk Read Bytes/sec, Disk Reads/sec, Disk Write Bytes/sec, Disk Writes/sec } All instances
- Expand Memory } Available MBytes, Cache Bytes, Cache Faults/sec, Committed Bytes, Free System Page Table Entries, Page Faults/sec, Pages Input/sec, Pages Output/sec, Pool Nonpaged Bytes, Pool Pages Bytes, System Cache Resident Bytes
- Expand Paging File } % Usage
- Expand System } File Control Bytes/sec, File Control Operations/sec, File Data Operations/sec, File Read Bytes/sec, File Read Operations/sec, File Write Bytes/sec, File Write Operations/sec, Processor Queue Length, System Calls/sec
- Change the "Sample Interval" to 30 seconds and click Next.
- In the "Where would you like the data to be saved?" section, change the path for the Perfmon files if you would like, click Next.
- In the "Create the data collector set?" section, click on the Finish button.
- Ensure that the directory where the Perfmon files will be written has sufficient space.
- Start the collection by right clicking and clicking Start.
- After the test is complete, click Stop.
- Gather *.blg from the output directory
For similar instructions and screenshots, see https://www.ibm.com/support/pages/node/411769
Load Existing Logs into Perfmon
- In the left pane, select Performance } Monitoring Tools } Performance Monitor.
- Select the icon for View Log Data.
- Select Log files: and click Add... and browse to the location of the Perfmon blg log files.
- Click Add to select from the available counters in the data.
typeperf
The Windows typeperf command allows for simple access to performance counters from the command line: https://docs.microsoft.com/en-us/windows-server/administration/windows-commands/typeperf
Central Processing Unit (CPU)
The key Perfmon counters are Process > % Interrupt Time, % Privileged Time, % Processor Time, % User Time > <All instances>. Note that the processor statistics for a particular process are in terms of a percentage of total CPU time, so if a process is using 2 CPUs at 100%, the sampled value will be 200.
"Where the "_Total" line reaches 100%, the Java process probably became constrained on CPU. If all the CPU is being used by the Java process, the performance is being limited by the machine. If another process is taking large amounts of CPU at those points in time, CPU contention is limiting the performance of the Java process." (Old Java Diagnostic Guide)
Per-Thread CPU Usage
With the Perfmon Thread counters, identify the threads that are using high CPU and convert the "ID Thread" value to hexadecimal. On IBM Java, if a thread dump was taken during these high CPU times, search the javacore file for the hexadecimal identifier to find the Java stack:
The reason for generating per-thread CPU usage information about the Java process is to understand what is happening to the process. The Java process might be deadlocked if all the threads are taking little or no CPU time. Points of contention or delay might be in the Java process if it does not take all the available CPU, even though the CPU usage is spread evenly over a number of threads in the process. This CPU usage pattern might also indicate a scalability issue. Finally, you might have a looping problem if the Java CPU usage is approaching 100% and a small number of the threads account for all of that CPU usage. The threads using the most process time might be looping. When you find some threads of interest, note the ID Thread values. Convert the values to hexadecimal, and look for the threads in the thread stack trace of the javacore.txt file. This trace helps you to determine if the thread is part of a thread pool and to understand what kind of work the thread performs. For example, an ID thread of 9244 becomes 241C in hexadecimal and is found in the "native ID" value in the javacore.txt file.
Perfmon counters: "% Processor Time", "ID Thread", and any other counters in which you are interested for all the Java thread instances
Old Java Diagnostic Guide
PsList
An alternative tool is pslist which is part of pstools: https://technet.microsoft.com/en-us/sysinternals/bb896682.aspx. See also http://www-01.ibm.com/support/docview.wss?uid=swg21304776
In most modes, you can filter the results by passing a process name prefix (such as java) or a PID at the end of the command.
No arguments prints the accumulated CPU time of each process and the elapsed time each process has been running:
> pslist.exe

Process information for ADMINIB-I6CU78U:

Name                Pid Pri Thd  Hnd   Priv        CPU Time    Elapsed Time
Idle                  0   0   2    0      0    11:08:07.609     0:00:00.000
System                4   8  82 4062    108     0:01:36.500     5:41:15.690
smss                240  11   2   30    440     0:00:01.484     5:41:13.940
csrss               316  13   9  871   2324     0:00:02.312     5:40:51.518...
The pslist argument -s shows an auto-updating view similar to task manager (similar to the top command on Unix platforms):
> pslist -s
2:24:04 PM 2/5/2014 Process information for ADMINIB-I6CU78U:

Name                Pid CPU Thd  Hnd   Priv        CPU Time    Elapsed Time
Idle                  0  97   2    0      0    11:15:27.906     5:45:06.985
pslist             4348   3   2  155   2840     0:00:02.015     0:00:30.546
smss                240   0   2   30    440     0:00:01.484     5:45:05.23537.32
csrss               316   0   9  847   2324     0:00:02.312     5:44:42.813
csrss               364   0   8  403   2504     0:00:01.234     5:44:41.250
wininit             372   0   3   77   1472     0:00:00.234     5:44:41.250
winlogon            404   0   3  113   2728     0:00:00.265     5:44:41.188...
The pslist argument -t shows a tree view of process ownership:
> pslist -t

Process information for ADMINIB-I6CU78U:

Name                             Pid Pri Thd  Hnd      VM      WS    Priv
Idle                               0   0   2    0       0      24       0
  System                           4   8  82 4030    3380     300     108
    smss                         240  11   2   30    4024    1100     440
java                            2684   8  87  989  816720  315196  294696
csrss                            316  13   9  853   50260    4780    2324
csrss                            364  13   8  406  210896   12332    2504
  conhost                       3484   8   2   79   77380    9916    4400
wininit                          372  13   3   77   49392    4452    1472
  services                       460   9   9  248   45168    9796    6204
    svchost                      580   8  10  362   46512    9492    3832
      WmiPrvSE                  2152   8   7  339   80312   16304    8368
      ProtectionUtilSurrogate   4036   8  10  289   98168   13184    4304...
The pslist argument -d prints the accumulated CPU times of each thread as well as the elapsed times the threads have existed:
> pslist -d java

Thread detail for ADMINIB-I6CU78U:

java 2684:
 Tid Pri    Cswtch            State     User Time   Kernel Time   Elapsed Time
2688   9         6     Wait:UserReq  0:00:00.000   0:00:00.000    5:47:24.155
2696   9      8465     Wait:UserReq  0:00:07.515   0:00:06.906    5:47:24.155
2700   8        22     Wait:UserReq  0:00:00.000   0:00:00.000    5:47:24.155
2704  15      8401     Wait:UserReq  0:00:08.921   0:00:02.203    5:47:24.092
2716  15   1146663     Wait:UserReq  0:00:00.000   0:00:00.000    5:47:23.733
2720   9     33519     Wait:UserReq  0:00:00.578   0:00:00.468    5:47:23.733...
The pslist argument -x is the same as -d but also prints memory information about the process (to get processes' memory without threads, use -m):
> pslist -x java

Process and thread information for ADMINIB-I6CU78U:

Name                Pid      VM      WS    Priv Priv Pk   Faults   NonP Page
java               2684  816720  315328  304244  313384   159552    633  257
 Tid Pri    Cswtch            State     User Time   Kernel Time   Elapsed Time
2688   9         6     Wait:UserReq  0:00:00.000   0:00:00.000    5:47:41.686
2696   9      8465     Wait:UserReq  0:00:07.515   0:00:06.906    5:47:41.686
2700   8        22     Wait:UserReq  0:00:00.000   0:00:00.000    5:47:41.686
2704  15      8402     Wait:UserReq  0:00:08.937   0:00:02.203    5:47:41.624
2716  15   1146681     Wait:UserReq  0:00:00.000   0:00:00.000    5:47:41.264...
Windows Performance Toolkit (WPT)
The Windows Performance Toolkit is a free tool from Microsoft that provides various dimensions of performance analysis: https://docs.microsoft.com/en-us/windows-hardware/test/wpt/
Installation
- Download Windows Assessment and Deployment Kit (Windows ADK)
- On the "Select the features you want to install" screen, only "Windows Performance Toolkit" is required.
- On 64-bit Windows 7 and Windows Server 2008 (but not newer versions
such as Windows 8 and Windows Server 2012), add the following registry
entry and reboot:
REG ADD "HKLM\System\CurrentControlSet\Control\Session Manager\Memory Management" -v DisablePagingExecutive -d 0x1 -t REG_DWORD -f
Collect Data
There are two main ways to collect data (ETL file):
- GUI:
- Start
C:\Program Files*\Windows Kits\*\Windows Performance Toolkit\WPRUI.exeas Administrator (replace with the correct path toWPRUI.exe) - Leave the defaults of Performance Scenario=General, Detail level=Verbose, Logging mode=Memory. These buffer data to memory, so available RAM is needed. There are also options to flush to files.
- Check Resource Analysis } CPU usage
- Click Start
- Reproduce the problem for at least a few minutes
- Click Save to stop
- Start
- Command line:
- Start command prompt as Administrator
- Start collection (replace with the correct path):
"C:\Program Files*\Windows Kits\*\Windows Performance Toolkit\xperf.exe" -on SysProf -stackwalk Profile -BufferSize 1024 -MaxBuffers 320 - These options buffer data to memory, so available RAM is needed. There are also options to flush to files.
- Reproduce the problem for at least a few minutes
- Stop collection (replace with the correct path to
xperf.exe):"C:\Program Files*\Windows Kits\*\Windows Performance Toolkit\xperf.exe" -d callstacks.etl
By default, WPT data is written to
%HOMEPATH%\Documents\WPR Files\*.etl. When clicking the
"Start" button, the old collection files are not overwritten.
Also consider UIforETW.
Analyze Data
There are three main ways to view an ETL file:
Windows Performance Analyzer (WPA.exe %ETL%)
Trace > Configure Symbol Paths
If .NET code was running at the time of the capture, an NGENPDB folder will be automatically created under %HOMEPATH%\Documents\WPR Files\ with the name of the .etl file. If it may be necessary to investigate .NET code, copy this path, which is automatically included in the default symbol path in WPA, and add to the end of the final symbol path.Example: C:\work\WAS8554_20140924\java\jre\bin\;C:\work\WAS8554_20140924\java\jre\bin\compressedrefs\;C:\work\WAS8554_20140924\lib\native\win\x86_64\;srv*C:\Symbols*http://msdl.microsoft.com/download/symbols;
Trace > Load Symbols
Absolute Times
WPA shows all data in relative terms (seconds). Unfortunately, there doesn't appear to be an option to use absolute timestamps. To determine when the tracing started:
- Click Trace > System Configuration
- Click Traces
- Review Start Time (UTC)
The default ETL file name will include the date and time in local format, but this appears to be roughly the time the trace is requested to be stopped.
It is common for a ~200 second delay between the start of the capture and availability of some data (presumably while the kernel is initializing tracing).
CPU Analysis
- Expand Computation > CPU Usage (Sampled) > Utilization by
Process, Stack

Flamegraphs can also be generated: https://randomascii.wordpress.com/2013/03/26/summarizing-xperf-cpu-usage-with-flame-graphs/
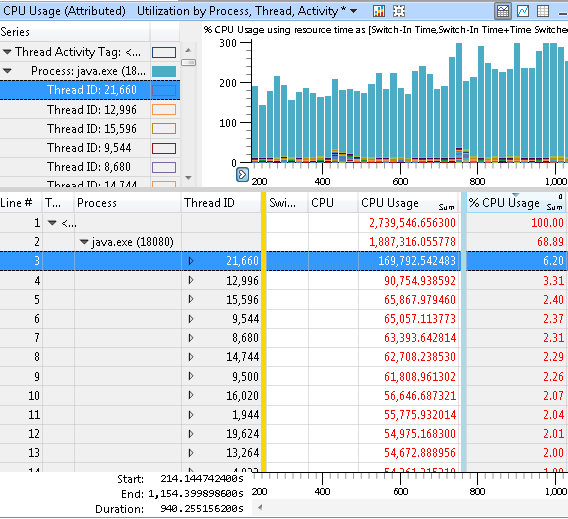
CPU Usage by Thread
- Expand Computation > CPU Usage (Attributed) > Utilization by
Process, Thread, Activity *
Disk Analysis
- Expand Storage > Disk Usage > Service Time by Process, Path
Name, Stack

- The disk times are in microseconds (https://blogs.technet.microsoft.com/b/robertsmith/archive/2012/02/07/analyzing-storage-performance-using-the-windows-performance-toolkit.aspx).
Analyzing on Another Machine
- Gather the etl file from %HOMEPATH%\Documents\WPR Files\
- Gather all *.pdb files from the WebSphere folder.
- If .NET code was running at the time of the capture, an NGENPDB folder will be automatically created under %HOMEPATH%\Documents\WPR Files\ with the name of the .etl file. If it may be necessary to investigate .NET code, also gather this folder.
TPROF
The open source performance inspector suite (originally created by IBM) includes a native Windows sampling profiler called TPROF: http://perfinsp.sourceforge.net/tprof.html
This is a great way to understand which native modules are using the CPU and it is requested as part of the IBM Performance MustGather on Windows: http://www-01.ibm.com/support/docview.wss?uid=swg21111364
The reason this tool is so useful is that it is a sampling profiler (see the Java Profilers chapter for background on this topic). It will sample the native stacks of the processes approximately every 7 milliseconds. This tends to be a very low overhead (less than a few percent) way to get insight into CPU usage without dramatically impacting the system. In general, TPROF can be used in production environments, although you should fully test this in a test environment first.
The instructions to install and use TPROF are quite straightforward: http://www-01.ibm.com/support/docview.wss?uid=swg21403450
Currently, TPROF does not work on Windows Server >= 2012.
Install with tinstall.cmd
Run with:
> setrunenv.cmd
> run.tprof.cmd
Press ENTER to start capturing data
Reproduce the problem
Press ENTER again to stop capturing data
Open tprof.out to analyze the results (see the TechNote above for a description of the various sections)
For example, in one case we were led to investigate some third party drivers by seeing a significant amount of CPU usage in the kernel (and other modules that are not shown here for confidentiality):
PID 695 51.00 java.exe_0c8c
  MOD 320 20.46 C:\Windows\system32\ntoskrnl.exe
Processor Performance Management (PPM)
Processor Performance Management (PPM) is a power saving feature. It may be changed to the "High Performance" setting: https://technet.microsoft.com/en-us/library/dd744398%28v=ws.10%29.aspx
A common symptom in profilers such as TPROF is a high CPU usage in, for example, the intelppm.sys driver:
   LAB    TKS   %%%     NAMES
    MOD 20448  7.13    C:\Windows\system32\DRIVERS\intelppm.sys
For example, the intelppm driver may be disabled with the following command followed by a restart:
> sc config intelppm start= disabledMemory
Terms:
- Memory may be reserved for future use although this puts no demands on RAM or paging spaces.
- Reserved memory may be concurrently or subsequently committed which ensures there is virtual space in RAM or paging spaces although committed memory only becomes resident in RAM once it's touched (read/written). Programs such as Task Manager have an option to add a column called the "Commit Size" which is the total committed. Reserved and committed memory are roughly two different ways of looking at the "virtual size" of the process from the terms of other operating systems.
- The working set of a process is the amount of memory resident in RAM. This is roughly the "resident set size" of the process from the terms of other operating systems.
- The commit
limit of a Windows node is the size of RAM plus all paging spaces.
If the commit
charge hits the commit limit, after the maximum number of paging
space auto-increases (when "Automatically
manage paging file size for all drives" is checked), a request to
commit memory will
fail even if there is available physical RAM. Unlike Linux, for
example, Windows does not allow overcommit of virtual memory (other then
reservations without commits):
The system commit charge is the total committed or "promised" memory of all committed virtual memory in the system. If the system commit charge reaches the system commit limit, the system and processes might not get committed memory. This condition can cause freezing, crashing, and other malfunctions. Therefore, make sure that you set the system commit limit high enough to support the system commit charge during peak usage.
Physical Memory (RAM)
Perfmon counters (https://technet.microsoft.com/en-us/library/2008.08.pulse.aspx):
- Memory\Available bytes = The amount of free physical memory available for running processes.
- Memory\Cache bytes = The amount of physical memory used by the file system cache.
- Memory\Free System Page Table Entries = The number of free PTEs. Should be non-zero.
- Memory\Pool Non-Paged Bytes = Memory used by the kernel which cannot be paged out.
- Memory\Pool Paged Bytes = Memory used by the kernel which can be paged out.
Process Memory Usage
To monitor process memory usage in Perfmon, check Process\Virtual Bytes and Process\Private Bytes.
VMMap is a useful tool to get a detailed breakdown of process memory usage: https://technet.microsoft.com/en-us/sysinternals/dd535533.aspx
Windows 32-bit uses a default virtual user address space of 2GB (http://download.boulder.ibm.com/ibmdl/pub/software/dw/jdk/diagnosis/dw3gbswitch3.pdf):
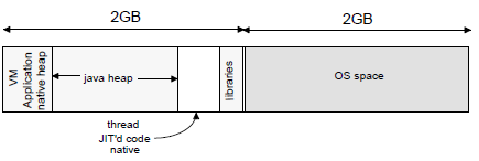
This can be changed to a 3GB virtual user address space:
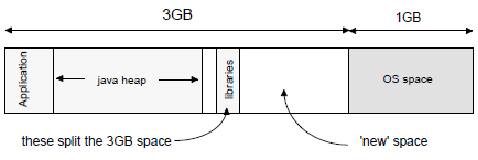
The OS space (Windows kernel) is used for things such as the paged and non-paged pools (e.g. network buffers, see https://blogs.technet.microsoft.com/b/markrussinovich/archive/2009/03/26/3211216.aspx), page table entries (https://technet.microsoft.com/en-us/library/cc784475(v=WS.10).aspx and https://technet.microsoft.com/en-us/library/cc786709(WS.10).aspx), and drivers.
On older versions of Windows, you enable 3GB mode with a /3GB flag in boot.ini and reboot the box: https://technet.microsoft.com/en-us/library/bb124810.aspx and https://msdn.microsoft.com/en-us/library/bb613473(v=vs.85).aspx
On newer versions of Windows, use BCDEdit /set increaseuserva 3072 and reboot the box: https://msdn.microsoft.com/en-us/library/ff542202.aspx
In 3GB mode, some libraries are still based at the 2GB boundary, so -Xmx is practically limited to between -Xmx1408m and -Xmx1856m because it is a single, contiguous allocation. Library rebasing is possible but then shared libraries are loaded privately.
Starting in IBM Java 6, the split heap option may be used which forces gencon and allows you to straddle nursery and tenured regions around the 2GB area. For example: -Xgc:splitheap -Xmx2800m -Xmox1800m (http://www.ibm.com/support/knowledgecenter/SSYKE2_8.0.0/com.ibm.java.win.80.doc/diag/appendixes/cmdline/xgcsplitheap.html)
A program must be linked with /LARGEADDRESSAWARE to utilize a system configured in a way other than the default 2GB mode. IBM Java is linked with this option.
"If an application was linked with /LARGEADDRESSAWARE, DUMPBIN
/HEADERS will display information to that effect."
https://msdn.microsoft.com/en-us/library/wz223b1z.aspx
This option is not risk free: Third party JNI libraries with pointer arithmetic may have unexpected issues or crashes. The kernel itself may also run into issues, particularly with exhausted page translation table entries or an exhausted non-paged pool when there is a lot of network activity.
Input/Output (I/O)
Useful Perfmon counters for disks are (https://technet.microsoft.com/en-us/library/cc722466.aspx):
- LogicalDisk\Avg. Disk sec/Read: Average time, in seconds, of a read of data from the disk
- LogicalDisk\Avg. Disk sec/Write: Average time, in seconds, of a write of data to the disk
- LogicalDisk\Current Disk Queue Length: Indicates the number of disk requests that are currently waiting as well as requests currently being serviced.
- LogicalDisk\%Idle Time: Reports the percentage of time that the disk system was not processing requests and no work was queued.
- LogicalDisk\Disk Reads/sec
- LogicalDisk\Disk Writes/sec
- LogicalDisk\Disk Read Bytes/sec
- LogicalDisk\Disk Write Bytes/sec
- Process\IO Read Bytes/sec
- Process\IO Write Bytes/sec
Defragmentation
As you delete files, you create gaps in the arrangement of the contiguously stored files. As you save new files (and this is especially true for large files), the file system uses up all of these bits of free space - resulting in the new files being scattered all over the disk in noncontiguous pieces. And thus we end up with fragmented disks and system performance issues because the disk heads have to spend time moving from cluster to cluster before they can read or write the data.
[The Disk Defragmenter] utility physically rearranges the files so that they are stored (as much as possible) in physically contiguous clusters. In addition to the consolidation of files and folders, the Defragmenter utility also consolidates free space - meaning that it is less likely for new files to be fragmented when you save them. For operating systems prior to Windows Vista, you had to manually run the utility or schedule automatic defragmentation via a scheduled task. On Windows Vista, Disk Defragmenter runs as a low-priority background task that is automatically run on a weekly basis without requiring user intervention. On Windows Server 2008, which uses the same Disk Defragmenter, the automatic defragmentation is not enabled by default... The basic operation of the utility involves passing it a driver letter, for example: defrag.exe c: would perform a defragmentation of the C: drive.
> defrag c: -a
CIFS/SMB
The most common protocols for a networked file systems on Windows are Common Internet File System (CIFS) and Server Message Block (SMB). The SMB version 2 protocol is new and no longer synonymous with CIFS (https://msdn.microsoft.com/en-us/library/ee441790.aspx).
The versions of SMB2 are 2.002, 2.1, 3.0, and 3.02 (https://msdn.microsoft.com/en-us/library/cc246492.aspx).
If acceptable from a security point of view, consider disabling SMB packet signing: "By default, client-side SMB signing is enabled on workstations, servers, and domain controllers... Using SMB packet signing can degrade performance up to 15 percent on file service transactions" (https://technet.microsoft.com/en-us/library/cc731957.aspx) and "... the overhead could get extremely high-up to 40 percent in some situations" (https://technet.microsoft.com/en-us/library/cc512612.aspx). Disable 'Microsoft network client: Digitally sign communications (if server agrees)' and 'Microsoft network client: Digitally sign communications (always)'.
SMB2.1 introduces large Maximum Transmission Unit (MTU) support up to 1MB (https://technet.microsoft.com/en-us/library/ff625695(v=ws.10).aspx). It is enabled with HKEY_LOCAL_MACHINE\System\CurrentControlSet\Services\LanmanWorkstation\Parameters\DisableLargeMtu = 0 followed by a reboot (http://download.microsoft.com/download/9/B/2/9B205446-37EE-4BB1-9A50-E872565692F1/PerfTuningGuideServer2012R2.pdf).
The Perfmon counter Network Interface\Bytes Total/sec may be used to test the throughput behavior of SMB: https://blogs.technet.microsoft.com/b/josebda/archive/2008/11/11/file-server-performance-improvements-with-the-smb2-protocol-in-windows-server-2008.aspx
Test the response time of an SMB copy using a large file by creating a batch file such as largefilecopy.bat:
@echo off
echo %TIME%
xcopy /J /Y %PATHTOLARGELOCALFILE% \\%SMBPATH%
echo %TIME%
One technique of determining what proportion of time a process spends waiting for SMB responses is to gather network trace, filter to the times spanning a particular process request, add a Wireshark column for smb2.time, export to CSV, sum the service response times, and compare to the elapsed time of the process request.
Some people suggest disabling "Domain member: Digitally encrypt secure channel data;" however, this option does not appear to be related to SMB traffic (https://technet.microsoft.com/en-us/library/jj852270(v=ws.10).aspx).
Networking
Update TIME_WAIT timeout: HKEY_LOCAL_MACHINE\SYSTEM\CurrentControlSet\Services\Tcpip\Parameters\TcpTimedWaitDelay = REG_DWORD value 30 (https://www.ibm.com/support/knowledgecenter/SSAW57_8.5.5/com.ibm.websphere.nd.doc/ae/tprf_tunewindows.html)
Update maximum ephemeral local port: HKEY_LOCAL_MACHINE\SYSTEM\CurrentControlSet\Services\Tcpip\Parameters\MaxUserPort = REG_DWORD value 65534 (https://www.ibm.com/support/knowledgecenter/SSAW57_8.5.5/com.ibm.websphere.nd.doc/ae/tprf_tunewindows.html)
Consider disabling delayed TCP acknowledgments: HKEY_LOCAL_MACHINE\SYSTEM\CurrentControlSet\Services\Tcpip\Parameters\Interfaces\TcpAckFrequency = REG_DWORD value 1. Warning: This option may or may not be better depending on the workload (see the discussion of delayed acknowledgments). (https://www.ibm.com/support/knowledgecenter/SSAW57_8.5.5/com.ibm.websphere.nd.doc/ae/tprf_tunewindows.html, https://support.microsoft.com/kb/328890)
Consider increasing the TCP maximum window size. For example, to set the value to 65535, HKEY_LOCAL_MACHINE\SYSTEM\CurrentControlSet\Services\Tcpip\Parameters\GlobalMaxTcpWindowSize = REG_DWORD value 0xFFFF: https://www.ibm.com/support/knowledgecenter/SSAW57_8.5.5/com.ibm.websphere.nd.doc/ae/tprf_tunetcpip.html
Consider increasing the maximum number of TCP/IP control blocks (MaxFreeTcbs) when using large numbers of connections: https://technet.microsoft.com/en-us/library/cc938178.aspx. When modifying MaxFreeTcbs, MaxHashTableSize must also be modified proportionally: https://technet.microsoft.com/en-us/library/cc938176.aspx
Starting with Windows Server 2008, it is no longer applicable to modify EnableDynamicBacklog/MinimumDynamicBacklog/MaximumDynamicBacklog/DynamicBacklogGrowthDelta (https://www.ibm.com/support/knowledgecenter/SSAW57_8.5.5/com.ibm.websphere.nd.doc/ae/tprf_tunewindows.html, https://support.microsoft.com/kb/142641, https://msdn.microsoft.com/en-us/library/ff648853.aspx, https://blogs.technet.microsoft.com/b/nettracer/archive/2010/08/11/where-have-those-afd-driver-related-registry-dynamicbackloggrowthdelta-enabledynamicbacklog-maximumdynamicbacklog-minimumdynamicbacklog-keys-gone.aspx)
Increase network adapter receive buffers: https://support.microsoft.com/kb/981482
It appears that TCP/IP in Windows 2012 is the same as 2008, so all of the same tuning applies: "In Windows Server 2012, TCP/IP - including both Internet Protocol version 4 (IPv4) and IPv6 - is unchanged from TCP/IP in Windows Server 2008 R2. For more information, see TCP/IP in the Windows Server 2008 and Windows Server 2008 R2 Technical Library." (https://technet.microsoft.com/en-us/library/jj573587.aspx).
Ping a remote host. In general, and particularly for LANs, ping times should be less than a few hundred milliseconds with little standard deviation.
> ping -t 10.20.30.1

Pinging 10.20.30.1 [10.20.30.1] with 32 bytes of data:
Reply from 10.20.30.1: bytes=32 time=92ms TTL=249
Reply from 10.20.30.1: bytes=32 time=89ms TTL=249
Reply from 10.20.30.1: bytes=32 time=155ms TTL=249
Reply from 10.20.30.1: bytes=32 time=89ms TTL=249

Ping statistics for
10.20.30.1    Packets: Sent = 4, Received = 4, Lost = 0 (0% loss),
Approximate round trip times in milli-seconds:
    Minimum = 89ms, Maximum = 155ms, Average = 106ms
TCP Congestion Control
Review the background on TCP congestion control.
Initial Congestion Window Size
The initial congestion window size may be changed with (https://support.microsoft.com/kb/2472264):
> netsh interface tcp set supplemental template=custom icw=10netstat
Create a snapshot of socket information:
> netstat -a -b -n -o

Active Connections

  Proto  Local Address          Foreign Address        State           PID
  TCP    0.0.0.0:7278           0.0.0.0:0              LISTENING       2684
 [java.exe]
  TCP    0.0.0.0:8881           0.0.0.0:0              LISTENING       2684
 [java.exe]
  TCP    0.0.0.0:9045           0.0.0.0:0              LISTENING       2684
 [java.exe]...
Show adapter statistics:
C:\tprof\bin>netstat -s

IPv4 Statistics

  Received Header Errors             = 0
  Received Address Errors            = 0
  Unknown Protocols Received         = 0
  Received Packets Discarded         = 9
  Routing Discards                   = 0
  Discarded Output Packets           = 17
  Output Packet No Route             = 0
  Reassembly Required                = 0
  Reassembly Failures                = 0
  Datagrams Failing Fragmentation    = 0...

TCP Statistics for IPv4

  Failed Connection Attempts          = 445
  Reset Connections                   = 149
  Segments Retransmitted              = 921...
Show ethernet statistics:
> netstat -e
Interface Statistics

                           Received            Sent
Bytes                     275244337        12757159...
Discards                          0               0
Errors                            0               0
Unknown protocols                 0
Wireshark
Capture network packets using Wireshark (covered in the Major Tools chapter).
Start the capture:
- Install Wireshark: https://www.wireshark.org/#download
- Start Wireshark as Administrator
- Click "Capture" > "Options"
- Select the network interface in the "Input" box
- Click the "Output" tab and enter a "File" such as C:\wireshark.pcap
- Click the "Options" tab and uncheck "Update list of packets in realtime" and click "Start"
Stop the capture:
- Click "Capture" > "Stop"
netsh
netsh is a command line tool to help configure networking.
Disable IPv6 DHCP Auto-negotiation
netsh interface ipv6 set interface %INTERFACE% routerdiscovery=disabledMessage Analyzer
The official way to capture network packets on newer versions of Microsoft Windows is Microsoft Message Analyzer: http://www.microsoft.com/en-us/download/details.aspx?id=44226
Network Monitor
The official way to capture network packets on older versions of Microsoft Windows is Microsoft Network Monitor: https://support.microsoft.com/kb/148942
Process Monitor (ProcMon.exe)
Microsoft Process Monitor provides detailed information on file system activity, registry activity, network activity and process/thread activity: https://technet.microsoft.com/en-us/sysinternals/bb896645. ProcMon replaces previous tools such as FileMon.
- Delete any existing PML files from previous runs.
- Command Prompt> ProcMon.exe /NoConnect (the /NoConnect option avoids immediately starting collection so that you can configure whatever's needed)
- File > Backing Files > Select "Use file named" and enter a path such as C:\ProcMon.pml and click OK.
- Filter > Uncheck "Drop Filtered Events"
- Options > Configure Symbols... > Ensure DbgHelp.dll points to an existing path (install Debugging Tools if not), and set symbol paths to include a local symbol cache directory, such as srv*c:\symbols*http://msdl.microsoft.com/download/symbols
- Options > Profiling Events > Check "Generate thread profiling events" and select "Every 100 milliseconds"
- In the menu bar on the right, uncheck the 5 boxes named "Show Registry Activity, "Show File System Activity," etc. so that only the backing file is capturing the events and not the GUI as well.
- File > Click Capture Events.
- Reproduce problem
- File > Uncheck "Capture Events" (or run ProcMon.exe /terminate from another command prompt). This step is required; otherwise, you may receive the following error when trying to open the PML files: "The file %FILE% was not closed cleanly during capture and is corrupt."
- Load the PML File
Thread Profiling Analysis
Click Tools > Stack Summary..., sort by Time %, and expand the largest stack paths:

Large Pages
The -Xlp option requests the JVM to allocate the Java heap with large pages. This command is available only on Windows Server 2003, Windows Vista, Windows Server 2008, and above. To use large pages, the user that runs Java must have the authority to "lock pages in memory".
To enable this authority, as administrator go to Control Panel > Administrative Tools > Local Security Policy and then find Local Policies > User Rights Assignment > Lock pages in memory. Add the user who runs the Java process, and reboot your machine. For more information, see these websites:
- https://msdn.microsoft.com/en-us/library/aa366720(VS.85).aspx
- https://msdn.microsoft.com/en-us/library/aa366568(VS.85).aspx
Note: On Microsoft Windows Vista and Windows 2008, use of large pages is affected by the User Account Control (UAC) feature. When UAC is enabled, a regular user (a member of the Users group) can use the -Xlp option as normal. However, an administrative user (a member of the administrators group) must run the application as an administrator to gain the privileges required to lock pages in memory. To run as administrator, right-click the application and select Run as administrator. If the user does not have the necessary privileges, an error message is produced, advising that the System configuration does not support option '-Xlp'.